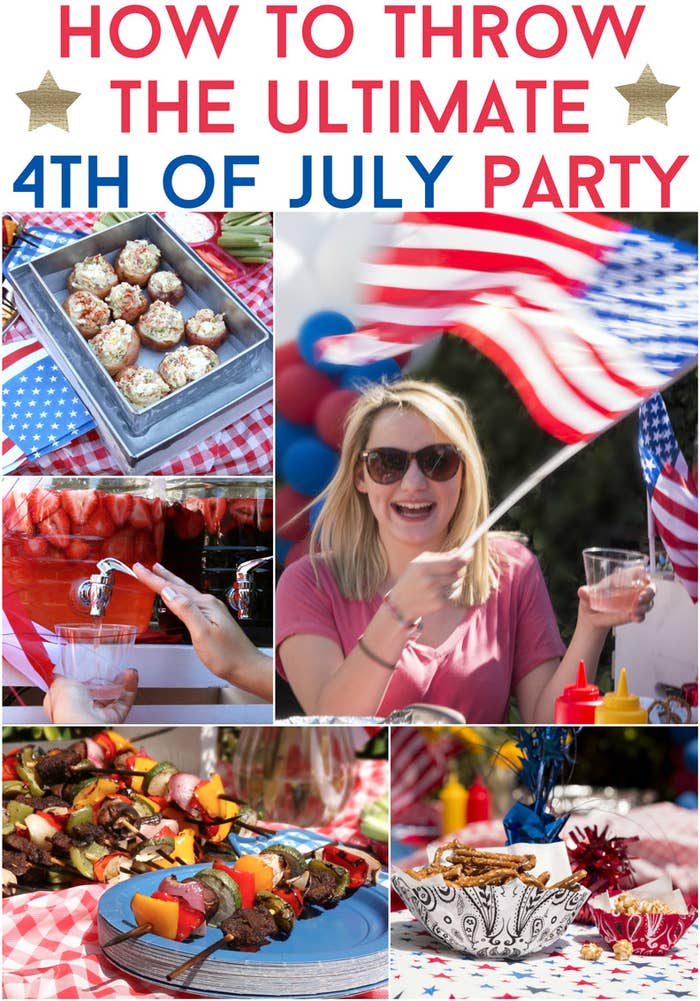

Loosen up the crowd with these four fruity and refreshing sangrias.


View this video on YouTube
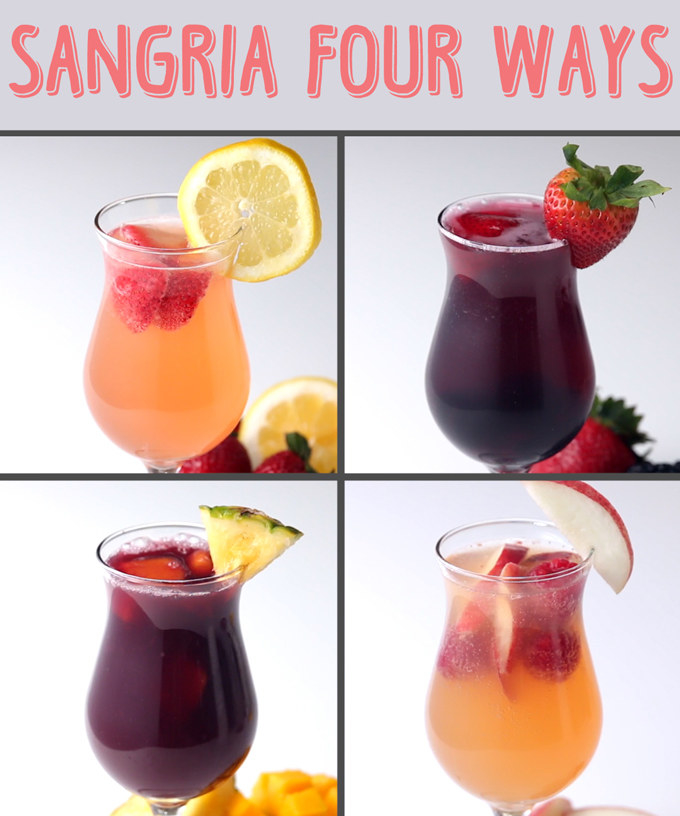
Strawberry Lemonade Sangria
Servings: 6-8
Ingredients
2 lbs strawberries, sliced
1 lemon, sliced
1 bottle white wine
1 cup white rum
4 cups lemonade
2 cups champagne
Lemon slices for garnish
Preparation:
In a large pitcher, combine the strawberries, lemon, wine, rum, and lemonade. Stir until mixed. Chill for at least 4 hours. Add the champagne, then serve with a lemon slice on each glass!
Mixed Berry Sangria
Servings: 6-8
Ingredients
1 cup blackberries
1 cup strawberries, sliced
1 cup blueberries
1 bottle red wine
1 cup brandy
3 cups apple juice
2 cups lemon-lime soda
Strawberries for garnish
Preparation:
In a large pitcher, combine the blackberries, strawberries, blueberries, red wine, brandy, and apple juice.
Stir until mixed.
Chill for at least 4 hours.
Add the lemon-lime soda, then serve with a strawberry on each glass!
Mango Pineapple Sangria
Servings: 6-8
Ingredients
2 cups pineapple, diced
3 mangos, diced
1 bottle red wine
1 cup brandy
3 cups pineapple juice
2 cups orange soda
Pineapple wedges for garnish
Preparation:
In a large pitcher, combine the pineapples, mangoes, wine, brandy, and pineapple juice. Stir until mixed. Chill for at least 4 hours. Add the soda, then serve with a pineapple wedge on each glass!
Raspberry Peach Sangria
Servings: 6-8
Ingredients:
3 white peaches, sliced
2 cups raspberries
1 bottle rosé
1 cup white rum
4 cups peach nectar
1 cup champagne
Peach slices for garnish
Preparation:
In a large pitcher, combine the peaches, raspberries, rosé, rum, and peach nectar. Stir until mixed. Chill for at least 4 hours. Add the champagne, then serve with a peach slice on each glass!
Have a variety of main course options with these skewers four ways.

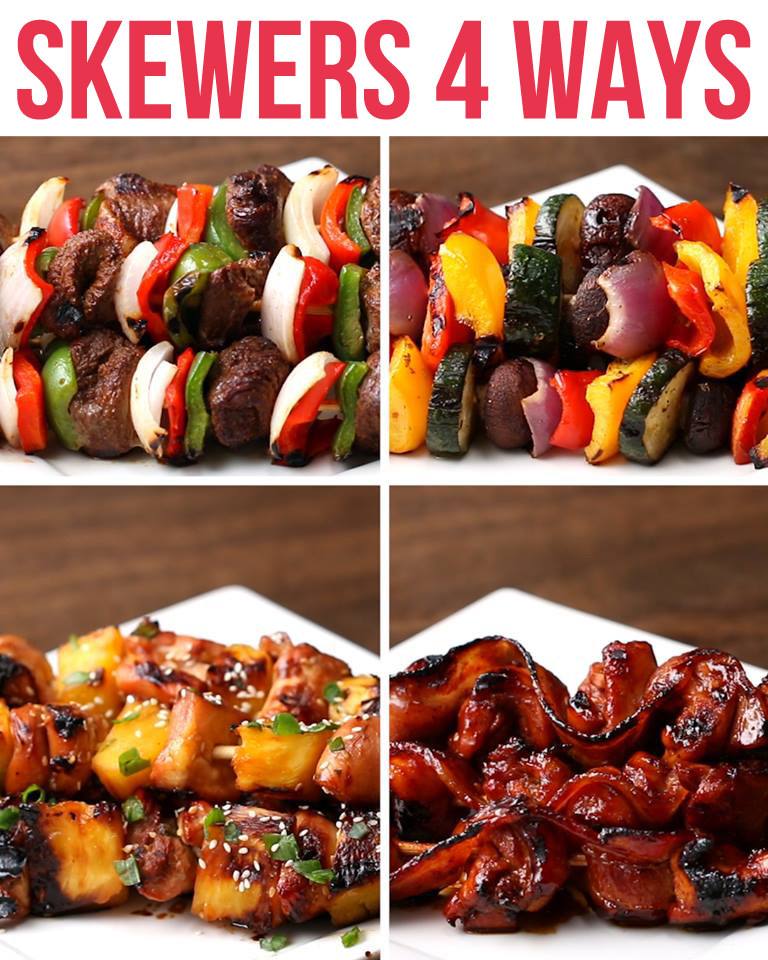
Steak Fajita Skewers
Servings: 8-10
Ingredients:
2 lbs sirloin steak, cut into 1-inch cubes
1 Tbsp. cumin
1 Tbsp. chili powder
1 Tbsp. garlic powder
1 tsp salt
1 tsp pepper
2 green bell peppers, cut into 1-inch pieces
2 red bell peppers, cut into 1-inch pieces
1 large white onion, cut into 1-inch pieces
8-10 bamboo skewers, soaked in water for 20 minutes
Instructions:
Preheat grill to medium-high heat. Combine the steak, cumin, chili powder, garlic powder, salt, and pepper in a bowl, mixing until the steak is evenly coated. Slide a piece of steak down the skewer, followed by pieces of green pepper, red pepper, and onion. Repeat until there is a 1-inch gap on the top of the skewer. Repeat with the remaining skewers.
Grease the surface of the grill by rubbing the grates with a tongs and an oiled paper towel. Grill the skewers for about 10-15 minutes with the lid closed, flipping them halfway. Serve!
Roasted Veggie Skewers
Servings: 8-10
Ingredients:
¼ cup olive oil
2 Tbsp. lemon juice
1 Tbsp. dried oregano
1 tsp salt
1 tsp pepper
2 zucchinis, sliced into rounds
3 cups cremini mushrooms
2 medium red onions, cut into 1-inch pieces
2 red bell peppers, cut into 1-inch pieces
2 yellow bell peppers, cut into 1-inch pieces
4-5 bamboo skewers, soaked in water for 20 minutes
Instructions:
Preheat grill to medium heat. Combine the oil, lemon juice, oregano, salt, and pepper, stirring until mixed. Slide a zucchini slice down the skewer, followed by pieces of mushroom, red onion, and peppers, repeating until there is a 1-inch gap at the top of the skewer. Repeat with the remaining skewers and vegetables. Brush each skewer liberally with the oil mixture. Grill the skewers for 12-18 minutes with the lid closed, flipping halfway. Serve!
Teriyaki Chicken Skewers
Servings: 4-5
Ingredients:
1 lb boneless, skinless chicken thighs, cut into 1-inch cubes
1 cup soy sauce
¾ cup brown sugar
1 Tbsp. sesame seeds
¼ cup green onions, chopped
1 pineapple, diced into 1-inch cubes
4-5 bamboo skewers, soaked in water for 20 minutes
Instructions:
Preheat grill to medium heat. Combine the chicken, soy sauce, brown sugar, sesame seeds, and green onions, stirring until evenly coated. Chill and marinate for at least 2 hours.
Slide a piece of chicken down the skewer, alternating between chicken and pineapple, until there is a 1-inch gap on the top of the skewer. Repeat with the remaining chicken, pineapple, and skewers.
Grease the surface of the grill by rubbing the grates with a tongs and an oiled paper towel. Grill the skewers for about 12-18 minutes with the lid closed, flipping them halfway. Brush the skewers with the leftover marinade during grilling, if desired. Serve!
BBQ Chicken Bacon Skewers
Servings: 4-5
Ingredients:
1 lb boneless, skinless, chicken thighs, cut into 1-inch cubes
1 cup BBQ sauce
1 tsp salt
1 tsp pepper
4-5 bacon strips
4-5 bamboo skewers, soaked in water for 20 minutes
Preparation:
Preheat grill to medium heat. Combine the chicken, BBQ sauce, salt, and pepper, stirring until evenly mixed. Thread one end of the bacon onto the end of a skewer. Add a piece of chicken, and weave the bacon around the chicken and back through the skewer, creating a wave pattern between the chicken. Move the bacon and the chicken down the skewer, repeating until the other edge of the bacon is threaded through. Repeat with the remaining chicken, bacon, and skewers.
Grease the surface of the grill by rubbing the grates with a tongs and an oiled paper towel. Grill the skewers for about 12-18 minutes with the lid closed, flipping them halfway. Serve!
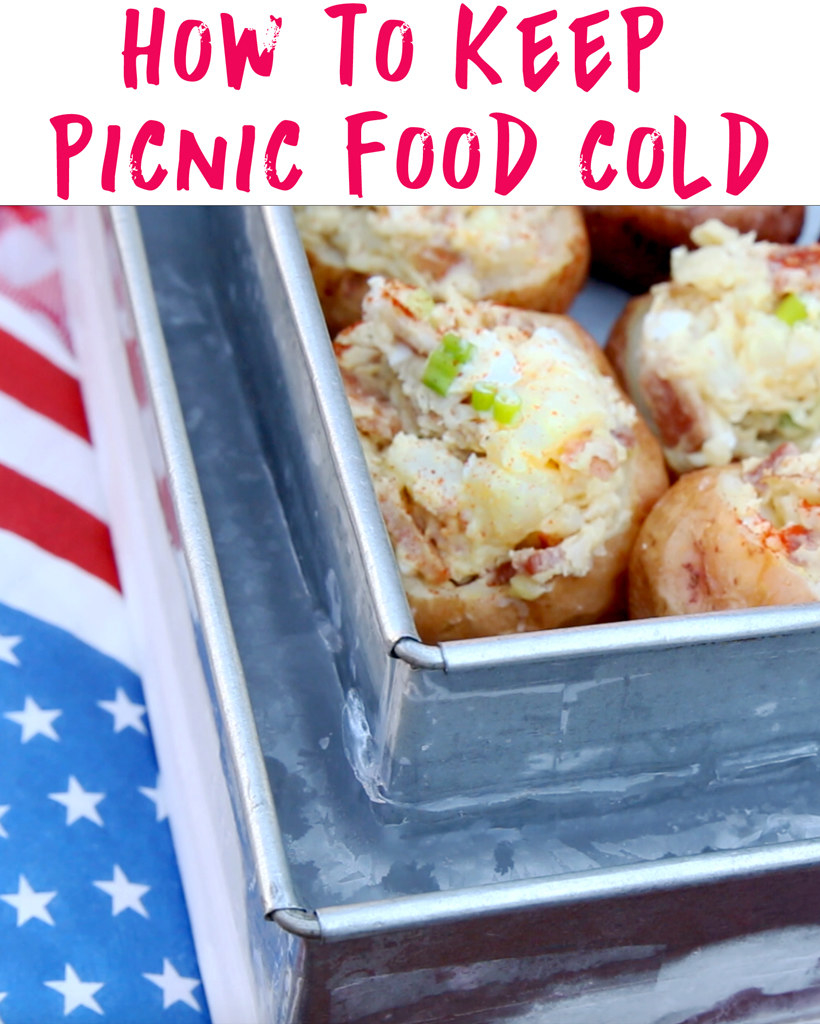
Jazz up your sides with some potato-ception and loaded baked potato salad bites.

Servings: 20-25 Potato Bites
Ingredients:
5 lbs small/medium red potatoes, washed and dried
1 Tbsp. salt
Olive oil
3 Tbsp. apple cider vinegar
1 tsp ground black pepper
½ cup mayonnaise
½ cup sour cream
3 hard-boiled eggs, chopped
½ cup cooked bacon, chopped
½ cup green onion, chopped
2 Tbsp. mustard
Paprika
Preparation:
Preheat oven to 375˚F/190˚C. Add the potatoes to a large bowl. Pierce each a few times with a fork. Drizzle with olive oil and salt. Rub to coat. Place the potatoes on a foil-lined baking sheet. Bake in preheated oven for 45-60 minutes, until fork tender. Remove the potatoes from the oven and allow to cool to the touch.
Cut the top third off of each potato and set aside. Using a melon baller or tablespoon, take a large rounded scoop out of the inside of the bottom ⅔ of the potato; set aside. Place the hollowed potato bottoms on a clean baking tray. Chop the scooped-out insides and the tops of the potatoes and place into a large mixing bowl. Pour over the apple cider vinegar and toss to coat. Add the black pepper, mayonnaise, sour cream, eggs, bacon, green onion, and mustard. Stir to coat.
Scoop the potato salad into the hollowed-out potatoes. Refrigerate about 1 hour.
Just before serving, sprinkle with paprika. Enjoy!
Also, here’s an easy way to keep your cold food chilled when it’s sitting outside in the heat.
What you need:
*Two nesting containers (any shape works!)
*Mounting putty or clay
*Water
*Your favorite cold picnic dish
Instructions:
1. Take your smaller nesting container and press four ½-inch balls of putty to each corner of the outside.
2. Carefully place the smaller container into the center of the larger container. Press into place.
3. This allows water to freeze underneath. Fill the bottom with water until it just reaches the bottom of the smaller container. Freeze this first layer of water so it holds the smaller container in place.
4. Once frozen, add about an inch of water (2.5 cm) until it reaches the rim of the outer container.
5. Once frozen, add your favorite picnic dish to the inside container, and enjoy it cold for up to 5 hours!

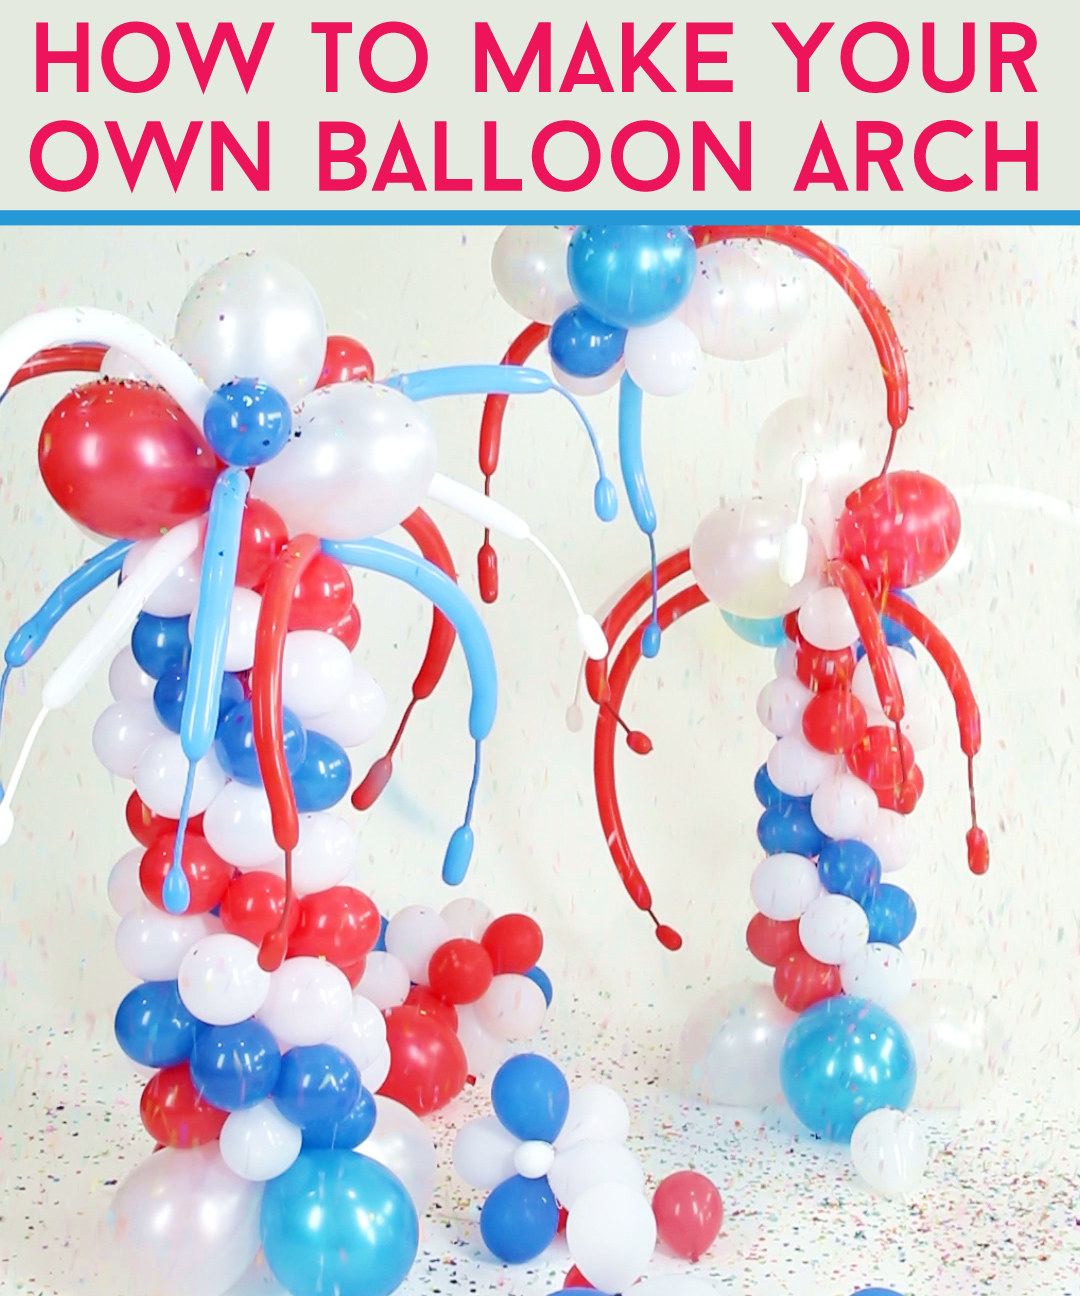
Brighten up your space with some red, white, and blue balloon towers.
What you need:
*String
*Scissors
Instructions:
1. Blow up four 12” balloons. Tie two together, then tie another pair onto the first pair. Create another quad using the 5” balloons. Weave string in a figure eight around the two sets of balloons. Using the remaining length of string on the bottom, tie the balloon weight on.
2. Keep adding more rows of balloons until desired height. Tie a set of 12” balloons on top, then tie one more 12” balloon at the very top.
3. Tie together four 5” balloons in a row on a piece of string, 5 inches apart. Tie around the very top balloon.
4. Blow up some twist balloons, leaving a little bit of space at the end. Twist and push a bubble of air at the end of the balloon to the very end to create a "bauble."
5. Tie two of these together, then slip between the 12” balloons at the top.
COMPLETE!
Put your food out in easy DIY bandana bowls.

You will need:
*Marker
*Bowls or planters
*Red, white, and blue bandanas
*Scissors
*All-purpose glue
*Water
*Plastic wrap
*Waxed paper
*Snacks
Instructions:
1. Use a marker to trace the rim of the bowl onto the banana. You can make the circle larger for a deeper bowl. Cut out the circle using scissors. Cut scraps into smaller circles to make more bowls if you’d like.
2. In a bowl, mix equal parts all-purpose glue and water until combined. Soak the bandana circle in the glue; squeeze out excess. If using a glass, plastic, or metal bowl or other solid container, cover with plastic wrap (you do not need to cover disposable bowls with plastic wrap) and place on a plate surface, open-side down. Drape the bandana over the bowl, smoothing and folding as needed. Let dry overnight.
3. Gently peel the bandana off of the bowl. Trim off any excess glue. Line with waxed paper and fill with snacks.
TIP: To make bowls even harder, use a paintbrush to add a second layer of glue as the bandanas dry.
Keep your kids (and adults) occupied with this colorful powder popping balloon game.

What you need:
*Two cups of cornstarch
*Water
*Food coloring
*Two bowls
*A blender
*Balloons
*Hairbands or rubber bands
*A big outdoor space
*A group of friends for two teams!
Instructions:
To make the colorful powder, combine 1 cup of cornstarch with 3/4 cup of water. Add food coloring and mix well. Create two colors (one for each team). Let the mixture sit in the sun until thoroughly dry and cracking. Place in a blender and blend on high for a few minutes to break up the mixture into a fine powder. Add the colored powder to the balloons with a funnel. Create an even number of both colors. Tie the balloons with a hairband or rubber band attached.
To play, separate into two teams (red and blue). Attach a balloon to everyone’s ankle filled with the powder of the opposite team color. (Red team wears blue-filled balloons, and blue team wears red-filled.) The object of the game is to have your team pop all the balloons of the other team first. When they pop, the powder creates a colorful cloud to signify which team scored! This game can be played by any even amount of people, and it's great for outdoor parties, youth camps, or 4th of July fun!
Enjoy this loud, colorful game!

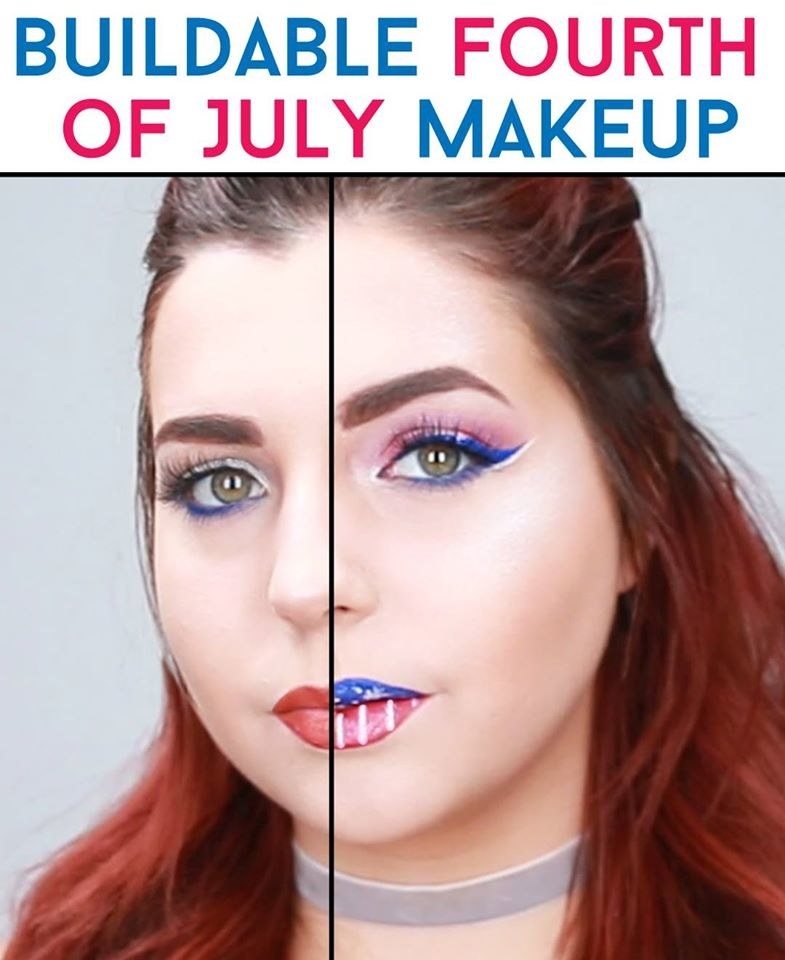
Go hardcore America (or just a little patriotic) with a buildable 4th of July makeup look.
And, finally, outshine everyone at the party with these fun 4th of July body stencils.

Instructions:
1. Choose a spot on yourself that you would like to decorate (keep rubbing/smudging in mind).
2. Pick a stencil. You can design/create your own stencils using paper and an X-Acto knife, or you can purchase them at your local craft store. (In my case, for our model, I hand-made stencils that were inspired by fireworks that I googled. I also drew many stars and cut them out.)
3. Choose a color scheme. You can combine and overlap all you want, if you want. (In our case, I wanted to focus on red, white/silver, and blue and also had pops of color to make it fun and contemporary).
4. Map out a composition. The body part you choose is important to the overall design. If you are stenciling down an arm, for example, you may want to choose something that has a long/linear composition. If it is in a small concentrated area, you can use a simple, compact design — wherever you want to lead the eye. (In our case, as I explained, I wanted to also send a message, which was stemming from her heart, across her collarbone, and down her arm, so to lead the eye, I created a long, winding design.)
5. Spray! Spray! Spray! Focus on completing one stencil at a time before moving on. Shake the can well and make sure you are in a well-ventilated room. (If we are thinking liability issues, you can do a small patch test 24 hours prior.) Hold the can far enough away from the stencil to create broad, even coverage. In our case, 1) I started off with the firework streams coming from the direction of the heart, and overlapped a couple of colors for depth. 2) I then chose my spots for the actual bursts and overlapped several different colors on top of each other and used dark, light, and florescent colors to add a pop. I placed a star in the middle of each firework. 3) I began to move across the collarbone with various large stars, separately colored red, white/silver, and blue. 4) At the shoulder joint, I started to overlap the red, white/silver, and blue colors to the elbow. 5) At the elbow joint, I used one long stencil that had smaller stars that tapered off and followed the color wheel scheme: red, orange, yellow, green, blue, and purple last.
6. Fix and adjust any touchups as needed.