We hope you love our recommendations! Some may have been sent as samples, but all were independently selected by our editors. Just FYI, BuzzFeed and its publishing partners may collect a share of sales and/or other compensation from the links on this page.

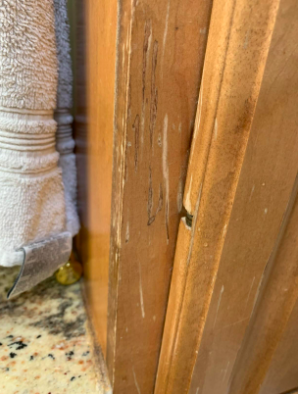
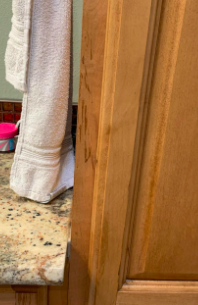
1. Before you break out the paint brushes, undo the wrongs of the past thanks to a wonderful lil' watermark-removing cloth reviewers say has erased dribbles of nail polish remover, hair dye, and, well, just plain old water stains. Never hurts to try something before going into a full-on project.
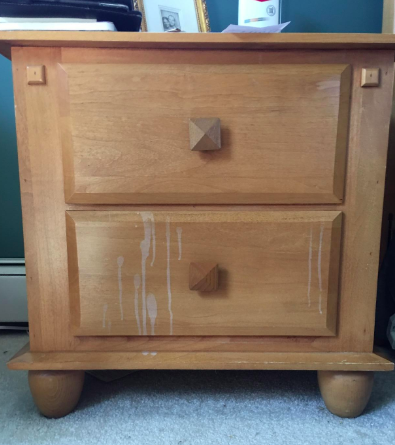
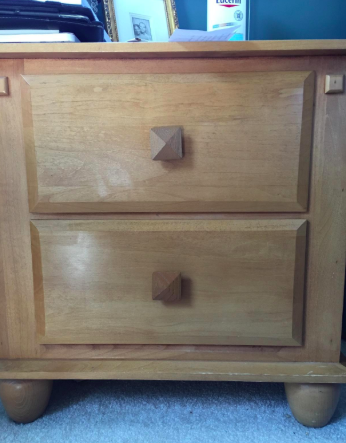
2. Zhuzh up tired cabinets that are looking dull from wear and tear with some wood polish and conditioner. It'll be worth a try before you decide to go whole hog and paint cabinets. (Painting cabinets is NOT the easiest.)
Promising review: "My bathroom cabinets had a lot of wear from the steam from showers and baths. I want to replace them but decided I would try this first. It’s very easy to apply, wait 20 minutes, then wipe off the excess. Filled in the places where the varnish was gone and showing raw wood and brightened up the finish. Looks much, much better for an easy and cheap fix. Very pleased with this product." —Dog Lovers
Get it from Amazon for $8.98.
Note that if you do use this polish and then decide to paint your cabinets after all, make sure to diligently follow the instructions for prepping the cabinets for paint.
3. And if you want a total kitchen transformation, a kitchen cabinet painting kit that requires ZERO stripping or priming *might* make you wonder if you're in someone else's house before you've had your coffee.
4. Before you go and buy out all the paint tools you might possibly need, ask your neighbors and pals if they have any supplies you can borrow.
You could go out and buy your own roller extension pole, but when is the next time you'll use it? Going the extra mile to ask will also lighten the financial load. I've borrowed a ladder, rollers, roller extension pole, roller tray, paintbrushes, and even drop cloths from pals instead of buying. Also, you could return them with a bottle of wine as an extra thank you. (Bottle of wine = still cheaper than buying all those supplies.)
HOWEVER, one thing that is worth buying to keep on your own is a 5-in-1 paint tool. You can use it to pop open paint cans, clean paint rollers, as a putty knife, a scraper, and a gouger. Don't believe me? I interviewed Fixer Upper (and Magnolia empire's) Chip Gains a few years back and it was the first thing he listed as an essential for DIY projects. He also uses it for scraping off paint, scraping out grout or thin set, opening a box, cutting carpet, and more. Any tool bag needs this!
5. But if you *are* buying some paint tools, go to the dollar store for some paint trays you'll feel OK about throwing away later. (Paint trays can be really hard to clean.)
I don't rec getting all your painting supplies there. It's worth going to a home center (or buying online) for paintbrushes. Psst, the kind of paintbrushes you use matters a LOT. Check out Family Handyman's guide on choosing paintbrushes for deets on bristle types and brush sizes. And! Hold onto your packaging for your brush to store your paintbrush in later. It'll help keep the integrity of your bristles.
6. And figure out how many cans of paint you need for your project from the jump to avoid mid-project trips to the store.
Check out how much paint you need from my old employer, This Old House.
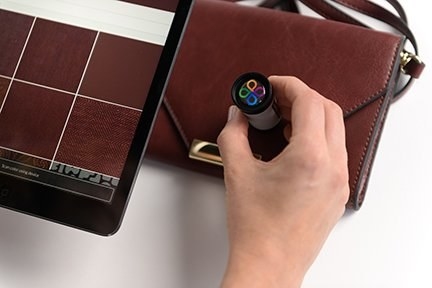
7. Find the right paint paint shade for your project with this tiny color-matching tool.
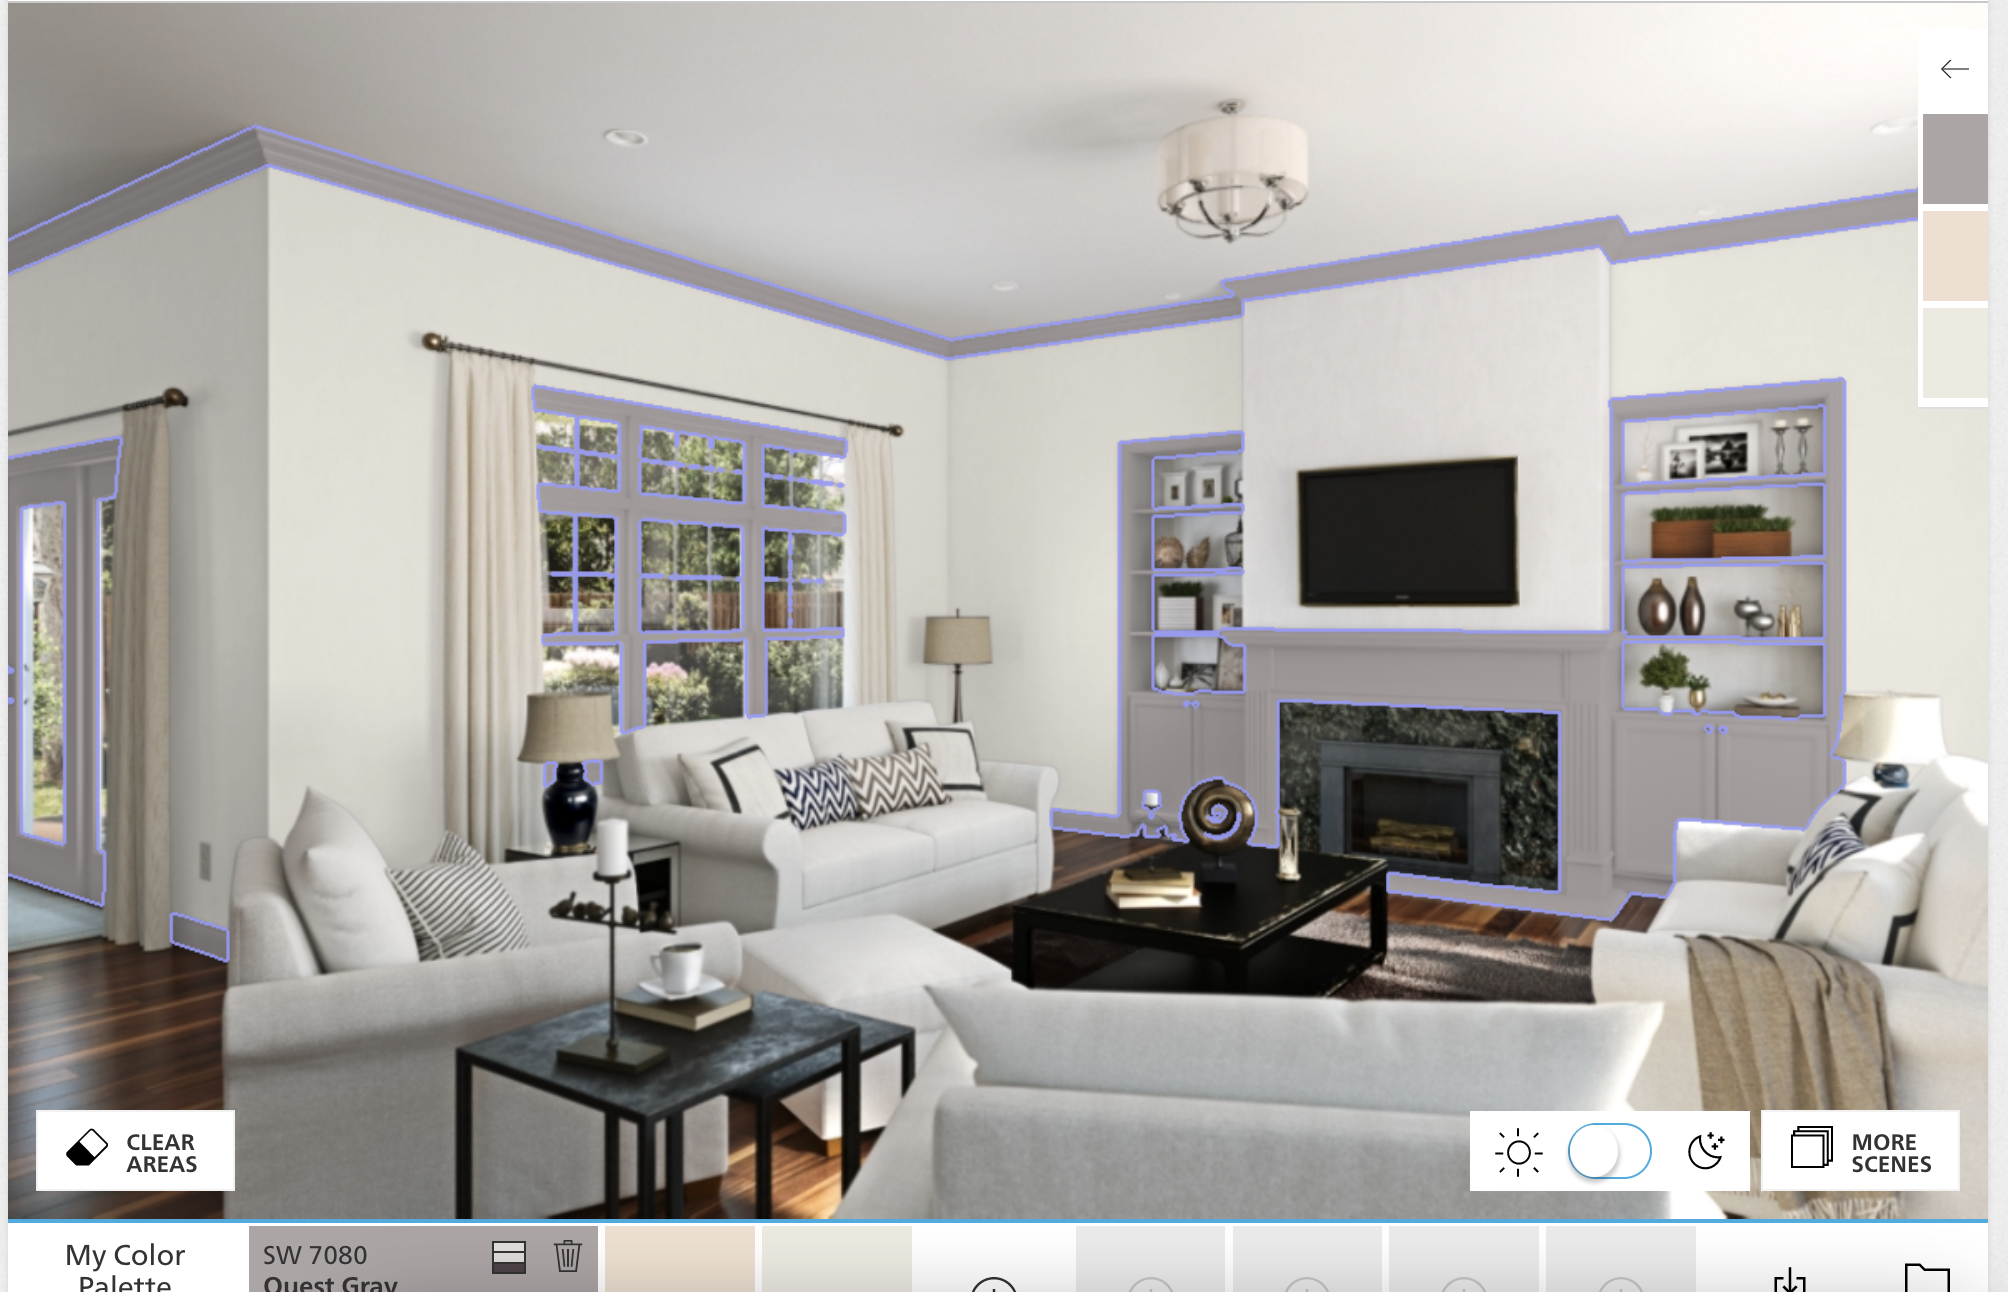
8. Use a paint website to upload a pic of your room to "try" out a new paint color to help cut down on some time looking at every single swatch in the paint aisle.
9. Remember that the color on your paint swatch you get from the paint center will look brighter in bigger quantities on your wall.
THAT is how I ended up with a lime green living room because I wanted a light green but didn't want to "go too subtle."
10. When testing out paint samples, move them around the room and observe at different times of the day when the light hits differently.
11. Cut down on one step with a a primer + paint 2-in-1 like Benjamin Moore Regal Select. It'll actually cover whatever color lies beneath...like a colorful mistake.
12. Remove *and label* all the hardware from the room, window, or piece of furniture you plan on painting. Don't try to paint around. (It's harder than you think.)
Goo Gone spray, The Pink Stuff, Bar Keepers Friend.
13. Don't forget to CLEAN before painting.
What you use and how you clean it will depend on what kind of paint you're using and what you're painting. But when it comes to tough messes, we love Scrub Daddy Erasers, The Pink Stuff, Bar Keepers Friend, and Goo Gone spray.
14. Fill and cover up unsightly holes with a drywall repair putty you can apply in a small circular motion before painting over it for a smooth surface. You CAN get away with some white toothpaste to fill holes but it won't hold up as well.
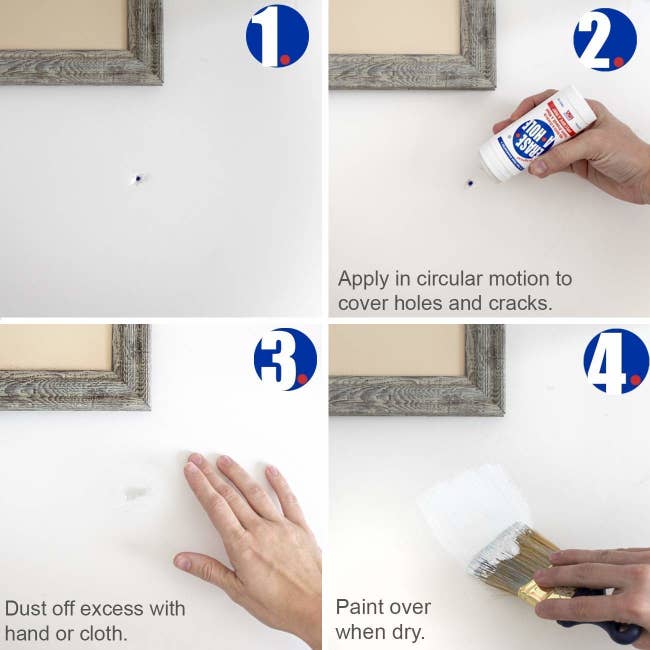
Promising review: "Does exactly what it says. Rather than getting spackle, waiting for it to dry, sanding it down, and tweaking as needed — this cuts the time/effort down! Just rub over the place in need of patching and wipe off the excess. The hardest part is not accidentally getting the product on parts of the wall that don’t need it, but that’s easy to clean up, so it’s not a problem. I used this to patch holes in the wall from a former Wi-Fi router and modem, other than the color difference from the patch to the paint, you’d never know it was patched. Great price, easy to use." —Amanda
Get it from Amazon for $10.95.
15. If you're painting windows and trim, prep by lightly scuffing them up with some 220-grit sand paper so the paint better adheres.
16. When painting trim or other tight spots, decant paint into an old stadium cup (or cup you're fine never drinking out of again) so you don't have to climb up and down a ladder or move to reload your brush from the paint can.
17. Invest in some fillable touch-up paint pens so you can make hold onto that new wall color for the living room and easily address touch ups later without having to run to the store for a paint match.

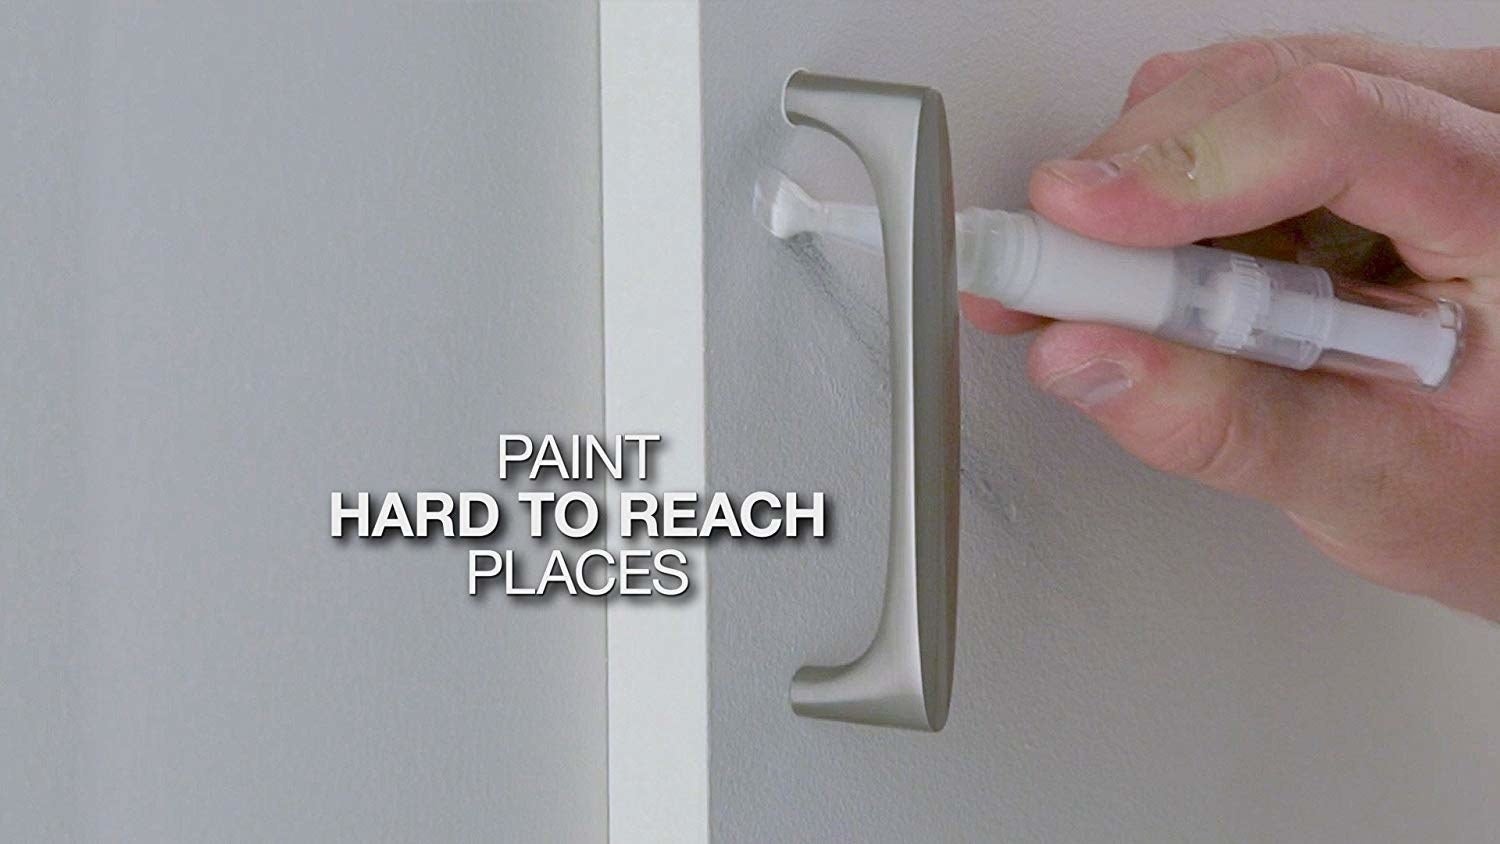
Promising review: "Love this — absolutely perfect for touchin' up little spots that need touchin' up. I have several sets filled with different paints and so far they've stayed usable, without the paint drying out. I rinse the brush really well after each use (latex paints) and recap it. It would be nice if the manufacturer put an area on the pen where you could easily label the paint info, but I use a permanent marker, and it works okay." —Hooked on Amazon!
Get a pack of two from Amazon for $19.99.
18. And tackle chips and marks with a container of touch-up paint available in a range of colors likely to match with colors seen throughout your home.

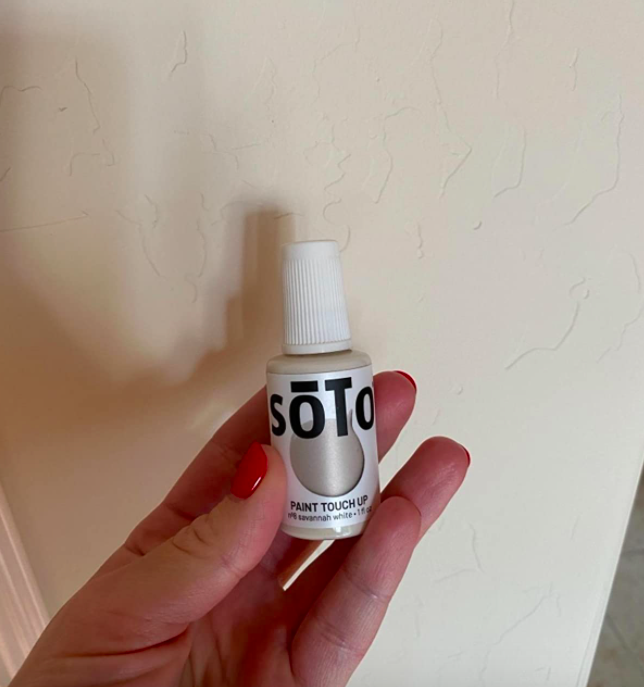
Promising review: "Rather than ditching furniture into a landfill, which is bad for the environment and one's pocketbook, this product allows you to give new life to existing furniture. Between the Soto touchup and new handles, my entertainment center looks like new....for less than $35. If you can use liquid paper, you can use this. I just ordered another bottle for porcelain. This is a fantastic product. You will love it!" —LexiNYC
Get it from Amazon for $14.95 (available in eight colors).
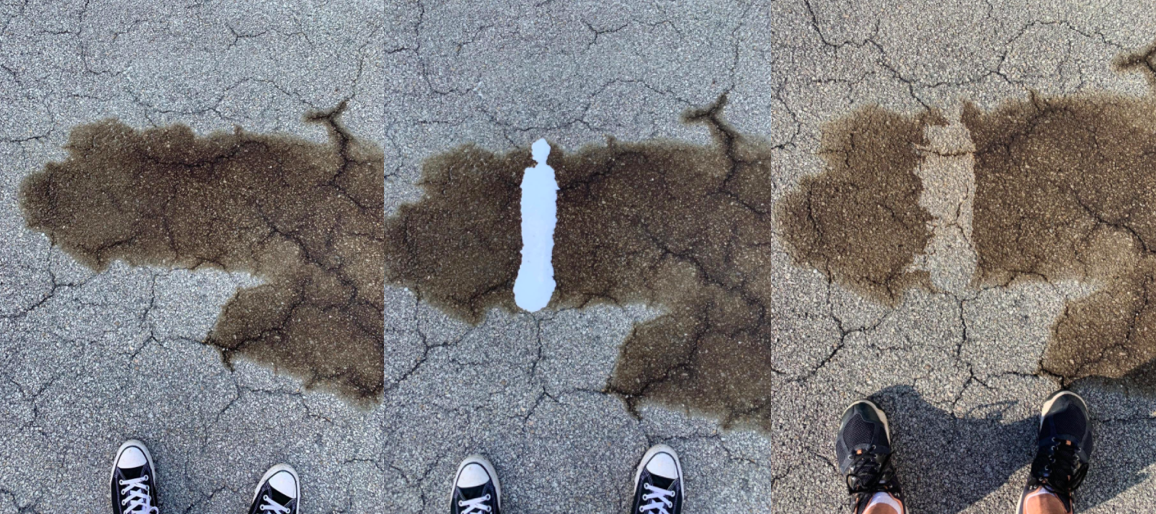
19. Before you go painting an unsightly outdoor hard surface, try a oil stain remover capable of annihilating that grease stain that you thought made your garage or driveway a goner.
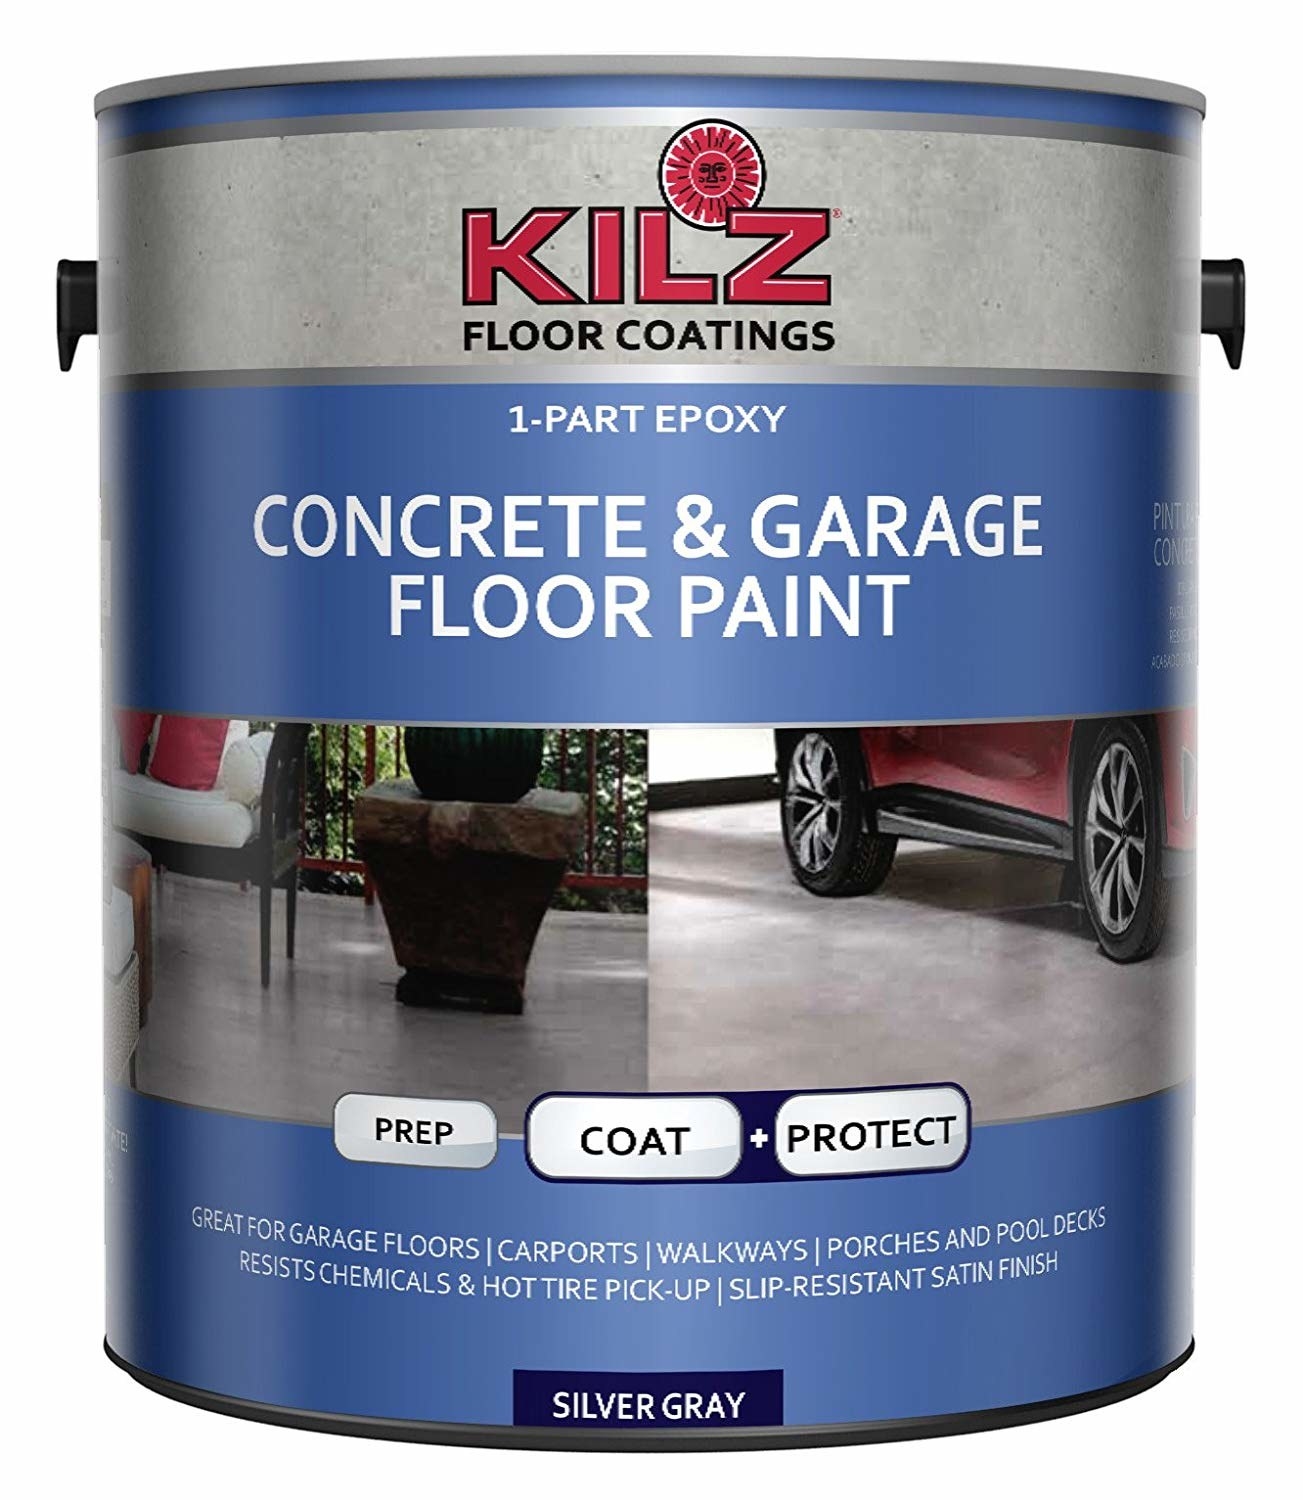
20. And if that won't cut it, try out some concrete paint – it will take a bit of elbow grease to spruce up stained concrete patios or walkways but it'll make a HUGE difference without tearing up any hard surfaces.
21. If you're painting a wall, trying the "cutting in" technique. Watch this video to learn about it from a pro.
I've had success using this technique on painted-who-knows-how-many-times NYC apartment walls around trim where people obviously haven't taken as much care to do a neat job.
22. And after you've cut in your corners, you can work with a roller to meet the WET paint edges you've already painted. *I* think it's easiest to offload your paint on a roller straight from the paint tray to the wall in a "W" shape and then spreading it from there, but there are lots of variations on this technique that also work well.
Offloading in a shape (whether you're of the opinion it should be a W, Z, or a general squiggle), will help you put paint on the wall that you can then more easily evenly distribute.
23. When using painter's tape, paint up TO the edge of it but not over it. When you paint on the tape, paint can sometimes creep up under the tape.
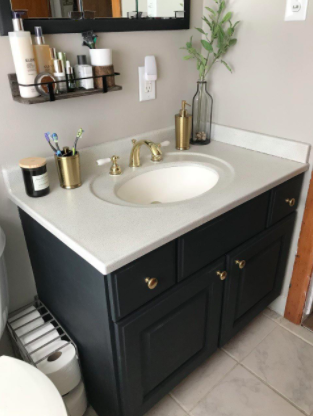
24. If you want to tackle a bathroom vanity, try a stone-effect spray paint that'll help transform an extremely '80s bathroom vanity. It won't be a 30-minute project, but the price point sure will beat replacing it with a new top.

Promising review: "May 2020 Update — The countertop is just now starting to need (slight) touch ups around the sink itself. We had to postpone the remodel until this summer, and this counter has held up like a champ. I couldn't be happier with this product!
This paint can be a little tricky to work with until you get the hang of how it applies, my suggestion would be to test it out on a scrap or something prior to applying. Once I had it, this product was a breeze to work with.
We recently purchased a new home, and we're not gutting our main bathroom until next summer, and I just couldn't live with that 1980's green another day. So, after reading a lot of tutorials, I decided to go for it and paint the counter. I LOVE how it came out! Once it was dry for 24 hours, I applied several coats of poly and let it sit for 72 hours before I let the counter go back into normal use. It's held up like a dream. I wouldn't use any heavy chemicals on it (but I wouldn't advise those period), but otherwise zero issues with it.
(I had done this previously with a different color by a different brand and the outcome was similar, it held up like brand-new for several months of daily abuse before I decided to repaint because I didn't really like the color).
I think this will easily hold up until we remodel, and it looks great too. DEFINITELY better than that '80s green!
Side Note: I see a lot of negative reviews on this product because it doesn't hold up for people outdoors. USE A SEALANT. Don't blame a product if you don't use it correctly. It's not rocket science folks." —Mistella
Get it from Amazon for $12.44+ (available in eight colors).
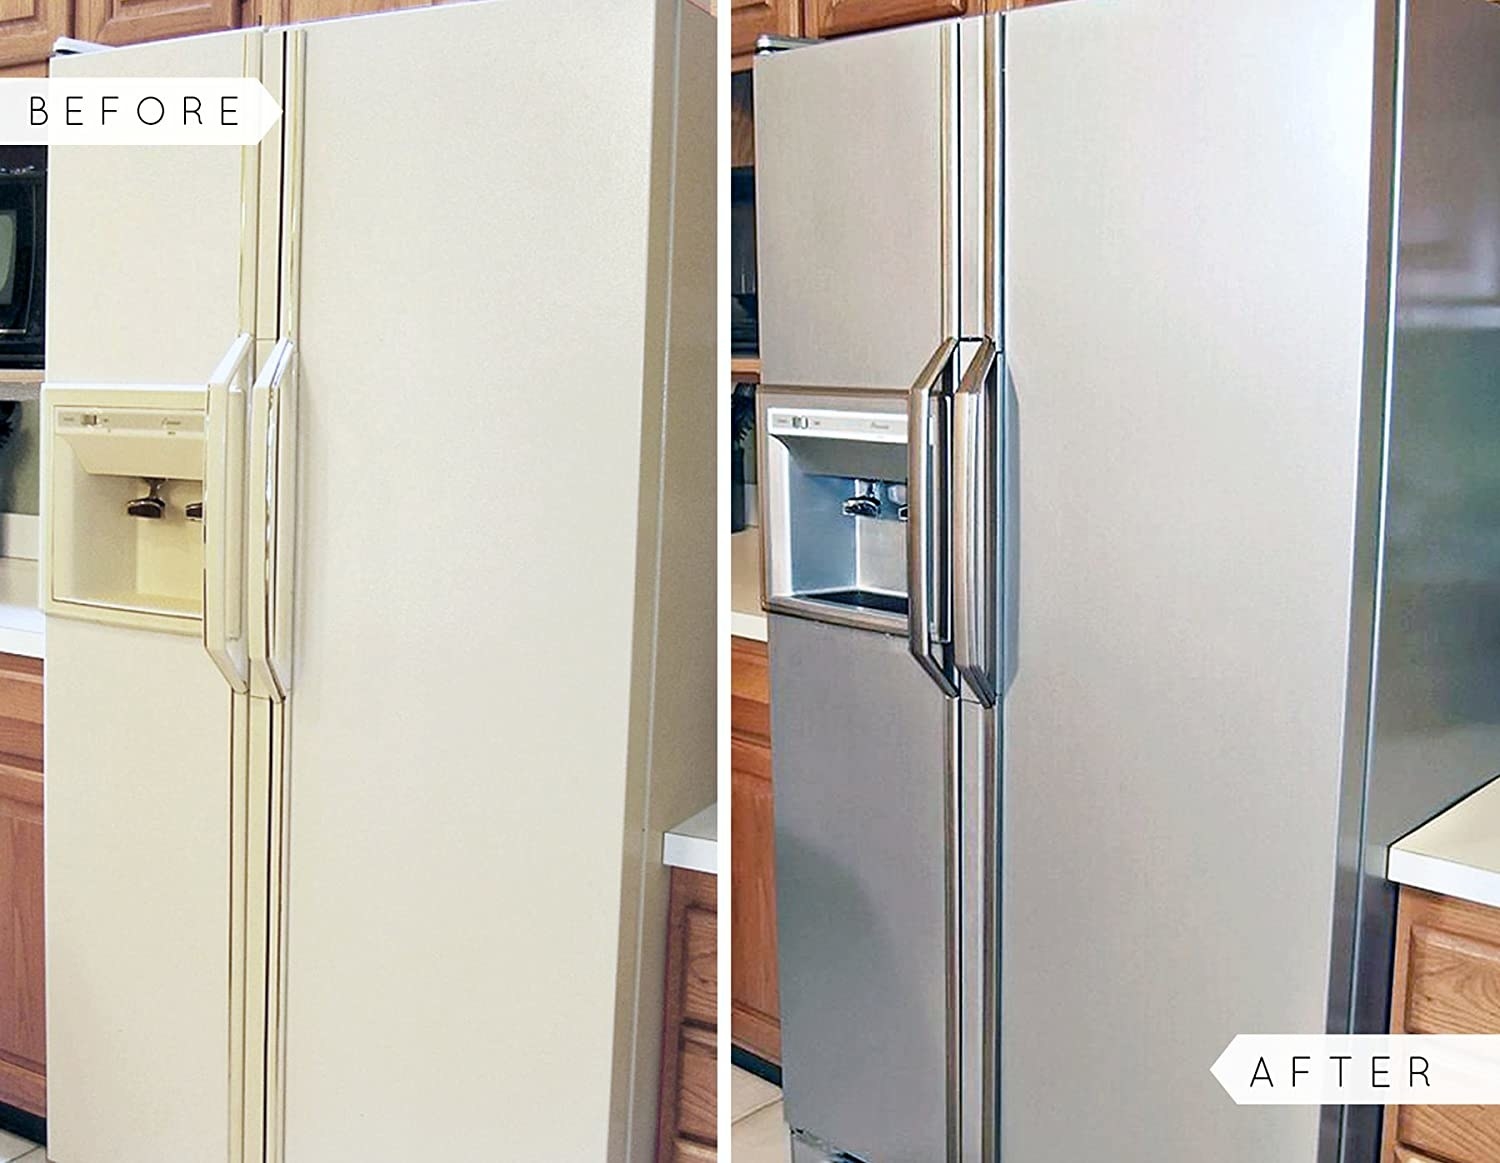
25. Consider an out-of-the-ordinary painting kit, like this "stainless-steel" look fridge kit to transform your white fridge. It'll for sure be a project. But have you priced out fridges lately?
26. Mask an eyesore tile shower surround with a specially formulated tile paint kit.
27. Or a fireplace whitewashing kit for a transformation on the cheap. Don't even LOOK up how much it'll cost you for a new fireplace surround. Trust me.
28. Don't let a paintbrush or roller go dry while painting. Keeping it wet will ensure a more even application.
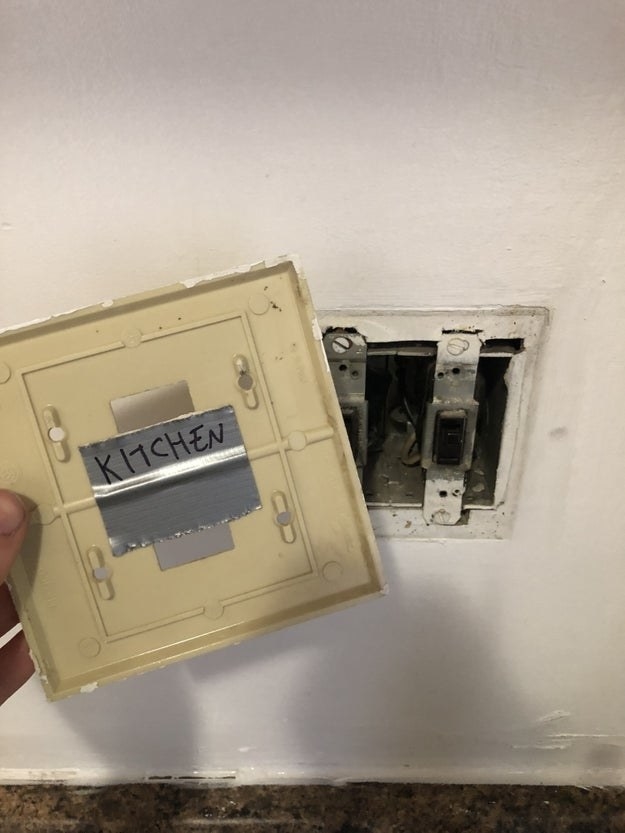
29. When you paint a room you'll REALLY make an even bigger impact by swapping in some fresh switch plates. Get even *more* productive by painting (and labeling) the old switch plates by room so you if you get a paint match at the paint center, you can simply take the switch plate.
30. If you're continuing a project with the same paint color the next day, wrap your wet paint roller or brush in plastic wrap and then place it in the fridge. Your paint will stay wet and be ready to use the next day...saving you some major cleanup on the first night of your painting project.
31. And when it's time to clean up, wash your paint brushes and roller ASAP.
Ask This Old House painter Mauro Henrique gives some easy tips for cleaning paintbrushes. (If you look on YouTube, some folks recommend using a wire brush like you'd use to clean a grill but you don't really need that. And that's just something else to buy. Plus, it can damage the brush bristles.)
As for paint rollers, follow this video that shows how you can use a putty scraper (or that 5-in-1 tool that I called out earlier!) to scrape off extra paint so you'll spend a significantly shorter amount of the time washing it out at your sink. If you're able to, also store a paint roller standing up so you don't get any flat edges.
But before you wash out your paint tools, make sure to empty any extra paint back into your paint can before it dries. You'll have more to work with on your next project and make for a much easier cleanup.
Happy painting!