
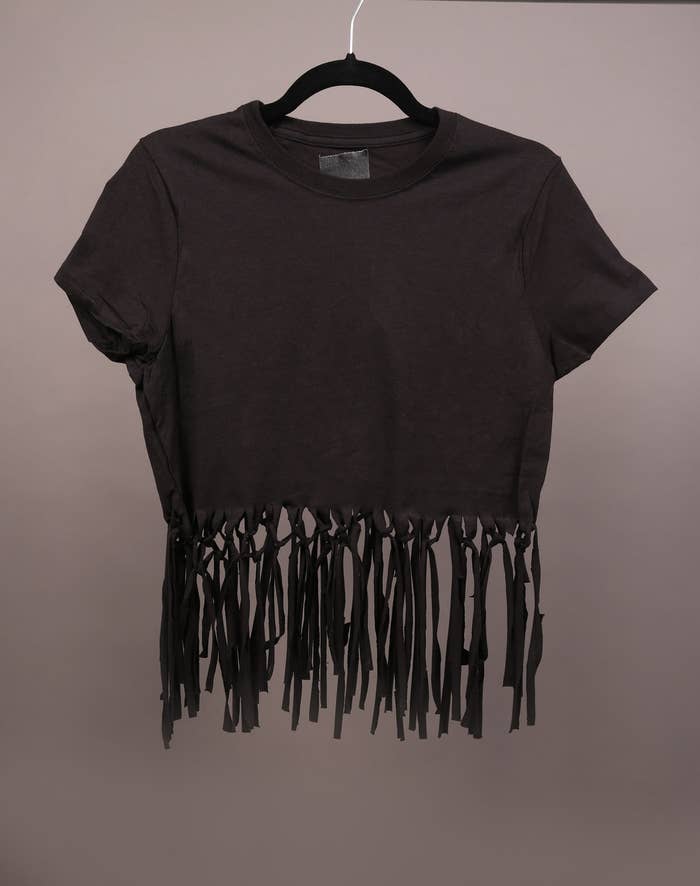
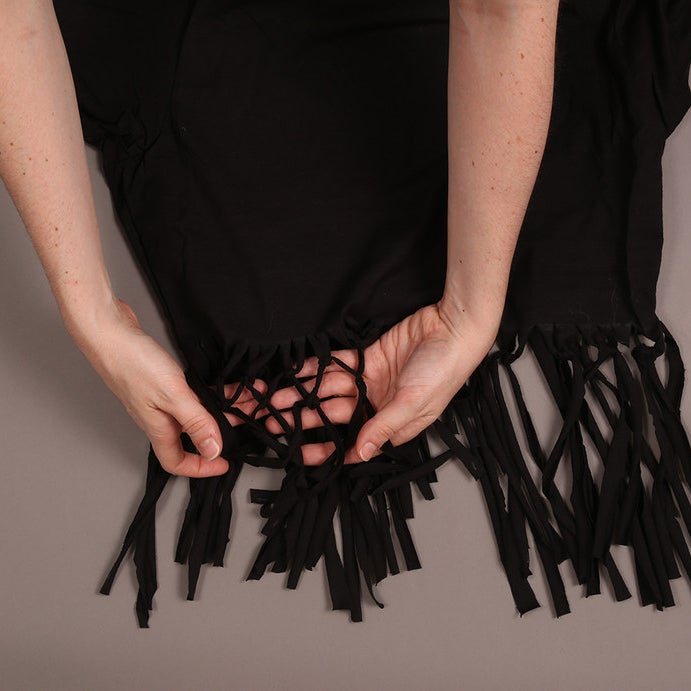
1. Macramé Tee


You'll need:
A T-shirt
Fabric scissors or a rotary cutter and board
Ruler
Washable marker
Instructions:
1. Cut the hem off the bottom of your tee so you're left with a raw edge.
2. Work out what height you want the fringing to start (we recommend a couple of inches under the bust line) and mark this line on the front and back of your tee.
3. Measure and mark ¼-inch strands across the width of the tee and up to the height of the line you just drew. IMPORTANT: Make sure you have an even number of strands.
4. Using scissors (or a rotary cutter if you fancy), carefully cut the the strands, stopping when you reach the line.
5. Knot each strand with the strand next to it.
6. Crisscross the strands and repeat.
7. Once you're finished knotting, trim all the strands so they're the same length.
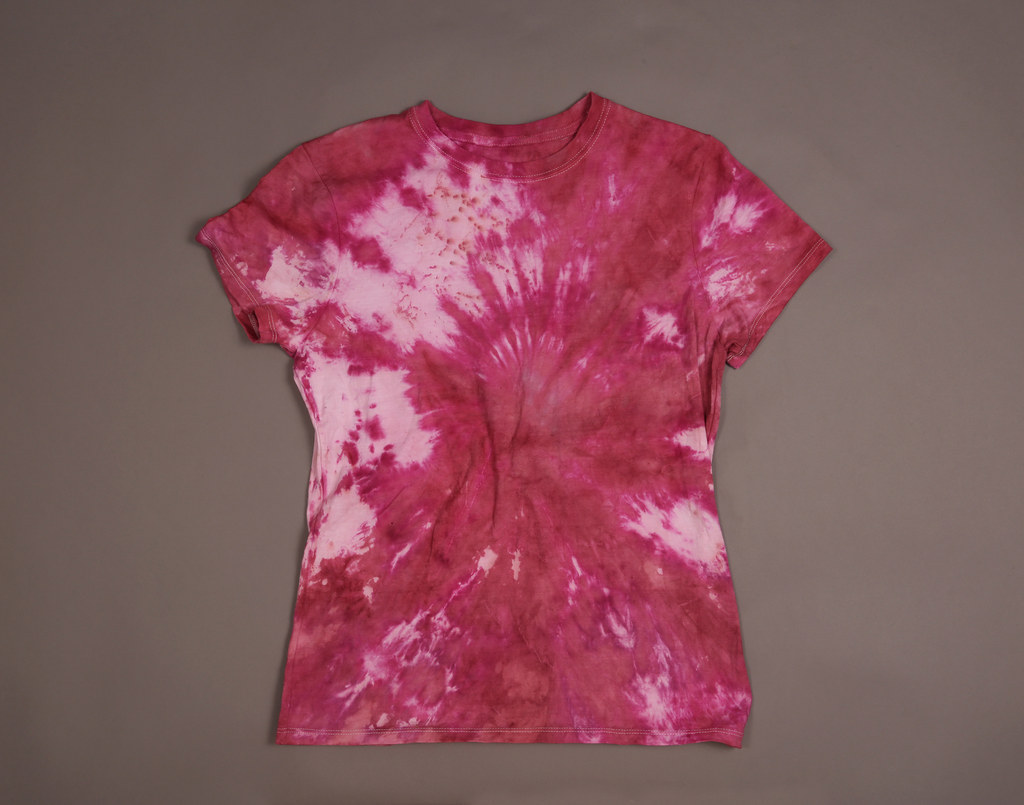
2. Tie-Dye Tee


You'll need:
A light-coloured T-shirt
Fabric dye
Plastic squeezy bottle (like a sauce bottle)
Rubber bands
Plastic bag
Instructions:
1. Dampen your T-shirt.
2. Lay your T-shirt out flat with the front facing up. Pinch the middle of your tee, lift up both layers, and fasten a rubber band an inch or so down. Make sure it's on tight!
3. Continue adding two more rubber bands until you've divided your tee into four sections.
4. Mix up the dye in the squeezy bottle, according to the instructions on the label.
5. Now for the fun part: Squeeze the dye over your tee! If you miss a few spots, that's OK – it'll add to ~the look~.
6. Place it in a the plastic bag for about eight hours.
7. Rinse under warm water until the water runs clear and all excess dye is removed. Take off the rubber bands and don your new hippie attire!
NOTE: For more defined "rings", use thick rubber bands.
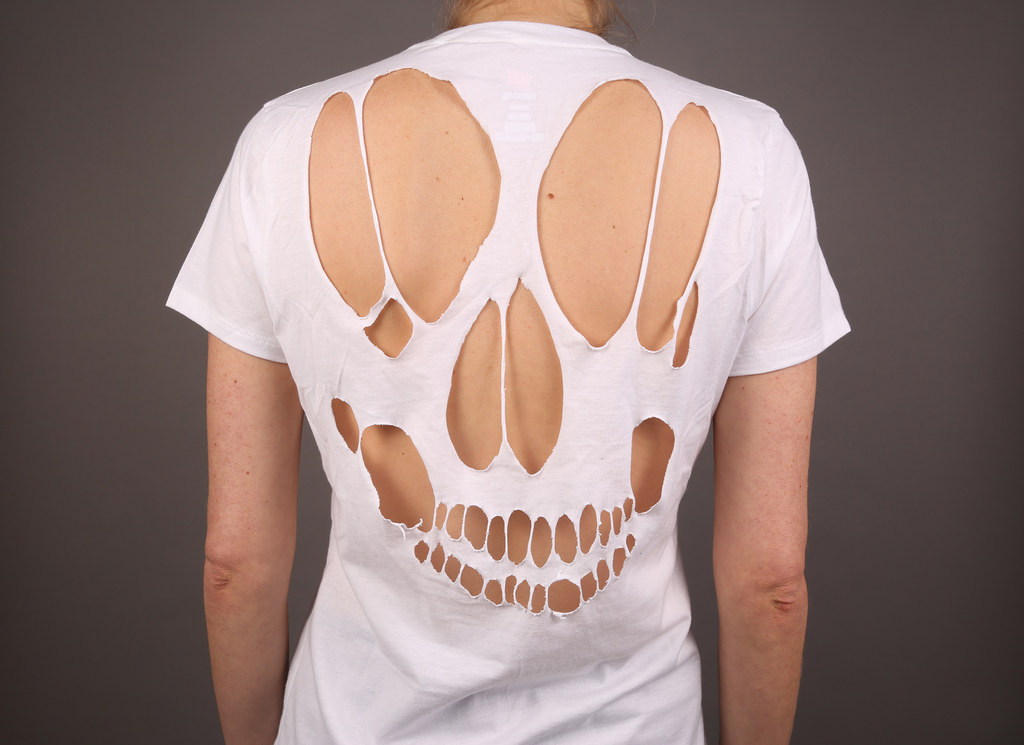
3. Skull Cutout Tee


You'll need:
A light-coloured T-shirt
Scissors
Fabric marker
A picture of a skull
Instructions:
1. Trace (or freehand draw if you prefer) the outline of the skull on the back of your T-shirt, making sure to leave enough fabric between the teeth. Don't worry, it doesn't have to be perfect.
2. Add fabric "strings" to bigger areas like the eyes and nose so you're not left with big gaping holes.
3. Carefully cut out the holes.
4. Gently pull at the fabric "strings" – those ones between the teeth and through the eyes and nose – until the fabric stretches slightly.
4. Distressed Tee


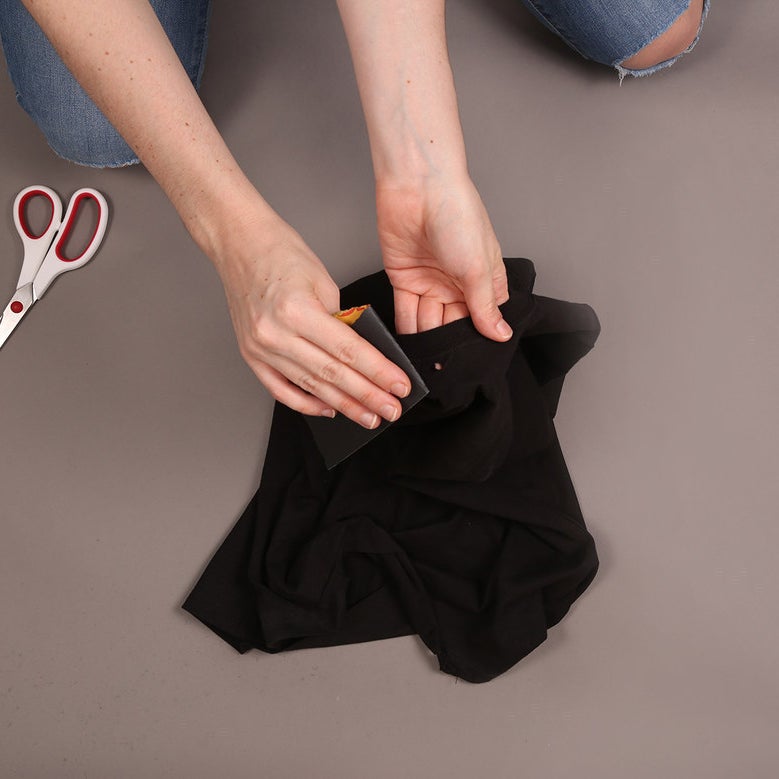
You'll need:
A T-shirt
Sandpaper
Fabric scissors
Some cardboard or an old book
Instructions:
1. Using your scissors, randomly cut some tiny holes on your T-shirt. Try to focus these where a top would naturally become worn over time, like along the collars and hemlines.
2. Split the hem in some places. There's no right or wrong way to do this!
3. Place your piece of cardboard inside your tee and use the sandpaper to rough up the hemlines and holes you just cut.
4. Prepare for everyone to ask, "Do you have moths in your cupboard?" or "Hope you got a discount for all those holes!" GOOD ONE GUYS.
5. Ombré Dip-Dye Tee
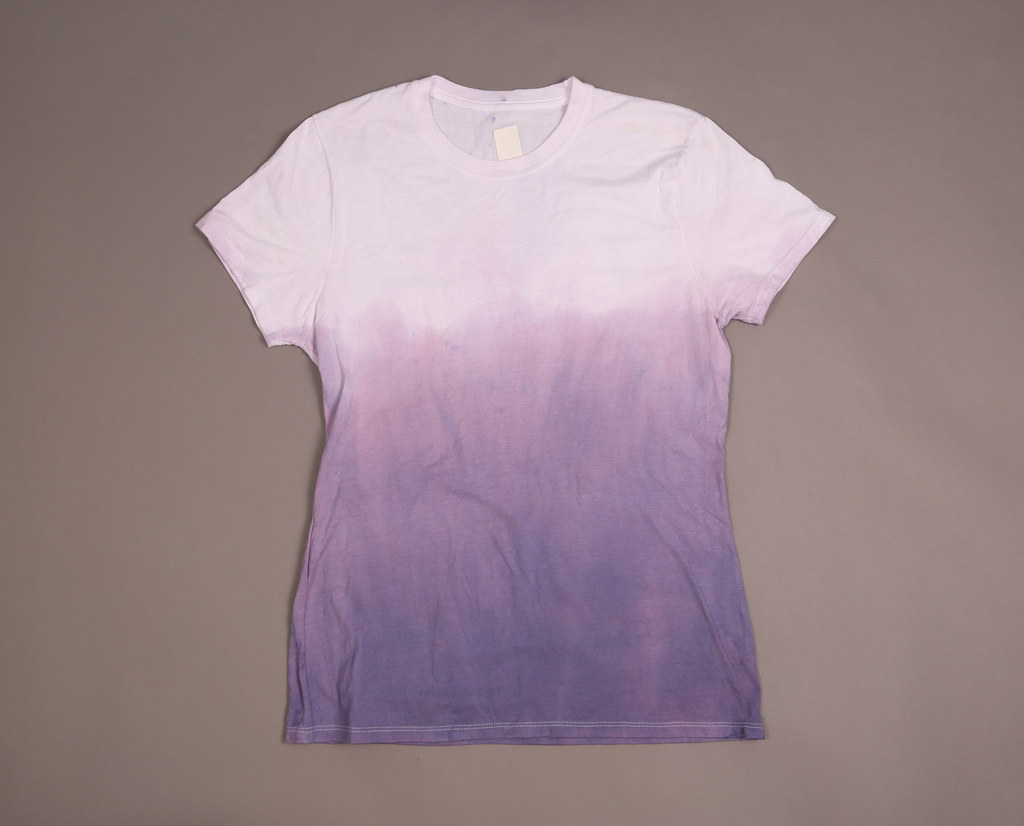


You'll need:
A light-coloured T-shirt
Fabric dye – you pick the colour
A big tub or bucket
Warm water
Instructions:
1. Fill a big bucket with warm water and add dye according to the instructions on the pack.
2. Dampen your T-shirt with clean, warm water.
3. To dye the lightest shade, hold your tee by the shoulders and dip into the dye bath until the colour reaches to about two thirds the height of the top, and immediately pull it out.
4. For the medium shade, dip your top back into the dye – this time only halfway. Since you want this shade to be darker, leave it in for a little bit longer.
5. Now add a bit more dye to the water and dip only the bottom third in. Hold it in there for a few minutes or until the desired level of colour is achieved.
6. Hang your T-shirt over a sink to dry.
7. Chuck it in the wash and voilà!
6. Rib Cage Cutout Tee
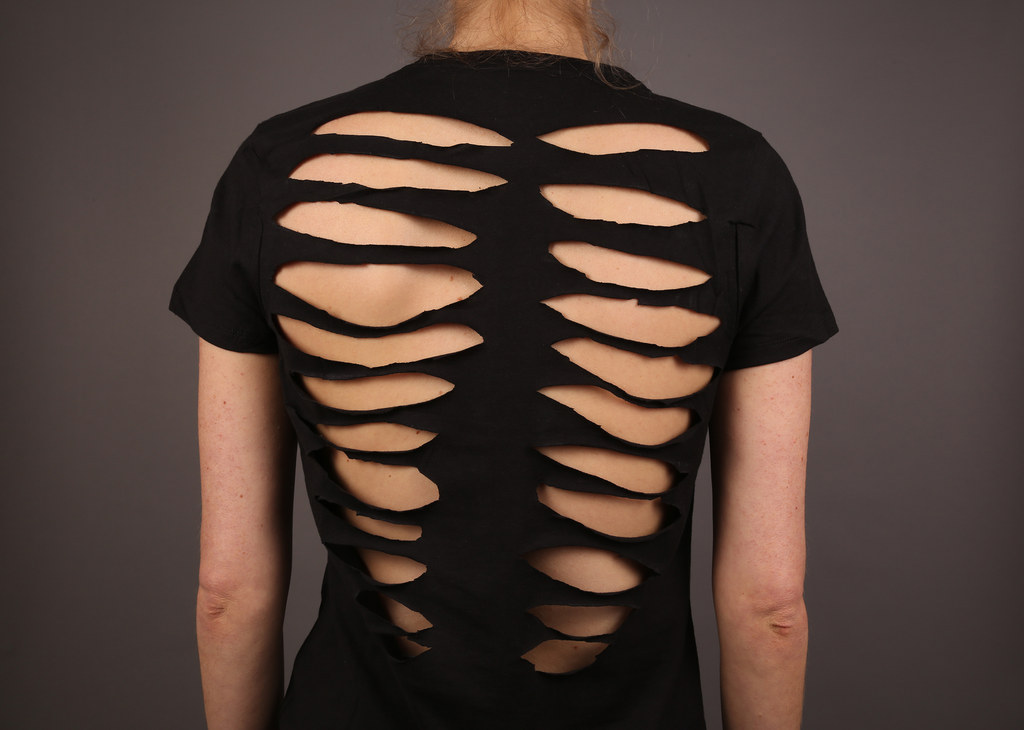
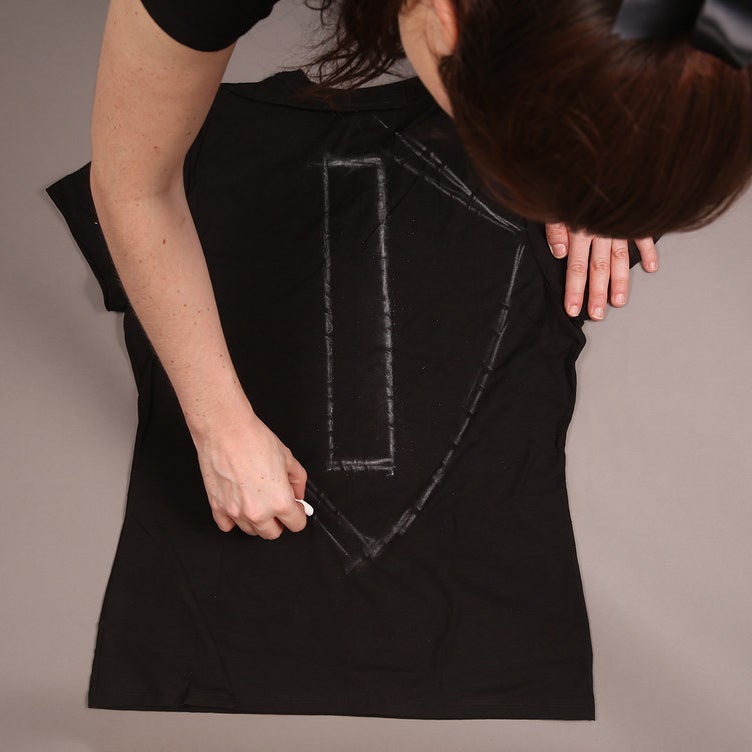


You'll need:
A T-shirt
Chalk
Ruler
Fabric scissors
Instructions:
1. Lay your tee out on a flat surface, back facing up.
2. Using your ruler, mark out a two-inch-wide rectangle down the middle of your tee, along your "spine".
3. Roughly mark out a diamond shape.
4. Now, staying within the diamond, rule horizontal lines about 1.5cm apart down the length of the tee. These are your ribs!
5. Using your scissors, carefully cut the slits along each line.
6. Gently pull on the slits to stretch the fabric slightly.
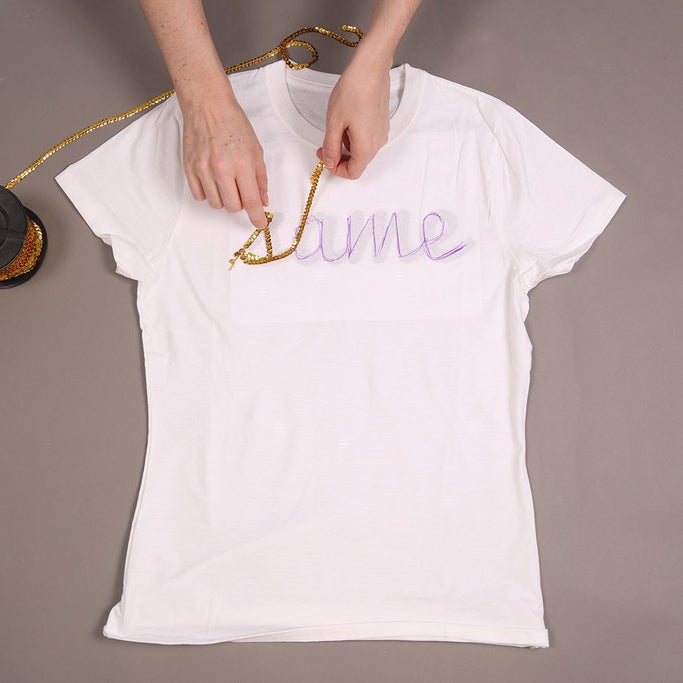
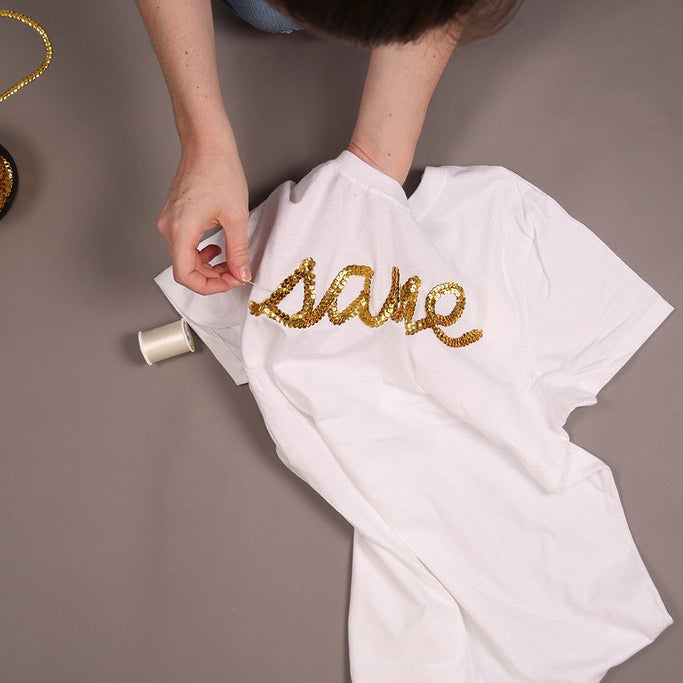
7. Sequin Text Tee


You'll need:
A light-coloured T-shirt
Fabric marker
Glue
Sequin trim
Needle and thread (in a similar colour to your trim)
Printer
Instructions:
1. Pick a word. Any word.
2. Print it out in a cursive font, the same size you want it to appear on your tee.
3. Place this template inside your tee and carefully trace through the middle of the letters (this is why you want a light colour).
4. Put glue on the left-hand side of your marker outline and start sticking on the sequin trim. Continue until you have one row of sequins covering all your letters.
5. When you get to the end of the word, turn around and trace the phrase backward, this time putting the sequins on the right side of the marker. They will overlap a little, and that's OK.
6. When you get back to the start of the word, you should have two complete rows of sequins. Trim any excess sequins and glue the last sequin in place by tucking it neatly under.
7. Let the glue dry, then use your needle and thread to reinforce the trim, sewing every third sequin or so.
NOTE: Depending on your word, you may need to backtrack over an already sequined area to get to the next letter. If so, just glue the new row on top of the previous row – you don't want any part of the word to be more than two sequins wide.
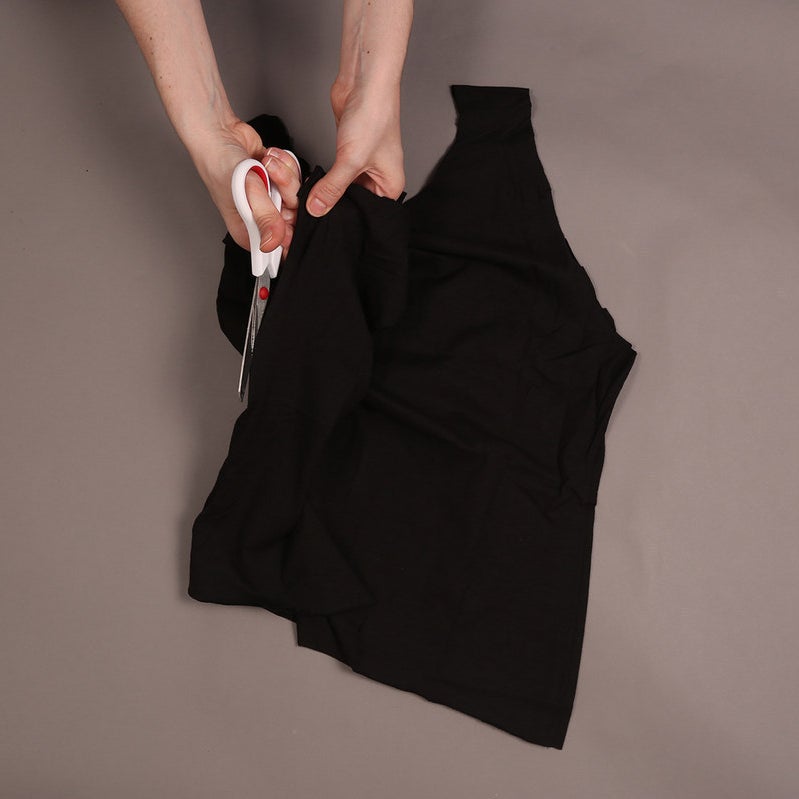
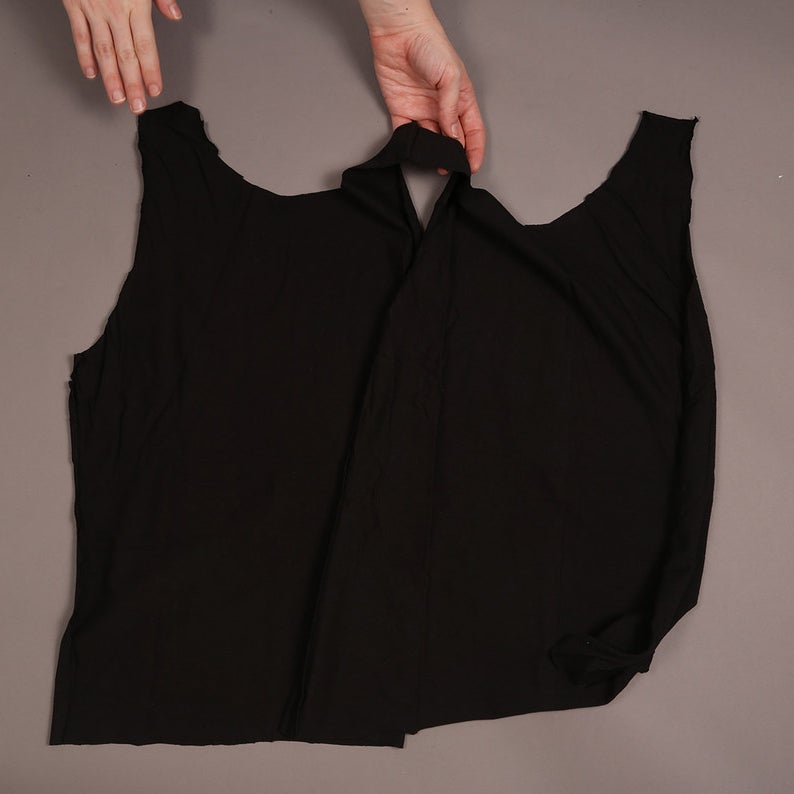
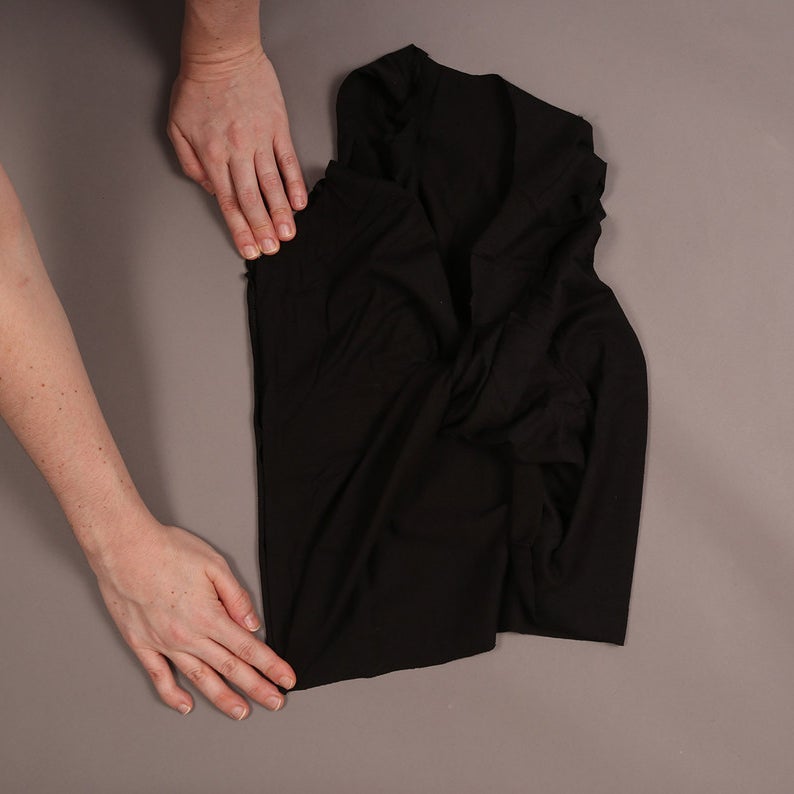
8. Twist Back Tank

You'll need:
A T-shirt
Scissors
Needle and thread (the same colour as your top)
Pins
Instructions:
1. Cut the sleeves off and trim the hemline.
2. Turn the top inside out, and cut along the inside seam and shoulder seam on one side of the top.
3. Twist the top 360 degrees around, so the same sides meet together again.
4. Pin the seams in place, and sew it back together.
4. Turn it the right way out, and you're done!
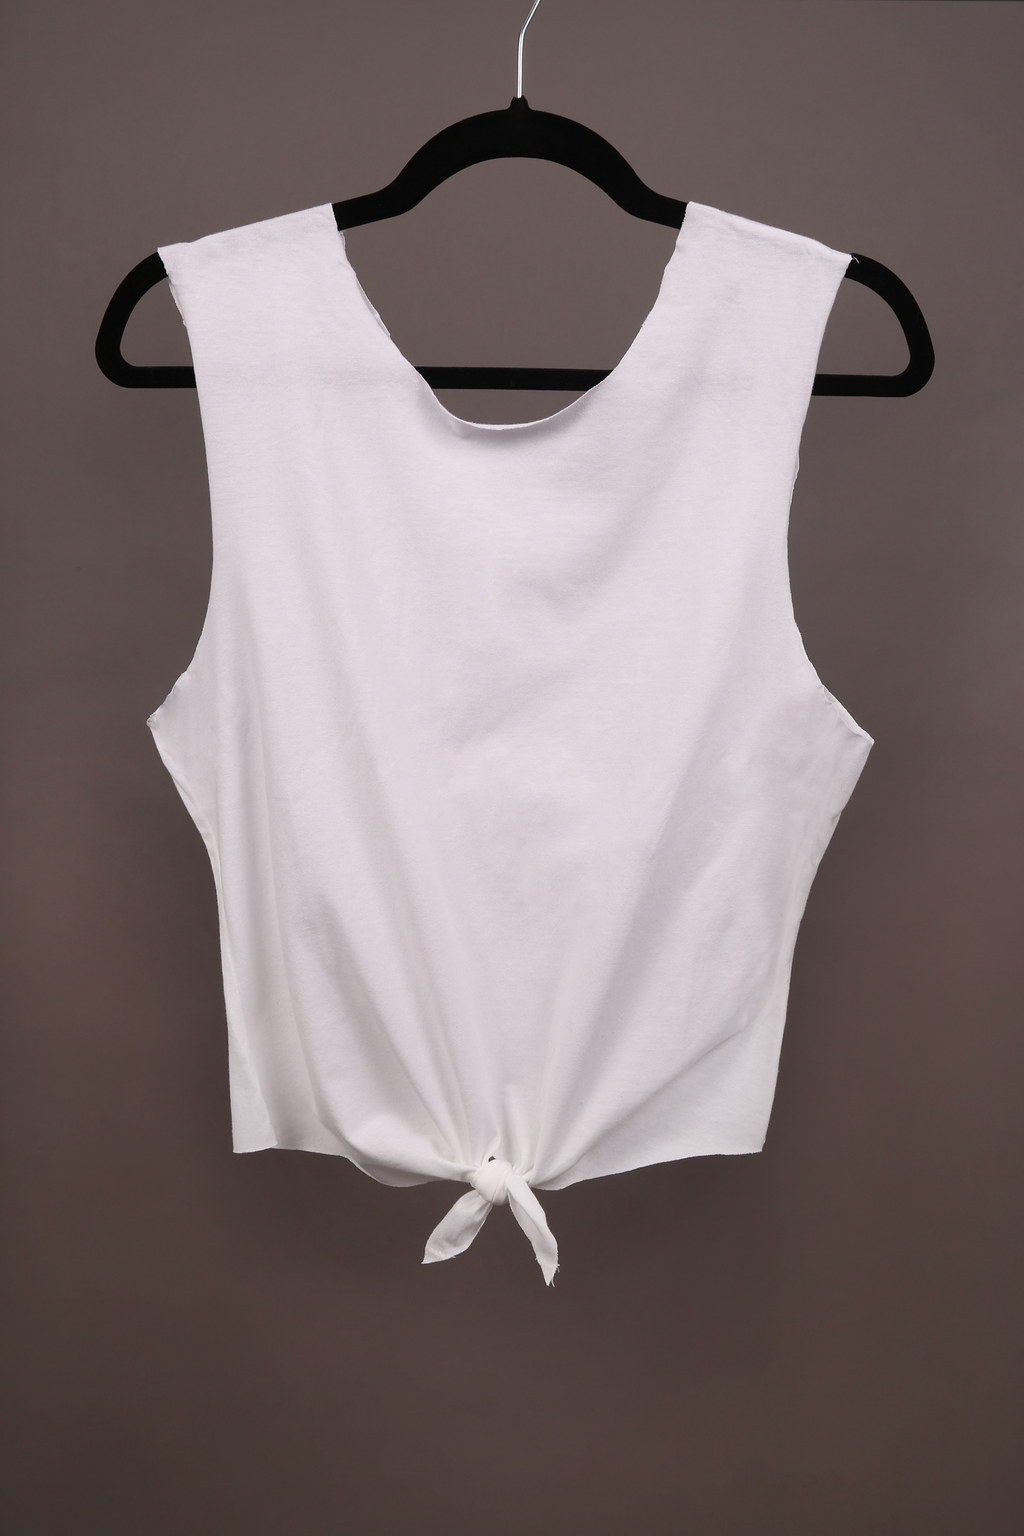
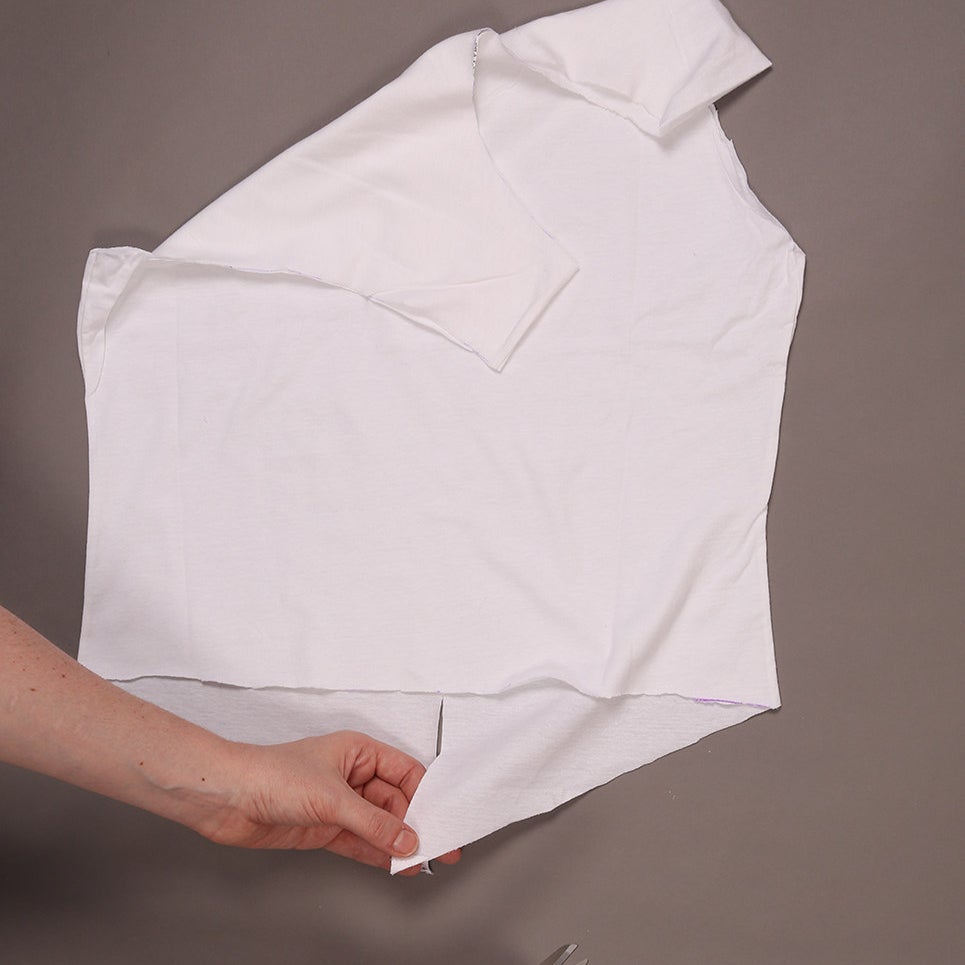
9. Cropped Tee With Tie Front


You'll need:
A T-shirt
Fabric scissors
Ruler or something with a straight edge
Washable marker
Instructions:
1. Cut off the sleeves and trim the hemline.
2. Rule and cut a straight line across the back of the tee at waist height.
3. Find the centre point on the long (front) side of the tee and cut a slit straight up the middle until you reach waist height again.
4. From the same centre point, cut diagonally to the side seams to make two triangular ties.
5. Tie those ties!
10. Lace-Up Tee


You'll need:
A T-shirt
Metal eyelets
Black trim
Black cord (make sure it's skinny enough to fit inside the eyelets)
Hammer
Fabric scissors
Black needle and thread
A piece of cardboard or something flat
A ruler or something with a straight edge
Chalk
Instructions:
1. Lay your tee out facing up and place your "something flat" inside near the neckline.
2. Decide how low you want the cutout to go. We know, decisions are hard. Mark it out in chalk and cut out the "V" shape, leaving the collar intact.
3. Sew the black trim along the edge of the cutout. (Here's where you can use a sewing machine if you know how to operate one.)
4. Mark where you want each of the eyelets to sit – ours were about 1.5cms apart – making sure they're even on both sides.
5. Cut a tiny hole for each of the eyelets and hammer those buggers in.
6. Lace it up!
7. Tie holes in the end of the string before this whole thing comes unravelled.
All images Lennon & Stone / © BuzzFeed
Now you can personalise your phone plan just like you personalise your wardrobe. Design your own prepaid with Vodafone MyMix, and you'll pay for what you choose.

Take this survey. It's almost like taking a quiz!