Courtesy of www.CaliforniaGoldRub.com/ www.TasteeBQ.com
[NOTE: The following article details a home cooking experiment. It is not intended to insure the the safety of anyone who tries it home. To be sure your DIY Smoker is safe, you may want to have it inspected by Fire and Food Safety Professionals. This project is not recommend for those under 18, without parental supervision.]
9/9/13- A big thanks to Marc Farris, Producer of the BBQ channel on YouTube. Thanks to his tip, we researched the latest FDA Guidelines on Terra Cotta. Until more testing is done, we do not recommend you do this at home. Otherwise, hope you enjoy reading about our little experiment.

You love the smoky flavor of Pulled Pork, but are tired of the long lines at the local BBQ Stop? The wait is over. You can build your own Electric Ceramic BBQ Pot Smoker at home. It is fast, easy, environmentally friendly and affordable. The commercial Ceramic Giant Egg can easily cost more than $1000, with all the accessories. Even Lady Gaga could have trouble affording one. TasteeBQ was recently inspired by vintage 2007-2008 Alton Brown videos which made Ceramic Flower Pot Smokers for $50. Now, he hopes to take you to the next level.
The concept of using plain Terra Cotta Flower Pots didn't seem so appealing to TasteeBQ. He needed something that could be presentable on the front patio next to his cherished Birth of Venus statuette. So TasteeBQ set a budget of $100 to see if he could build a Smoker with a little more visual appeal. In the end, he only spent $77.38 (tax not included) to build an environmentally friendly Electric Ceramic BBQ Pot Smoker, which uses less Wood and little to no Charcoal. Also, no Propane Gas or Lighting Fluid required.
INSTRUCTIONS FOR BUILDING CERAMIC BBQ POT SMOKER

Here are the Parts Needed, where we got them and for how much:
2- 19″ Wide Terra Cotta Vases from Home Depot $13.98 ea.= $27.96
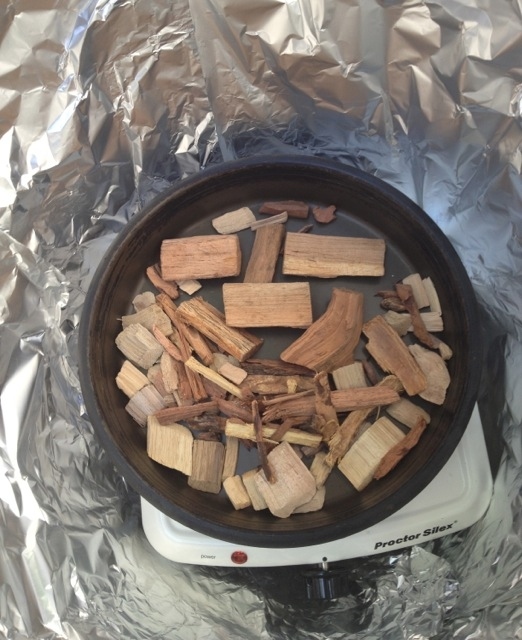
1- Proctor Silex durable Fifth Burner from Rite Aid= $19.99*
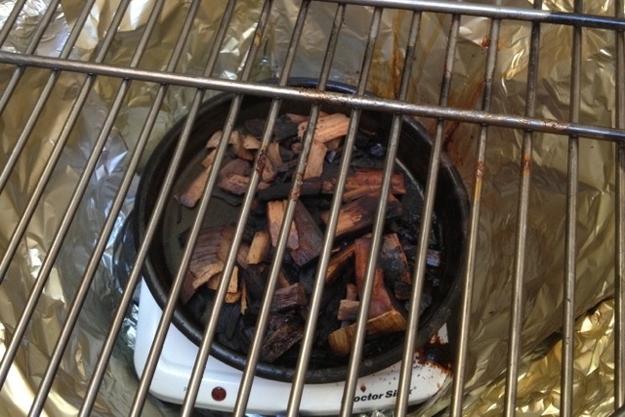
1- Weber Charcoal Grate (#7441) from Home Depot= $10.99
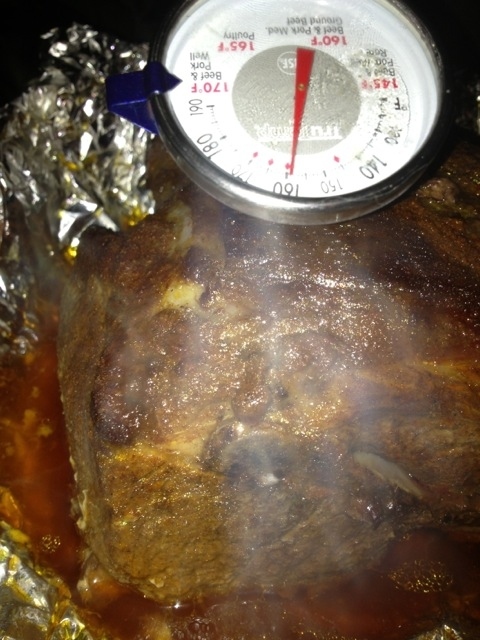
1- Instant Read Meat Thermometer from Target= $7.39**
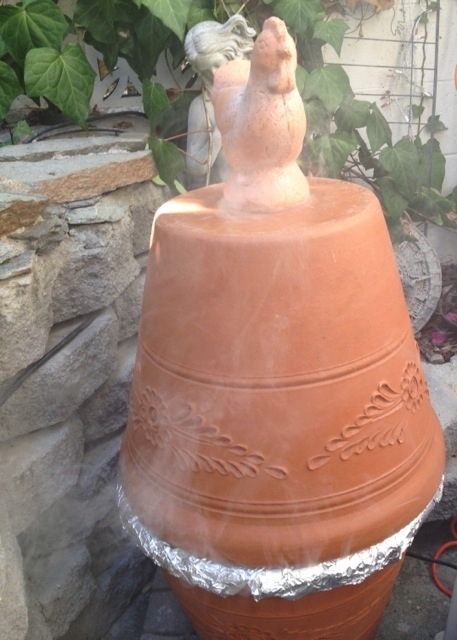
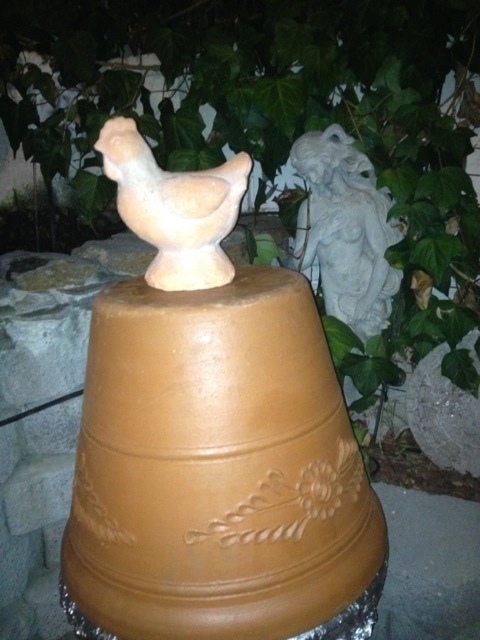
1- Decorative Terra Cotta Chicken (retail $19.99) on Clearance at Target= $5.98
3- Decorative Cobblestone Base Bricks from Home Depot ($1.69 ea.)= $5.07
_________________
TOTAL= $77.38
*We have since found exact same Proctor Silex model for sale at Baller's True Value Hardware (Silver Lake) for only $17.99. So this Ceramic BBQ Pot Smoker could have cost only $75.38)
**This is on Shopping List because everyone should have an Instant Read Meat Thermometer. If you already have one, cost for this Smoker would be less than $70.00.
Additional Materials Needed (from around the house):
Wood Chips/ Chunks (Mesquite, Hickory, Cherry, or Applewood, etc..)
Metal Pan for Chips,
Aluminum Foil
2 Bricks (clean) to hold up Hot Plate (prefably Terra Cotta)
Outdoor Extension Cord
Oven Mitts
BBQ Tongs or Poker for stirring Chips
Fire Extinguisher (Always good to have around whenever cooking.)
EASY 5-STEP SET UP
Assembly takes less than 1 Hour. Of course, it is good to check that everything fits before doing final project.
1. Set Pot on Base Bricks in steady position, leave gap to run Cord.

2. Line Bottom Pot with Aluminum Foil. Then place level Holding Bricks at bottom inside Pot.

3. Set Burner on top of Bricks. Position Control Knob in open spot where it can be reached. Run Cord through bottom hole. Outdoor extension Cord may be needed to reach nearest outlet. Be sure connection is at safe/dry location.

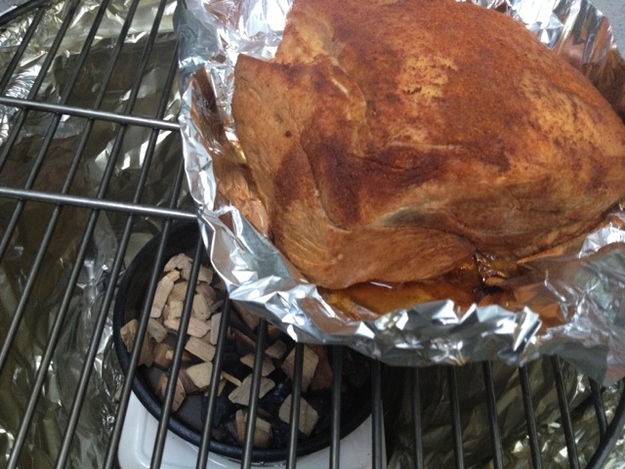
4. Place Metal Pan with Wood Chips on top of Burner Coil.
5. Place Grate on Top of Bottom Pot. Now you are ready to get Smoking.

First time starting it up, we checked that Burner was working before adding Meat. The Burner had to be turned up to Max to make Wood Chips smoke and heat entire oven. We used the Terra Cotta Chicken to cover top hole and hold in the heat. Once it started to smoke, we placed Meat Thermometer in top hole until it topped 190 degrees, so we knew we had a hot Oven.

PROS AND CONS
Before moving on to the Pulled Pork Recipe, here are some general Pros and Cons about using your DIY Ceramic BBQ Pot Smoker:
Pros
1. Smoker is electric and environmentally friendly. We only had to replace Wood Chips once, at the beginning (to get sufficient amount). After that, it did aromatic wood cooking with very little actual clouds of smoke. The Wood Chunks worked (sort of) like smokeless incense, while the smaller Chips seemed to smoke better. If you want more constant smoke, try adding Natural or Ceramic Charcoal and replenish dry Wood Chunks every few hours or so, as needed.
2. It is easy to use as Slow Cooker, would be very difficult to overcook Meat. At least with our sized Smoker. It you build smaller one with 12″ Grate, your Smoker is likely get much hotter, so you may have to adjust heat accordingly.
3. The Flavor- This is real deal Wood Smoking technique. Food came out tasting great. If you don't like the flavor of coal, it is even better the the Giant Egg, which uses Charcoal.
4. Cost: The $77.38 is less than you would spend for one Smoked HoneyBaked Ham. Smoke two DIY Hams and you have already saved money. It costs a fraction of price for Giant Egg.
Cons
1. The Lid can get a bit hot, awkward and heavy (our Pot weighs over 25 lbs). There are no handles so use Oven Mitts to pick up Lid. Be careful to clear it above the Meat, as to not knock it away. Once again, if you build a smaller 12″ Grate model, Lid should be lighter to handle. Once you get Recipes (and curiosity) down, You can do no-peek cooking for hours at a time.
2. Smoker is for Low and Slow BBQ Only. Not for Grilling. One advantage of the Giant Egg is that it cooks at extreme heats as well as low temps. This Ceramic Smoker cannot replace your regular Grill for quick fire Hamburgers and Steaks. It would be next to useless if you are into Vegan Cuisine, which almost always calls for quick Grilling Recipes. (though we may experiment with Smoked Kale Chips). This Smoker is best for Chicken Pieces, Sausages, Roasts and Whole Bird Cooking. It could also used to smoke Fish.
3. Emphasis on Slow. Our 5 lb. Pork Roast took 11 Hours to get well done (and probably could have gone for 3 more). We could normally Smoke a Pork Roast in 4-5 Hours on a regular Charcoal Grill. While experimenting with Smoker, give yourself extra time to be sure your Meat gets fully done. Make alternate back-up plans if you are on deadline for dinner. You can always transfer Meats to finish in oven. Even an hour on the Smoker will impart Natural Wood Flavors that you can't get from Oven cooking alone, or from Liquid Smoke.
[Consider Smoking your Pork Roast the Day before your party. Refrigerate it after it cools down (1-2 Hours). Then reheat it in foil at 420 degrees in Oven for 40 minutes on day of Party, before pulling Pork.]
RECIPE: CITRUS PULLED PORK (Gluten Free)

If you have shopped lately for fresh Ribs, we don't have to tell you how expensive they can get. Especially if you are feeding a large crowd. Serving Pulled Pork is an affordable alternative. One 5 lb. Roast will render enough meat for about 10- 12 sandwiches. If you are only serving a few (and can afford Ribs) you can also use Smoker to cook them. We will do Rib Recipe soon.
Many Pork Roast Recipes call for the traditional Salt and Sugar Brine. Our Brine uses Orange Juice, which contains enough natural Sugar and Acids to do the Job. Extra Sodium is in the Gluten Free Italian Dressing and Worcestershire Sauce. You can also try this with Apple Juice, Cider and Cloves for the Holidays. Or an Orange Juice/ Lemonade Combo might be nice.
INGREDIENTS-
Pork/Brine
1 5lb. Pork Picnic Shoulder or Butt Roast
1 1/2 Cup Orange Juice
1/3 Cup Gluten Free Italian Dressing
4 Tbsp. POWER BBQ Rub
2 Tbsp. Worcestershire Sauce
Salt & Pepper (if desired)
BBQ Sauce
1 1/2 Cup Orange Juice
2 Tbsp. Apple Cider
2-3 Tbsp. POWER BBQ Rub
1 Tbsp. Molasses or Raw Sugar (if desired)

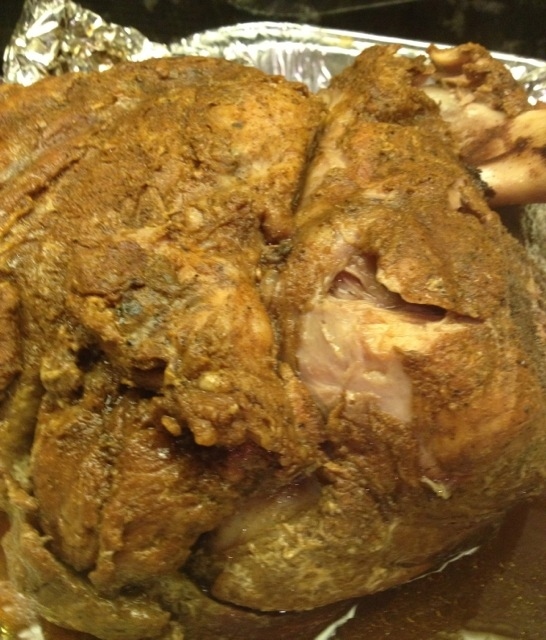
In Large Ziplock, cover Pork Roast with Orange Juice, Italian Dressing, BBQ Rub, Worcestershire Sauce and Salt and Pepper. Shake Well and Refrigerate overnight. May place on Foil or in Bowl in case of leaking.

Next Day- no need to rinse off Brine. Shake off extra liquid and move Roast to Smoker Place Meat on the Grate to the side, to reduce juice dripping into Wood Chips. After 1 to 1-1/2 hours place Foil underneath, leaving Meat open to absorb more smoke.

Ours Pork Picnic Roast took 11 hours to get done, you may want to smoke yours for up to 14 hours.
Quick Recipe- Gluten Free BBQ Sauce

You will have plenty of time to make this simple BBQ Sauce. Heat 1 cup of Orange Juice, mixing in 2 Tbsp. POWER BBQ Rub and 1 Tbsp. Apple Cider Vinegar. Once it boils, reduce to simmer and (you may) add Raw Sugar or Molasses. Stir frequently. Sauce will thicken as it simmers. It will be ready to use in about 15-20 minutes.

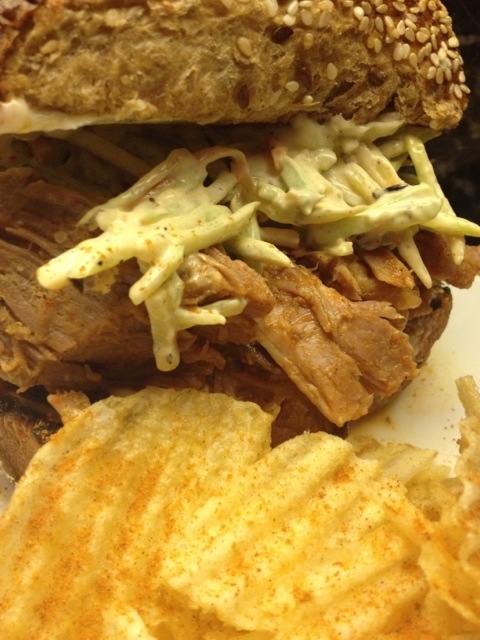
Once Pork is done let it rest in Foil for about an hour. Pull Meat off bone and separate into chunks. Use 2 Forks to shred Pork to desired consistency. Add BBQ Sauce to drench (not drown) Pork. Add a little more BBQ Rub, as well. Stir and let Meat absorb sauce for a least a few minutes. Serve on your favorite Grilled Bread Roll with Coleslaw & Chips. Can't find Gluten Free Bun, Make it a Citrus Pulled Pork Lettuce Wrap with Romaine.

RECIPE: GRILLED CABBAGE BROCCOLI COLESLAW

INGREDIENTS:
1 Bag Trader Joe's Broccoli Coleslaw Mix
1 Cup Sliced Yellow Cabbage
1 Half Cup of Gluten Free Mayo
1 Tbsp. Apple Cider
1 Tbsp. POWER BBQ Rub
Salt and Pepper (to taste)
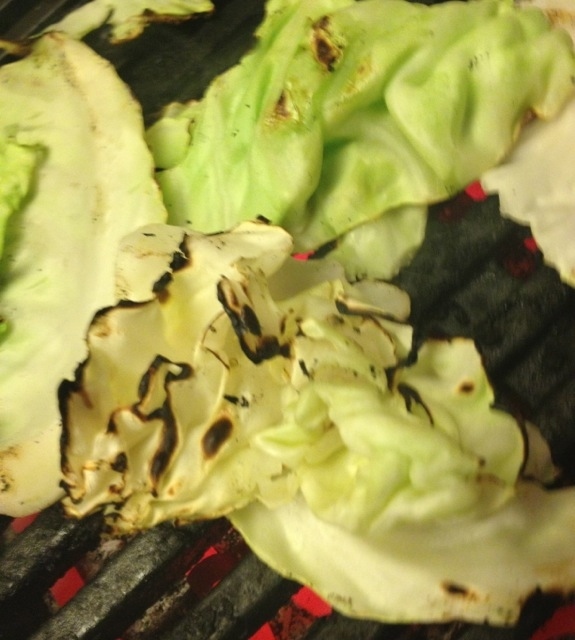
We grilled 1 Cup of sliced Yellow Cabbage. You can put it on Smoker to wilt for 30 Mins. Julienne Cabbage and add to Broccoli Coleslaw Mix with Mayo, Cider, BBQ Rub and salt and Pepper to Taste. Refrigerate for up to 1/2 hour before serving. We topped our Pulled Pork Sandwich with Slaw. A delightful way to break in your DIY Ceramic BBQ Pot Smoker.
BONUS VIDEOS
Homegrown Alton Brown


View this video on YouTube
Alton Brown’s original homemade video on How to Make Ceramic Flower Pot Smoker on Youtube.
Vintage Good Eats

View this video on YouTube
Original Episode of Good Eats where Alton Brown builds Ceramic Flower Pot Smoker.
FROM OUR SPONSORS…
facebook.com
See the true story as it unfolded on California Gold BBQ Rubs page on Facebook. It started this past Monday (8/26/13).
California Gold BBQ Rubs
californiagoldrub.com
For more about POWER Rub by California Gold BBQ Rubs visit website. Start on Product page, explore Recipes and Blogs.
Share This Article