1. Cutout Cookies

Cutout Cookies
About 30 cookies
Cutout cookies are a must for the holiday season. The wonderful thing about this dough is that it can be cut into any shape or size that a particular holiday requires. I make the dough year-round and use cookie cutters that suit the occasion. The cookies are fun to decorate. When my daughter was a toddler, we painted the icing on the cookies instead of piping it. Painting the cookies was so much easier. Now that she is older, it is a wonderful way for both of us to get creative when decorating the cookies. Each cookie can be a masterpiece.
INGREDIENTS
2 cups / 280 g Jeanne’s Gluten-Free All-Purpose Flour (see separate recipe below)
1½ tsp baking powder
¼ tsp salt
½ cup / 115 g unsalted butter, at room temperature
1 cup / 200 g granulated sugar
1 extra-large egg, at room temperature
1 tsp pure vanilla extract
½ tsp grated lemon or orange zest (optional)
Tapioca flour for dusting
Colored sugar for decorating (optional)
Icing
2 cups / 225 g confectioners’ sugar, sifted
1 tsp pure vanilla extract
4 to 6 Tbsp heavy cream, or more if needed
Food coloring in various colors (optional)
PREPARATION
In a medium bowl, mix together the flour, baking powder, and salt.
In a large bowl, using a hand mixer on medium-high speed, beat the butter until light and fluffy, about 2 minutes. Add the granulated sugar and beat for 1 minute. Add the egg and beat for 1 minute. Add the vanilla and beat to combine. Add the lemon zest (if using). Add the flour mixture and beat until combined.
Divide the dough in half, shape each half into a disk, and wrap tightly in plastic wrap. Refrigerate until firm, about 30 minutes, or for up to 3 days.
Preheat the oven to 375°F/190°C/gas mark 5. Line two cookie sheets with parchment paper.
Remove one dough disk from the refrigerator. If the dough is rock hard, let it warm up a bit. Place the dough between two pieces of waxed paper and roll to ⅛ in/3 mm thick. Using cookie cutters dipped in tapioca flour, cut out as many shapes as possible. Using a spatula, place the cutouts on the prepared sheets, spacing them at least 1 in/2.5 cm apart. Roll out the dough scraps and repeat the process until all the dough is used or the cookie sheets are full. The dough is best cut when it is firm, so you may have to return it to the refrigerator before cutting more shapes.
Sprinkle the shapes with colored sugar (if desired or leave them plain and decorate with icing after baking). Bake until the edges of the cookies are lightly browned, 8 to 10 minutes. Let cool on the cookie sheets for about 2 minutes, then remove to wire racks to cool completely. Let the sheets cool completely and repeat with the remaining dough.
While the cookies are cooling, make the icing. Place the confectioners’ sugar in a large bowl. Add the vanilla and 4 Tbsp of the cream. Whisk until all the ingredients are combined and smooth. If desired, add more cream to make the icing thinner. If you want to color the icing, divide it among small bowls and tint each bowl of icing with a different food coloring. Using a small paintbrush per color, decorate the cookies. Place the decorated cookies on the wire racks to let the icing set.
Store the cookies in an airtight container, between layers of waxed paper, at room temperature for up to 5 days or in the refrigerator for up to 2 weeks.
2. Chocolate-Cherry Biscotti

Chocolate-Cherry Biscotti
About 4 dozen cookies
As you may know, biscotti means “twice baked” in Italian. Biscotti are an Italian version of hard biscuits found around the world. They were originally created to feed travelers and soldiers, because their lack of moisture allowed them to be stored for long periods of time. Versions of these cookies abound in other cultures—they are known in the United States as hard tack, in Germany as zwieback, and in Jewish baking as madelbrot. Biscotti are excellent cookies for dunking—baking them twice ensures that they retain their shape and crunch when dipped into a hot beverage. My husband and I are tea drinkers, so we dunk them in our tea. My daughter is a hot cocoa drinker, so she dunks them in her cocoa (hey, you can never have too much chocolate, right?). Because of the cookies’ terrific storage qualities (and delicious flavor), I like to have a tin of these ready for spur-of-the-moment visitors during the holiday season. For double-chocolate biscotti, substitute 1 cup/170 g regular or mini chocolate chips for the dried fruit.
INGREDIENTS
2 cups/280 g Jeanne’s Gluten-Free All-Purpose Flour (see separate recipe below)
½ cup/45 g unsweetened cocoa powder, sifted
¾ tsp baking soda
½ tsp baking powder
½ tsp salt
6 Tbsp/85 g unsalted butter, at room temperature
1 cup/200 g granulated sugar
2 extra-large eggs, at room temperature
1 cup/160 g chopped dried cherries or cranberries
PREPARATION
Preheat the oven to 350°F/180°C/gas mark 4.
Line two cookie sheets with parchment paper.
In a medium bowl, mix together the flour, cocoa, baking soda, baking powder, and salt.
In a large bowl, using a large spoon, mix together the butter and sugar until well combined. Add the eggs, one at a time, stirring well after each addition. Stir in the flour mixture until just combined. Fold in the dried cherries. The dough will be very stiff.
Divide the dough in half and put the portions on opposite ends of one prepared cookie sheet. Shape each portion into a rough rectangle about 12 in/30.5 cm long by 4 in/10 cm wide by ½ in/12 mm thick. If you use your palms to shape the dough, it shouldn't stick to your hands, but if the dough does stick, wet your hands before continuing. You will now have two dough rectangles on your cookie sheet.
Bake the rectangles for 25 minutes. Let cool on the sheet for 20 minutes. Using a serrated knife, cut each rectangle on the cookie sheet crosswise, as you would a loaf of bread, into slices about ½ in/12 mm thick, cutting slowly and carefully so the slices don’t crumble. Stand the slices upright on their bottoms on the two cookie sheets, spacing them ½ in/12 mm apart. The cookies should now look like the familiar biscotti.
Bake until the cookies are crisp and a finger pressed lightly on a cookie does not leave an imprint, about 15 minutes. Remove the cookies to wire racks to cool completely.
Store in an airtight container at room temperature for up to 1 week.
3. Springerle
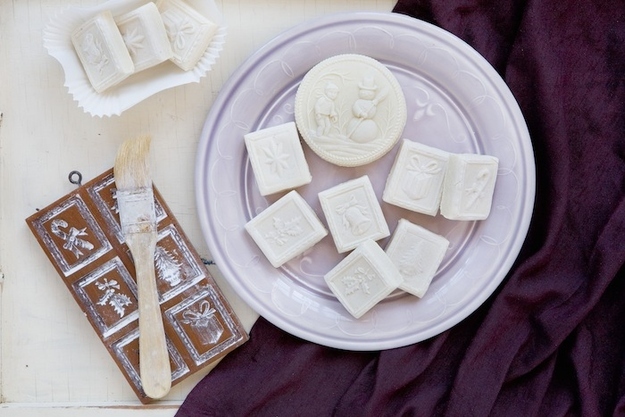
Springerle
About 40 cookies
These delicate, cakey German cookies have been around, some say, for hundreds of years. The name springerle comes from an old German word meaning “ jumping horse” or “little knight,” which probably refers to the original shapes of the molds. Springerle molds are amazingly beautiful and detailed. Each is a work of art, and I would buy every one if I had the budget. The mold I used for this recipe makes cookies that measure about 1½ by 1¾ in/4 by 4.5 cm. The cookies are traditionally flavored with anise and lemon oils. If you want a milder taste, use the corresponding extracts.
Making the cookies takes 2 days. The first day, you prepare the dough and cut out the cookies. The next day, you bake them.
INGREDIENTS
4 cups/560 g Jeanne’s Gluten-Free All-Purpose Flour (see separate recipe below), plus more for kneading
¼ tsp salt
½ tsp baking powder
3 extra-large eggs, at room temperature
3 cups/340 g confectioners’ sugar
¼ cup/55 g unsalted butter, at room temperature
¼ tsp pure vanilla extract
¼ tsp anise oil or extract
¼ tsp lemon oil or extract
1 Tbsp milk
Tapioca flour for dusting
PREPARATION
Line two cookie sheets with parchment paper.
In a medium bowl, mix together the 4 cups/560 g flour, salt, and baking powder.
In the bowl of a stand mixer fitted with the whisk attachment, beat the eggs on medium high speed until thick and light yellow, about 20 minutes. Slowly add the confectioners' sugar, a little at a time, beating after each addition. Continue to beat until smooth. Add the butter and beat until creamy, about 2 minutes. Add the vanilla, anise oil, and lemon oil and beat until combined. Add the milk, beating until combined.
Change to the paddle attachment. Add the flour mixture a little at a time and beat on medium-low speed until combined. The dough will be stiff.
Turn out the dough onto a board generously dusted with all-purpose flour mix. Knead the dough, incorporating more flour, until the dough is quite stiff and will retain the imprint of the springerle mold. (The dough is ready when it is no longer sticky. The humidity in your kitchen will determine how much more flour will be needed.)
Dust your rolling surface and your rolling pin with tapioca flour. With a pastry brush, brush the insides of the mold well with tapioca flour.
Roll out the dough to about ½ in/12 mm thick (no thinner). Firmly and carefully press the mold onto the dough, making a good impression—you will need to press hard and evenly around all parts of the mold. Remove the mold by lifting it straight up, so you don’t alter the impression as the mold disengages from the dough. Carefully cut out the cookies with a pastry cutter, a sharp knife, or a cookie
cutter that is the same shape as your mold. Using a spatula, place the cookies on the prepared sheets, spacing them ½ in/12 mm apart. Only imprint and cut one mold at a time. If you do more, all the dough will move, and the previously imprinted designs will be distorted. Repeat until all the dough is used.
Let the cookies dry, uncovered, at room temperature, for 12 to 24 hours. The drying period helps form a film on the top that sets the design when the cookies are baked. When you are ready to bake the cookies, check the bottom of a cookie to make sure it is still moist. This will help anchor the cookies to the parchment paper and allow them to rise.
Preheat the oven to 300°F/150°C/gas mark 2 for cookies measuring 2½ in/6 mm or smaller or to 325°F/165°C/gas mark 3 for cookies measuring 3 in/7.5 cm or larger.
Bake until the cookies are barely brown on the bottom, 10 to 25 minutes, depending on the size. The cookies should remain white on top—do not gauge doneness by the tops browning. When you take a cookie from the sheet, look at the bottom. When it is done, there should be cracking along the bottom rising points—kind of like an inner square with lines going to each corner or, for circles, an inner circle. Remove the cookies to wire racks to cool completely.
Store in an airtight container. Traditionally, springerle are baked several weeks before Christmas and are allowed to “age” in the container at room temperature to mellow the anise taste. In our family, we eat some of the cookies soon after baking and others later after they have aged.
Jeanne’s Gluten-Free All-Purpose Flour
Makes 4½ cups / 660 g
1¼ cups/170 g brown rice flour
1¼ cups/205 g white rice flour
1 cup/165 g sweet rice flour
1 cup/120 g tapioca flour
scant 2 tsp xanthan gum
In a large bowl, whisk together the brown and white rice flours, sweet rice flour, tapioca flour, and xanthan gum thoroughly. Transfer the mix to an airtight container. Store in a cool, dark place for up to 6 weeks or in the refrigerator for up to 4 months.