
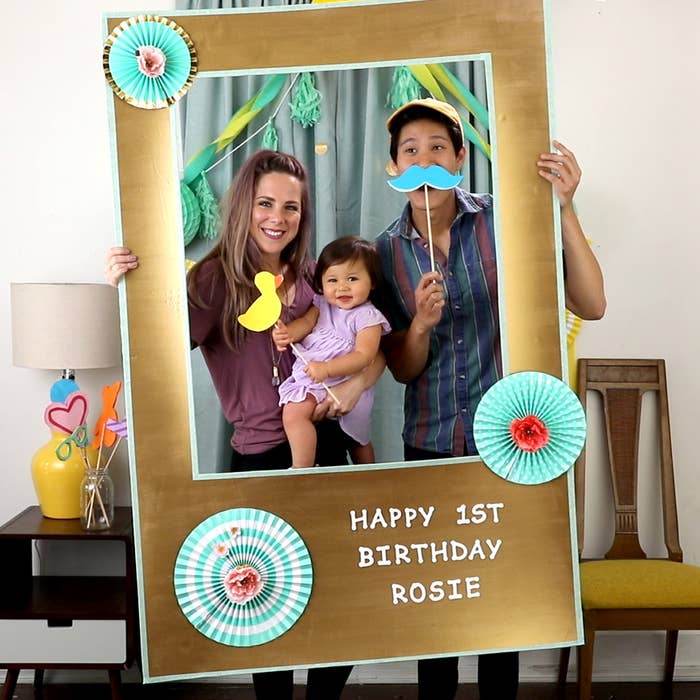
DIY First Birthday Photo Frame
MATERIALS
Two 40 x 60–inch Styrofoam boards
1 yardstick
1 No. 2 pencil
1 box cutter
1 bottle gold metallic acrylic paint
1 large foam paintbrush
1 box of wooden alphabet letters
1 bottle of white paint
Various fake flowers and paper party decorations
1 hot glue gun and glue sticks
1 pair of scissors
1 pack of multi-coloured construction paper
1 dispenser of double-sided tape
6–8 wooden dowels
Optional: 1 scrapbook
INSTRUCTIONS
1. Take two 40 x 60–inch Styrofoam boards and stack them on top of one another to avoid cutting the ground.
2. Sit them down on the ground and trace a rectangle in the middle of the top board measuring 6 inches from the top and sides and 18 inches from the bottom, creating a 28 x 36–inch rectangle.
3. Use a box cutter to cut out the middle rectangular portion of the Styrofoam board. Save this for later.
4. Using a large foam paintbrush, paint the photo frame with the metallic gold acrylic paint. Let dry.
5. Add a second layer of paint. Let dry.
6. As the paint dries, put bottles of paint or other heavy objects on each of the corners to keep the board from warping.
7. Paint the wooden alphabet letters white. Let dry.
8. Once the board and letters are dry, hot glue wooden letters to spell “Happy 1st Birthday [Name]”.
9. Customize the photo frame by hot gluing flowers, colourful tape, and other paper decorations.
10. Draw a duck, or other baby-themed image, onto a piece of construction paper and cut it out.
11. Take that paper duck and sit it on top of the leftover foam board.
12. Trace it onto the foam board.
13. Use a box cutter to cut the duck shape out of the foam board, then tape the construction paper version of the duck on top of the foam board version.
14. Flip the duck over and hot glue a wooden dowel onto the back of it.
15. Pose with the props inside of the photo booth frame in front of a pretty wall.
16. Print your pictures and put them into a scrapbook for your baby.
17. Enjoy the memories!
Sign up to the SMA® Baby Club for personalised content and advice to support you during the toddler years!
ZTC1880E/06/17
Advertisement Feature