
MATERIALS
Sharpie
Toilet paper roll tube
Two plastic party cups
Xacto knife
Spray paint
Washi tape
INSTRUCTIONS
1. Use the Sharpie to trace outlines of the toilet paper roll ends on the insides of two party cups and cut out the holes with an Xacto knife.
2. Use the Sharpie to trace the outline of the bottom of the phone across the top of the toilet paper roll and cut out with an Xacto knife.
3. Optional: Spray paint the cups with your favorite color and wrap washi tape around the toilet paper roll to add a custom look.
4. Slide the toilet paper roll ends into the cup holes.
5. Slide your phone into your new speakers and get the party bumpin'!

MATERIALS
Scissors
A thin wallet with vertical credit card slots
Phone case
Hot glue gun or superglue
INSTRUCTIONS
1. Cut out the credit card slot section on the wallet. Double check to make sure it fits the width of your phone case across the back.
2. Use a hot glue gun (or superglue) to attach the back of the card section to the back of the phone case.
3. Gently press across all the edges until glue dries and wallet piece is secure.
4. Slide in your credit cards and go hit the town!

MATERIALS
Ruler
Pencil
Hardcover book
Xacto knife
Piece of cardboard
Scissors
Sandpaper (optional)
Paintbrush
Glue
Wax paper
Paint or decorative fabric (optional)
INSTRUCTIONS
1. With the ruler, mark a rectangle big enough to fit your phone on the inner first page of the book (this will be the size of the secret hole). Leave at least ¾” along all the edges.
2. Using an Xacto knife, carefully cut through all the pages along the edges you drew.
3. As you near the bottom pages, slide a piece of cardboard between the last page and the book cover to protect the back cover from getting cut into.
4. Fine-tune the inner edges of the page cuts with scissors. You can also use a small piece of sandpaper (optional).
5. Using a paintbrush, spread little amounts of glue (too much will wrinkle the pages) along the outer and inner rim of the pages you cut to make sure the pages stick together as a block.
6. Place pieces of wax paper to separate the clock of pages from the front and back covers to keep the book from getting glued shut. Stack several books on top to apply pressure to the pages and wait until the glue dries.
7. Repeat steps 5 and 6 as needed until all the pages are solidly glued together.
8. Once dry, use the Xacto knife and a ruler to cut a notch across the top of the block of pages the height of your power cord (about ¼”).
9. To decorate: you can cover the front and back covers with fabric or paint solid colors.
10. Once dry, slide the power cord across the notch, plug in your phone, and voilà!


MATERIALS
Headphones
Clothespins
Masking tape
Nail polish in assorted colors
Clear nail polish
INSTRUCTIONS
1. Suspend the headphones between two objects using clothespins (e.g., between two vases or between your curtains) so you can easily paint around the headphone wire.
2. Cut strips of masking tape and wrap around your headphone wire in a desired pattern. Make sure to press the tape tightly into the wire or else the nail polish will seep through.
3. Use the nail polish brush to paint the exposed headphone wire that’s not taped off and wait until completely dry. Paint over with clear nail polish to seal.
4. Once dry, remove the taped portions on the headphone wire and repeat step 2 until you get the design you desire!

MATERIALS
Mini easel (in light wood or white color)
Washi tape or paint
Paintbrushes
INSTRUCTIONS
1. Decorate the mini easel with washi tape and/or paint in desired pattern.
2. Once set, sit your phone on top for easy streaming or playing music. That’s it!

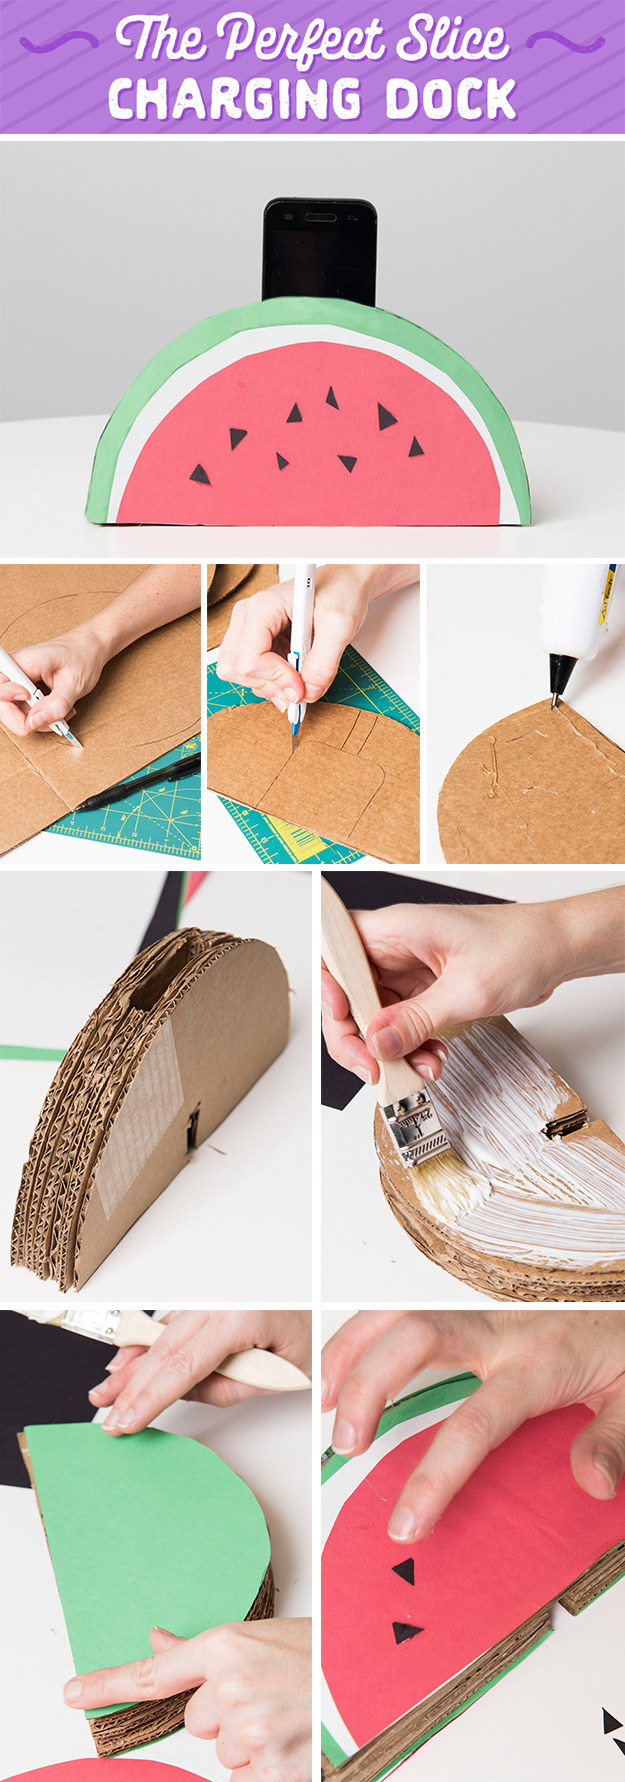
MATERIALS
Pen
Large piece of cardboard or cardboard box
Scissors
Xacto knife
Ruler
Hot glue gun
Construction paper (green, red, white, and black)
INSTRUCTIONS
1. Trace a circle 9”–10” across in diameter on the cardboard (photo team: I can’t tell what the best width is, so feel free to adjust) and cut it in half to make 2 semi-circles.
2. Use one semicircle as a stencil to trace 7 more semicircles on the cardboard. Cut them out with an Xacto knife for an overall total of 9 semicircle pieces.
3. Place the bottom half of your phone with the charger cord connected on the rounded edge of a semicircle and trace an outline around it. Cut it out with an Xacto knife. Use the pieces to trace to cut the same on 2 more semicircles for a total of 3 semicircles with this phone cut.
4. Next, make only a slim rectangle cut on the flat edge of the semicircle (for the cord) across 3 more semicircles.
5. Assembly: Use strong craft glue or hot glue gun to glue all the pieces of the same type together as a set. The 3 fully cut semicircle set needs to be in the middle between the no-cut set and the small rectangular cut set.
6. Cut green, white, and red construction paper in the design of a watermelon and glue them onto the front, top, and sides of the dock.
7. Slide the power cord through the back and up the center hole, attach it to your phone, and slide the phone inside to sit. Cute!
Photos Lauren Zaser / Design by Kirby Darland / BuzzFeed.
Your other tech just got serious jealousy vibes. Get the best for your phone with two lines of Unlimited 4G LTE data for just $75 — all on a reliable 4G LTE network — from MetroPCS.
Video@480p. Users> 32GB may have reduced speeds. No tethering.
