We hope you love our recommendations! Some may have been sent as samples, but all were independently selected by our editors. Just FYI, BuzzFeed and its publishing partners may collect a share of sales and/or other compensation from the links on this page.

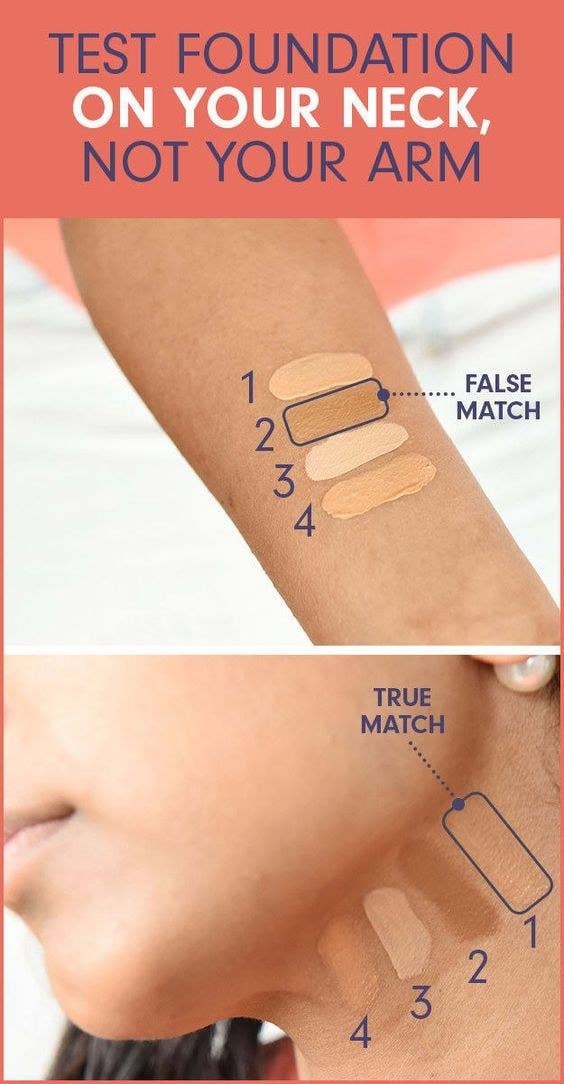
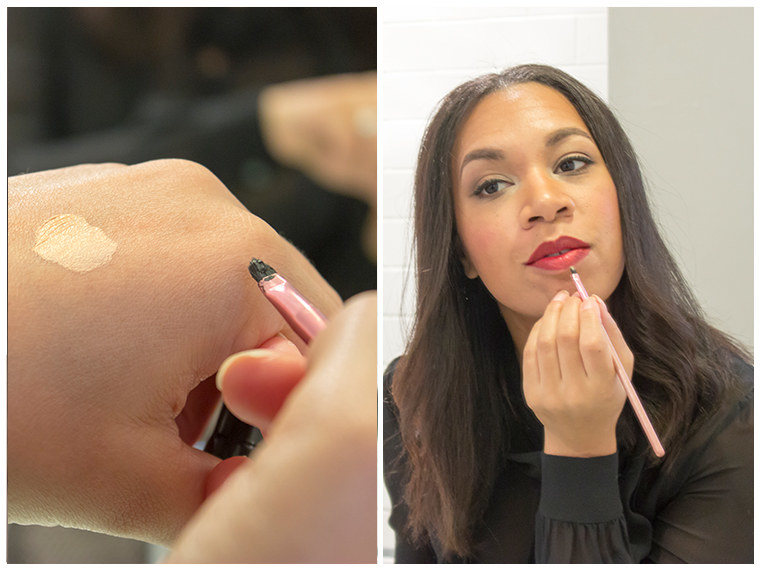
1. Ensure your foundation or skin tint *actually* matches your skin by testing different shades on your neck rather than your wrist or hand. As you can see here, you might get a completely different result.
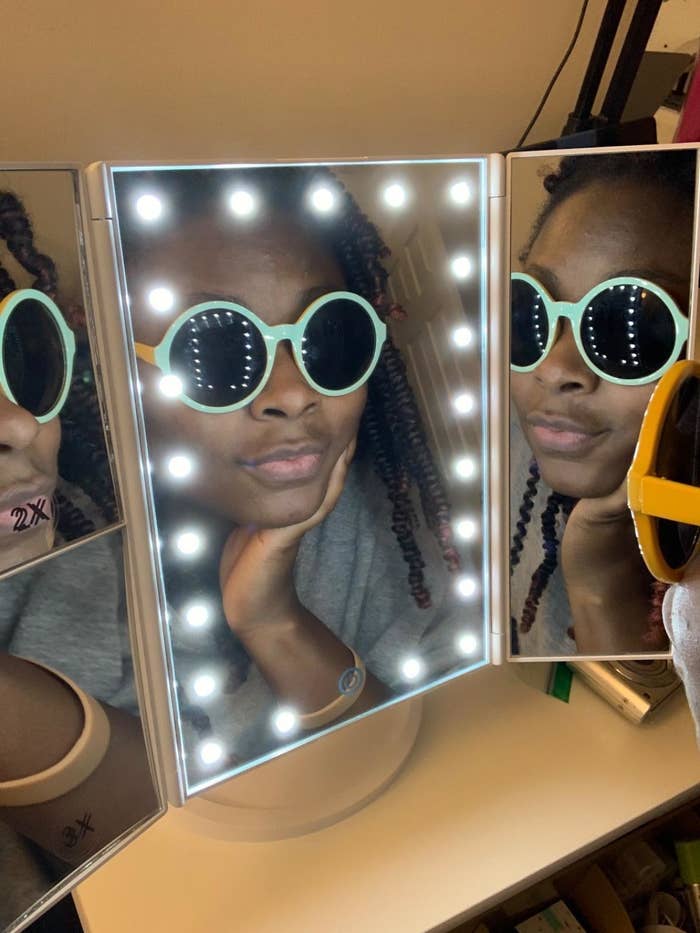
2. Perfect your makeup in a foldable magnifying mirror with LEDs that adjust brightness so you don't step outside and see unblended blush and splotchy foundation.
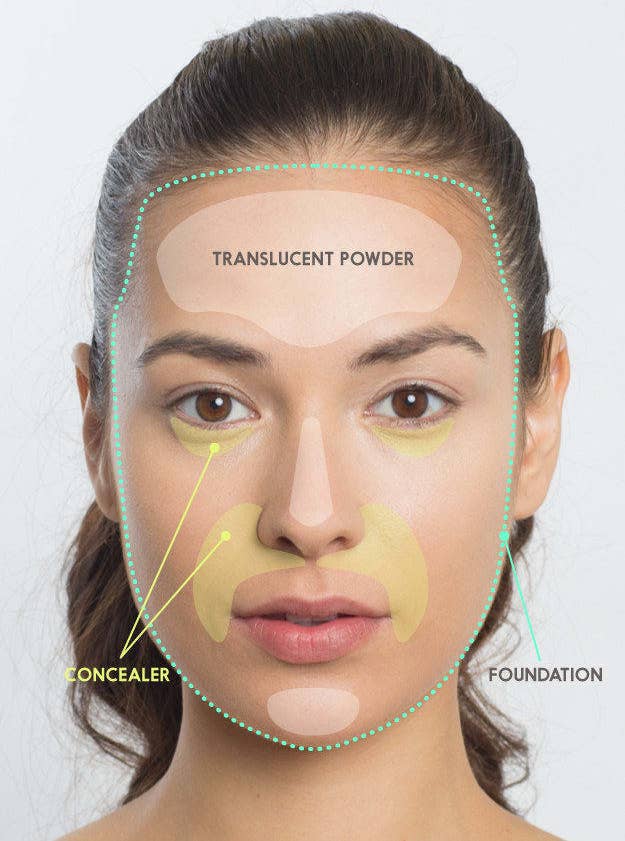
3. Follow along with this guide to map out where to put on concealer, foundation, and translucent powder for the best photo-ready makeup so it shows up best — without looking flat. 100+ Instagram likes, anyone?
4. And try a popular Etude House Zero Sebum translucent powder to set your makeup for the whole day without cakiness — only where you get shiny rather than all over.
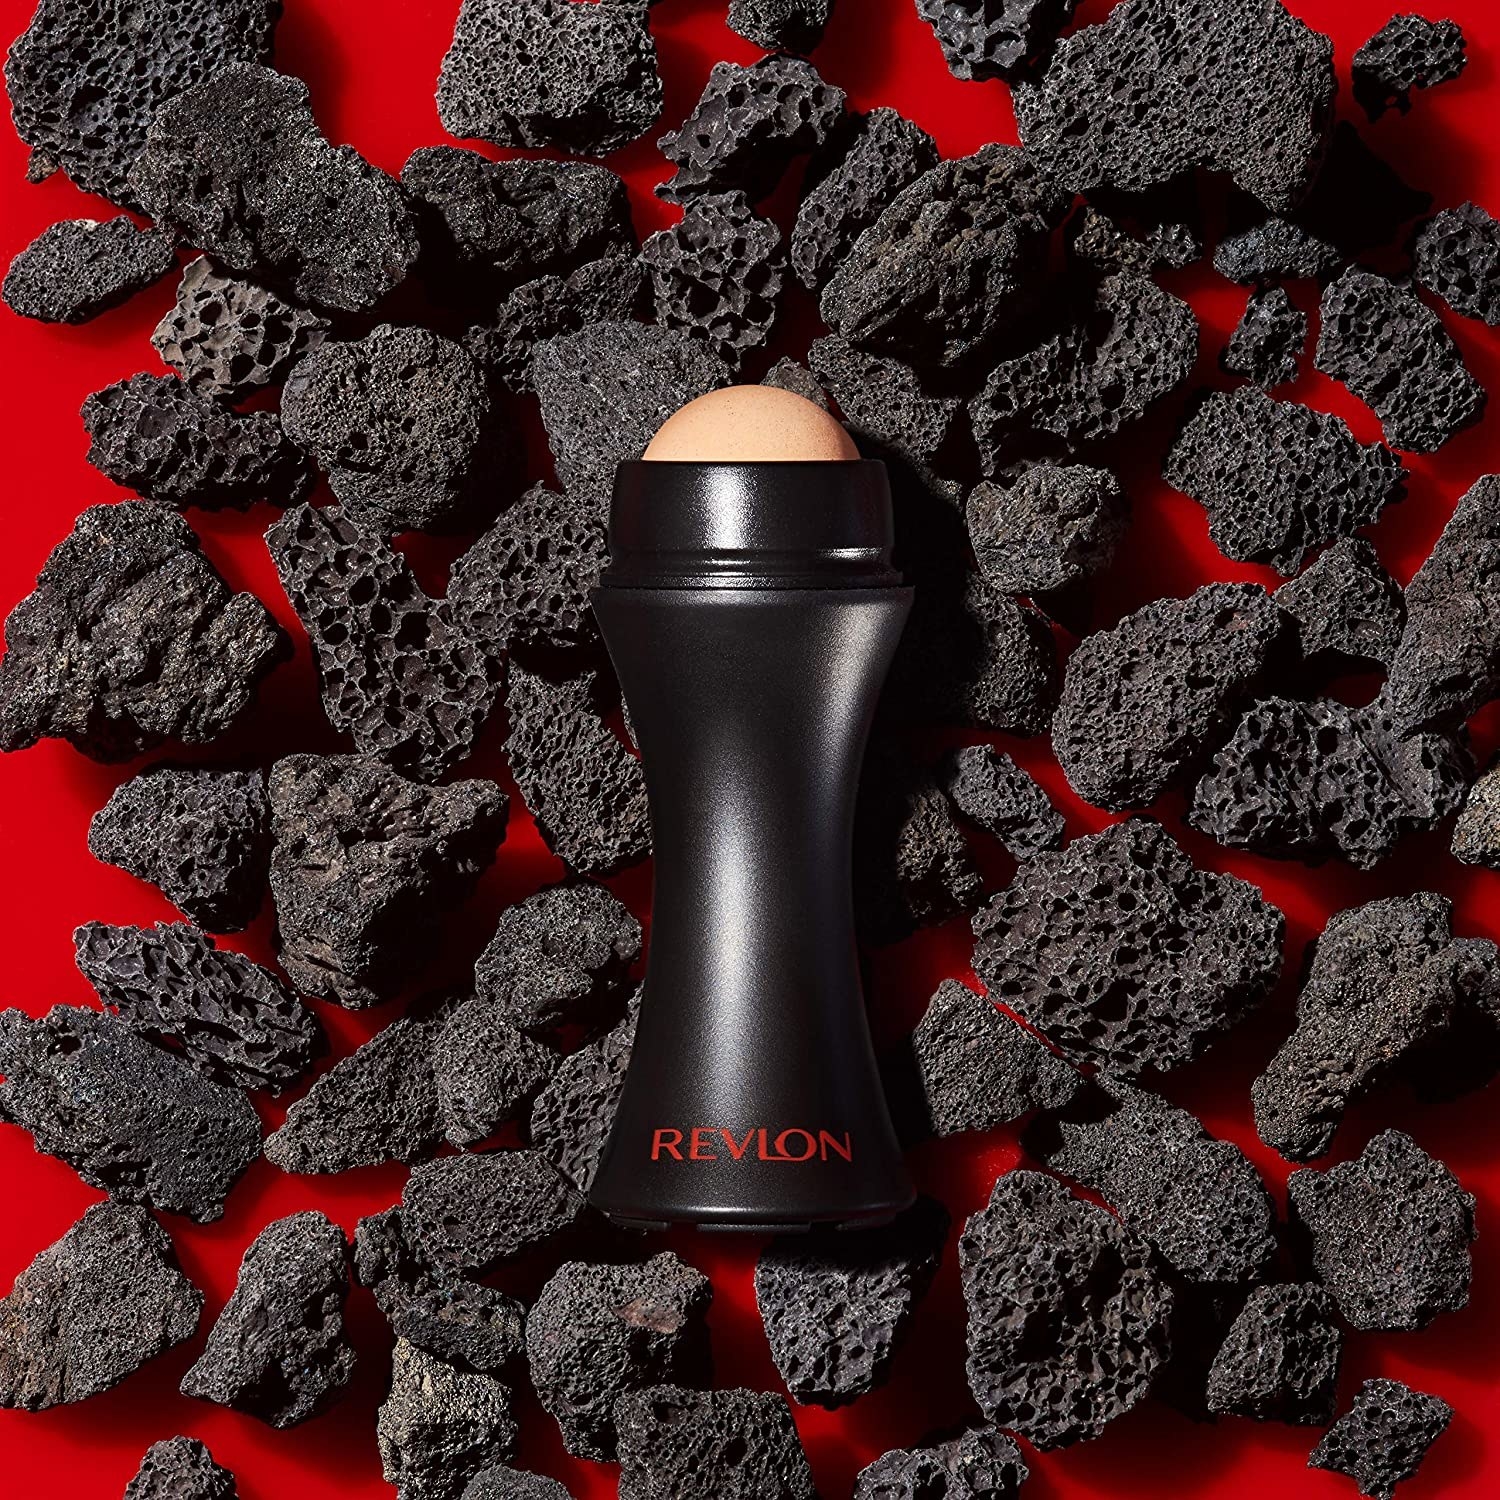
5. *Or* keep Revlon's oil-absorbing roller stick in your purse for on-the-go shine control. It's designed with a ball made of volcanic stone that sucks the excess shine right off your face. Just pop it out and give it a wash once in a while and you can reuse it over and over and over again!
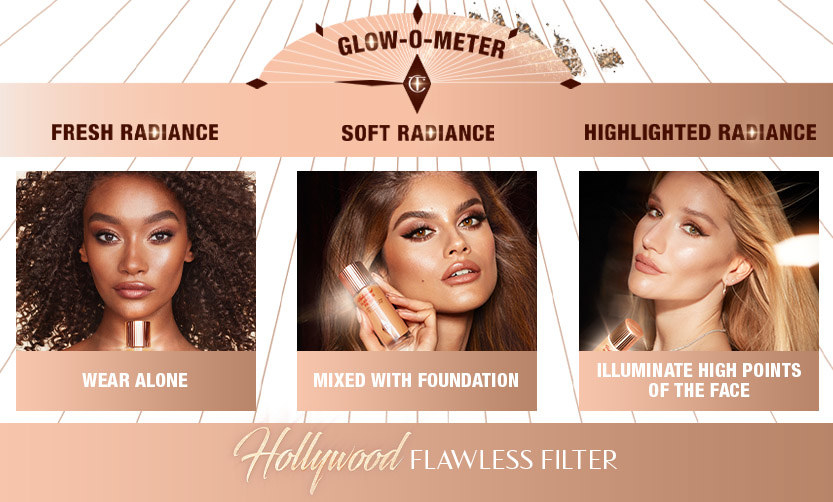
6. And if you're all about that glow, I myself (and the rest of the internet it seems) can't stop gushing about Charlotte Tilbury's Hollywood Flawless Filter. Use it alone for sheer, glowy coverage, on the high points of your face, under, or mixed with your foundation for a stunningly natural, just-dewy-enough coverage.
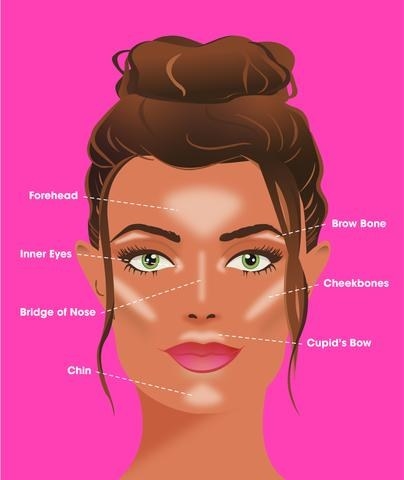
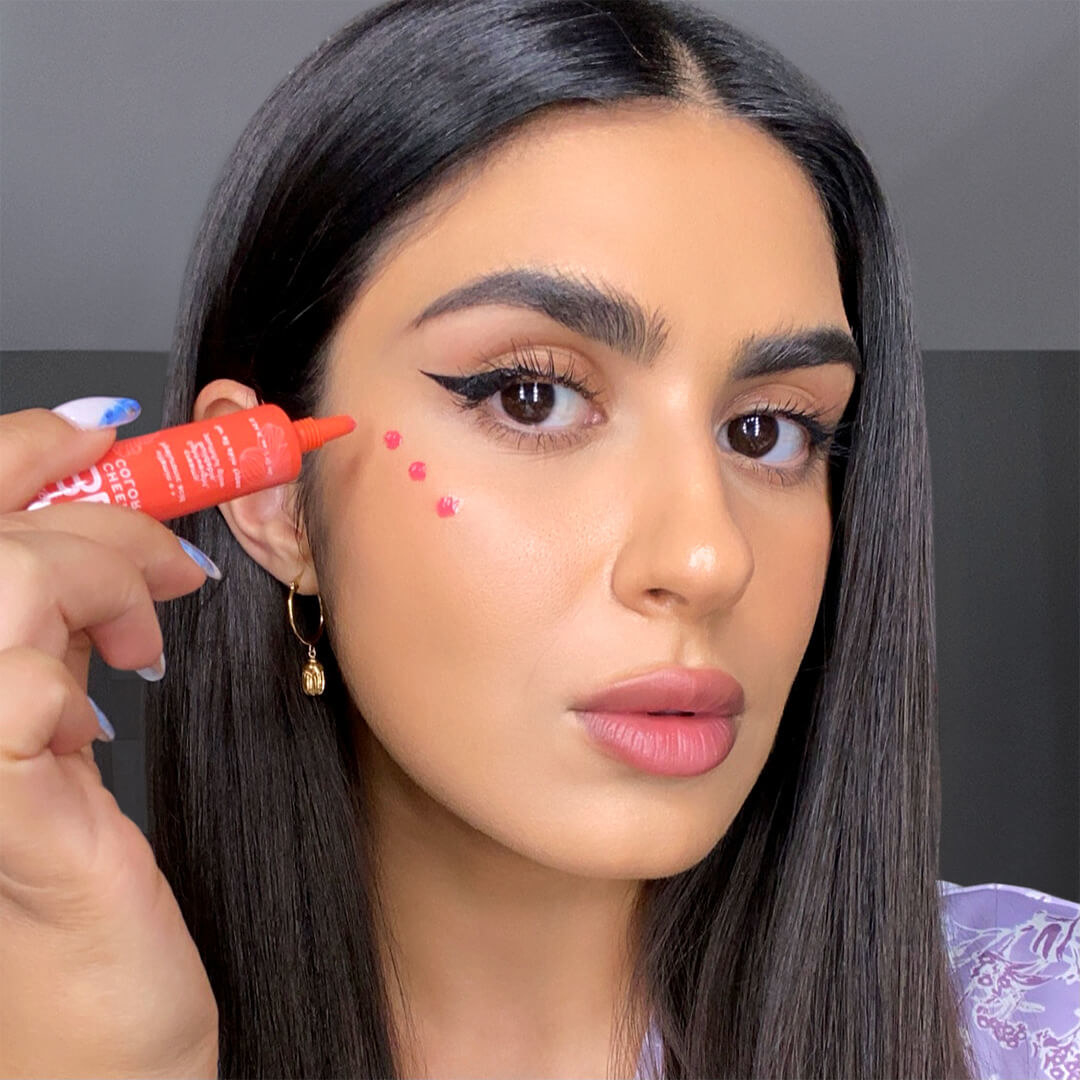
7. And for more targeted glowing, finish up with highlighter where the light hits your face, like on your cheekbones, the bridge and tip of your nose, and your cupid's bow.
8. Looking for a great option? The reviewers pictured here are wearing Maybelline Master Chrome Metallic Highlighter, which adds a warm glow to your face with soft powder infused with reflective pigments you can apply sparingly or intensely.
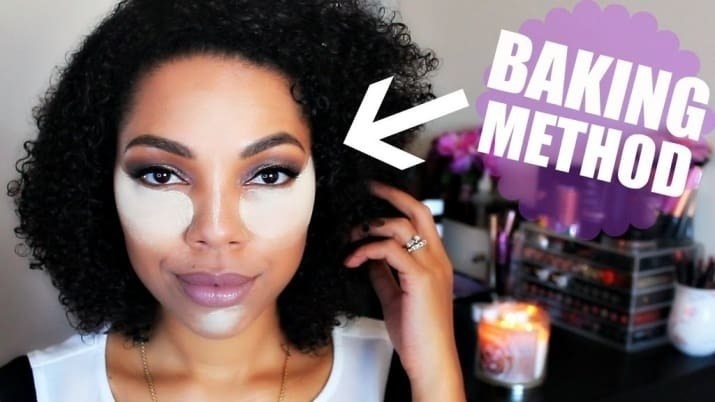
9. Set your under-eye concealer and say goodbye to creases with a baking technique — press on a generous amount of setting powder, let it "cook" for a few minutes, and brush it off.
10. Seamlessly blend all your products from foundation to concealer to eyeshadow with a flat-top oval brush (also TikTok-approved!) that has tightly-packed, but super-soft fibers for an airbrushed finish.
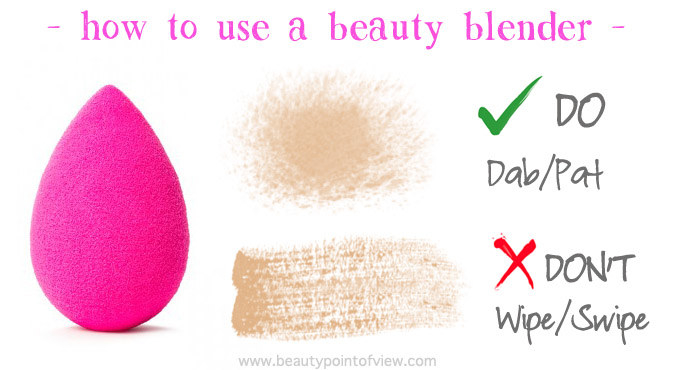
11. And if you're using a BeautyBlender (also a great tool!) make sure you're using it damp (so it absorbs less product) and dab dab dab your foundation on, no swiping!
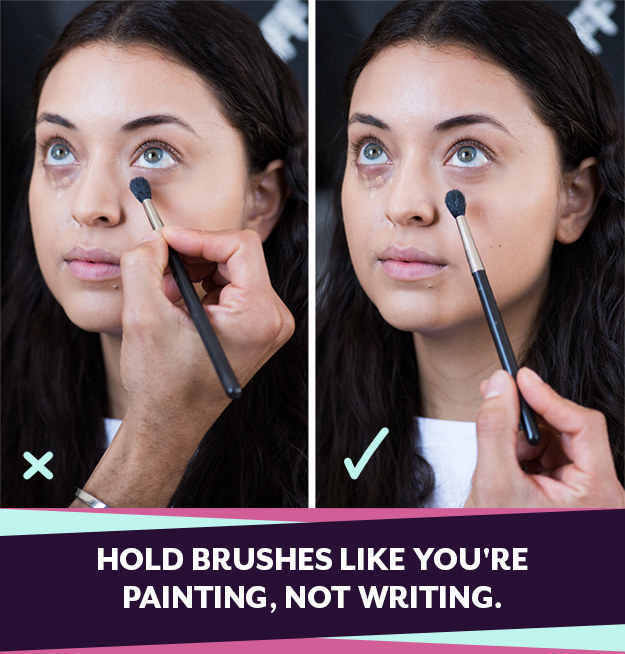
12. For an easier blending experience and smoother finish, handle your brushes like a pro — hold them like paintbrushes (aka loosely from the bottom) rather than like pens.
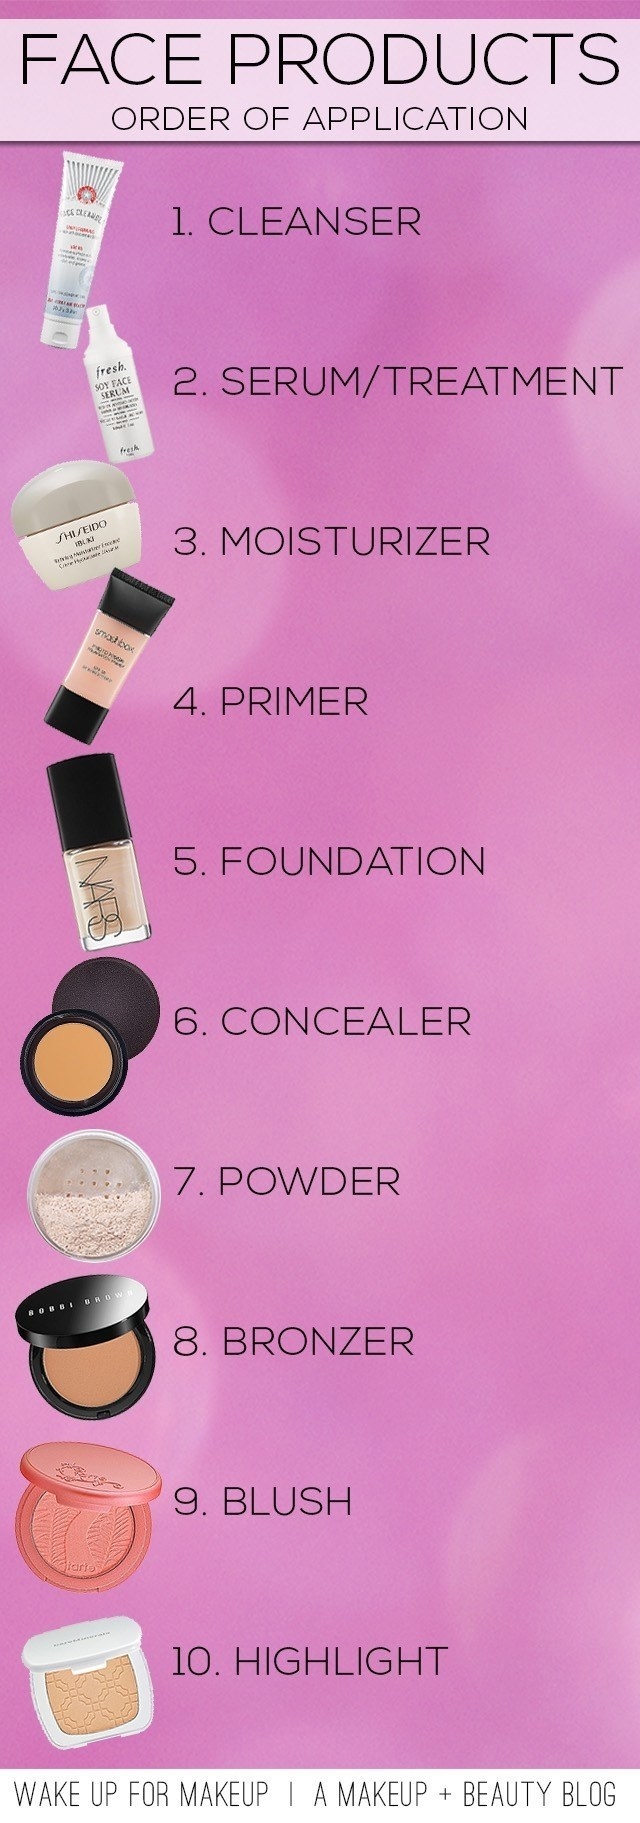
13. Apply skin care and makeup in the right order for a flawless finish (and less wasted product) every time.
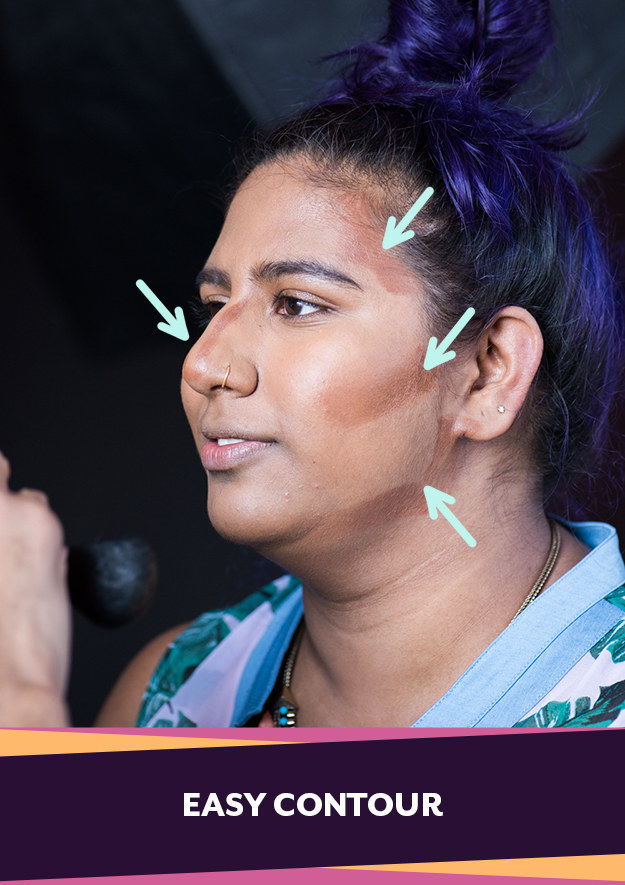
14. Apply a cream contour just one shade darker than your foundation to your temples, slightly above the hollows of your cheekbones (for a ~lifted~ look), and the outline of the bridge of your nose for an easy, sculpted look.
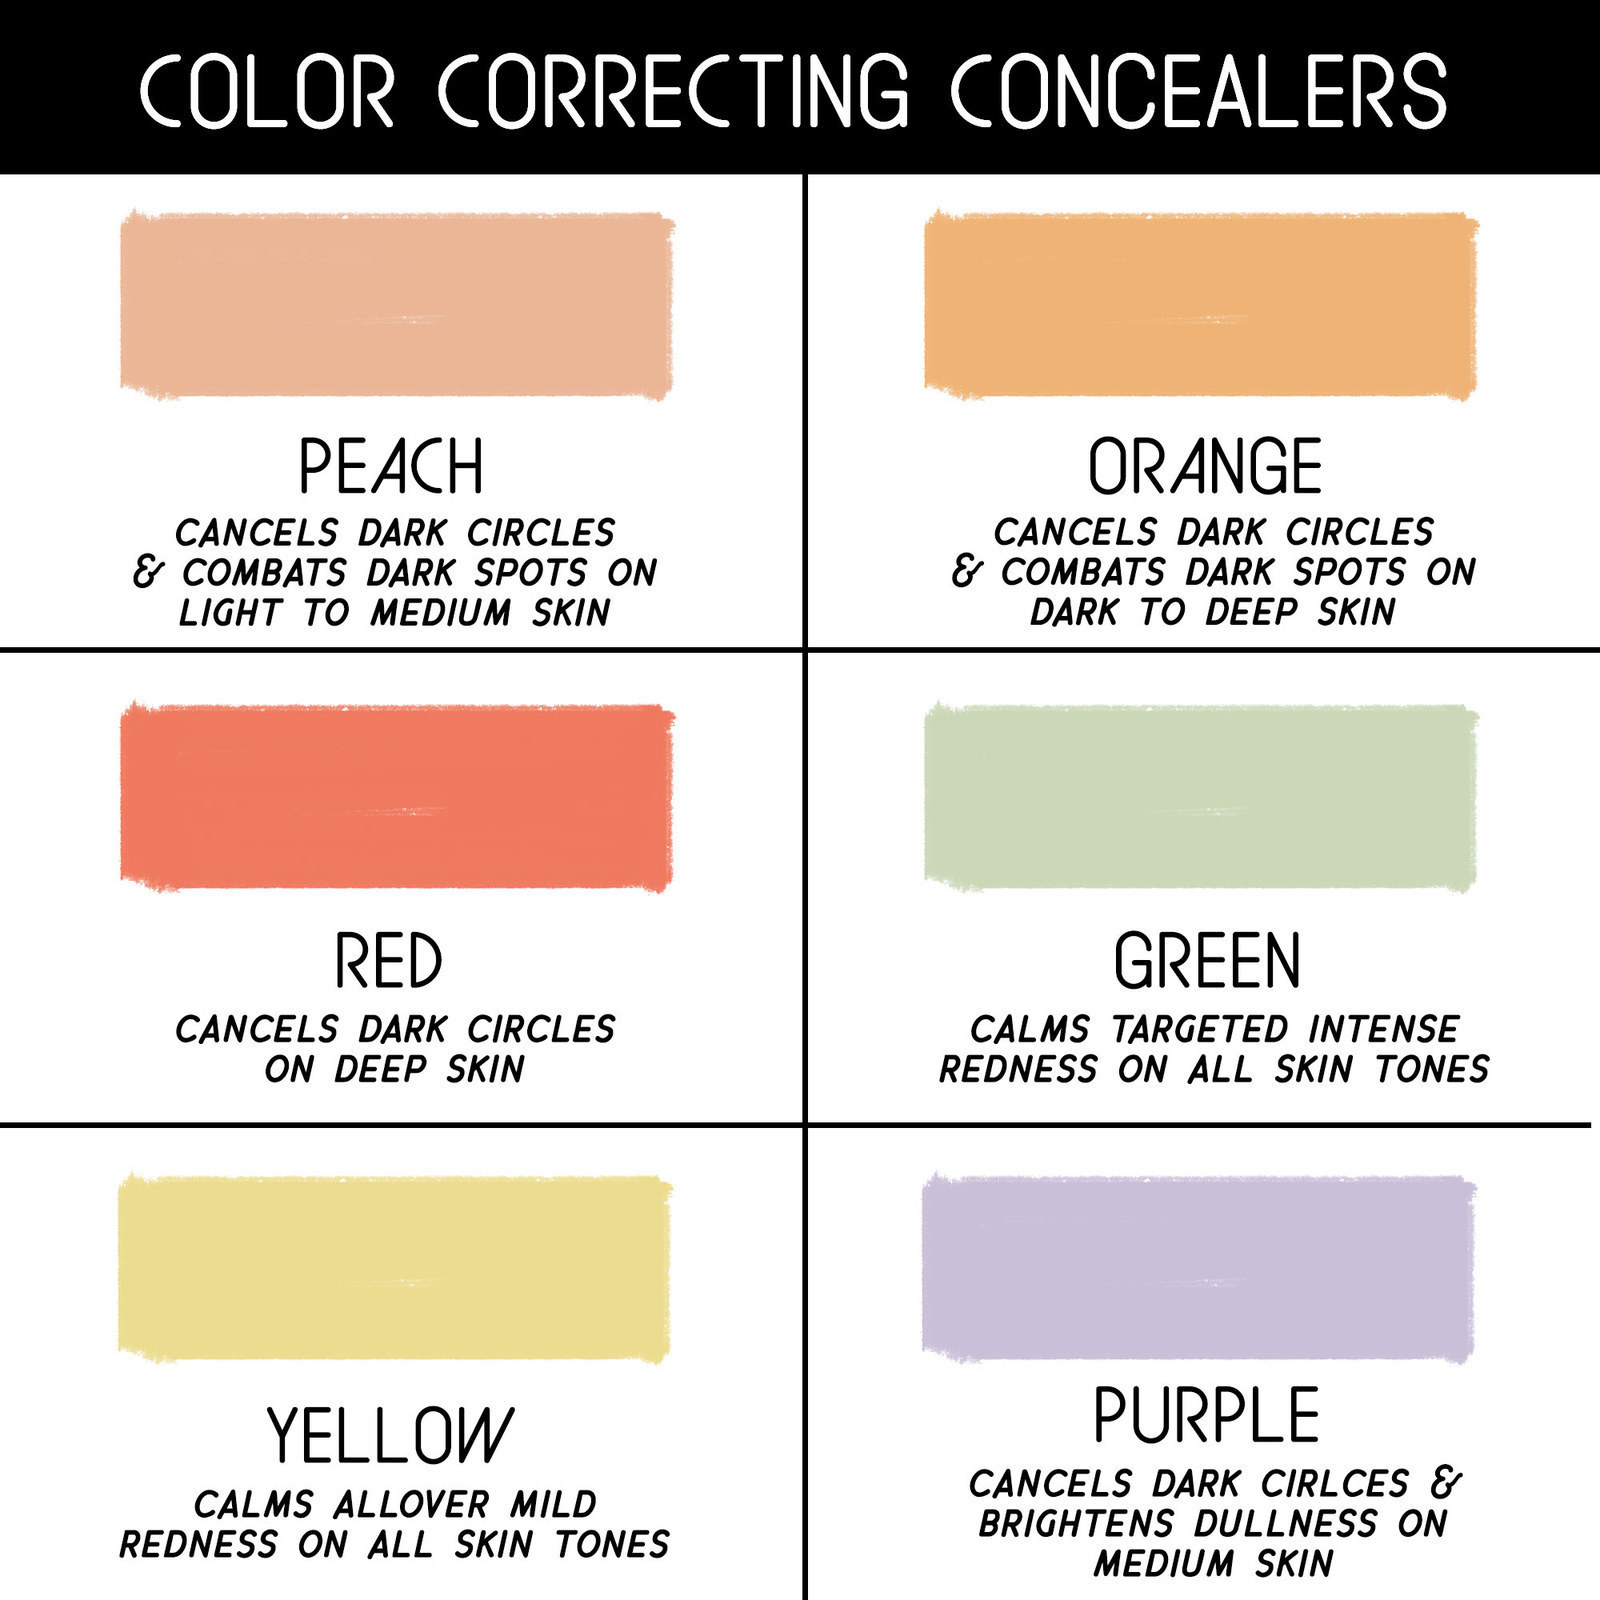
15. If you're new to color-correcting, check out this handy guide to figure out exactly what you're looking for.
16. Apply your blush higher on your cheekbone (allllmost where you'd place highlighter) for a more lifted look. We're leaving that "smile and apply on the apples of your cheeks" trick in the past.
17. Not sure where to start with blush? I couldn't recommend Glossier Cloud Paint more highly. The gel-cream formula majorly blendable, and even doubles as eyeshadow for a monochromatic look that looks ~fashun~.
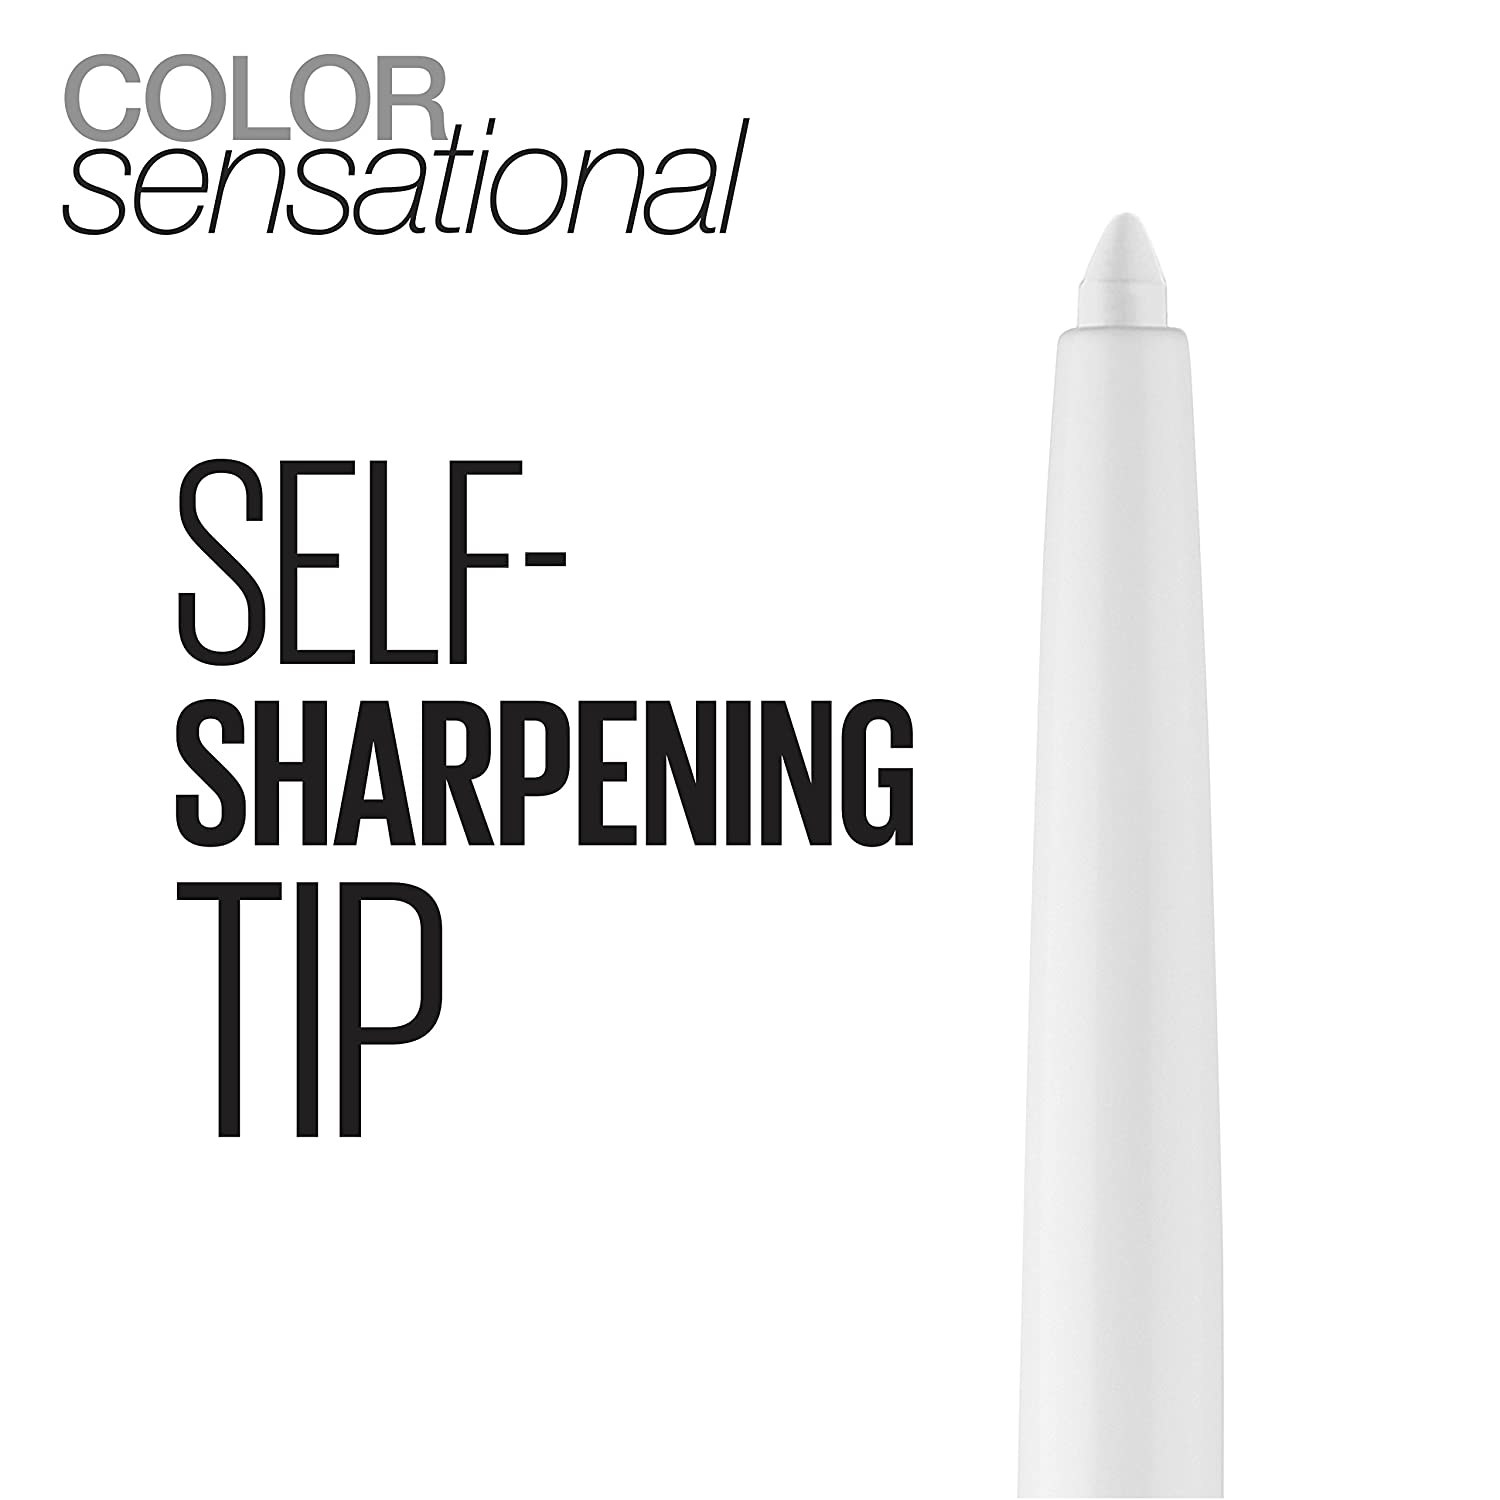
18. If you struggle with lining your lips precisely, start with creating an X at your cupid's bow, and apply powder between lipstick coats for long-lasting wear.

19. And if you're tired of buying a lip liner for every shade of lipstick you own, try a transparent Maybelline clear, self-sharpening liner to keep your lips on lock — no feathering in sight.
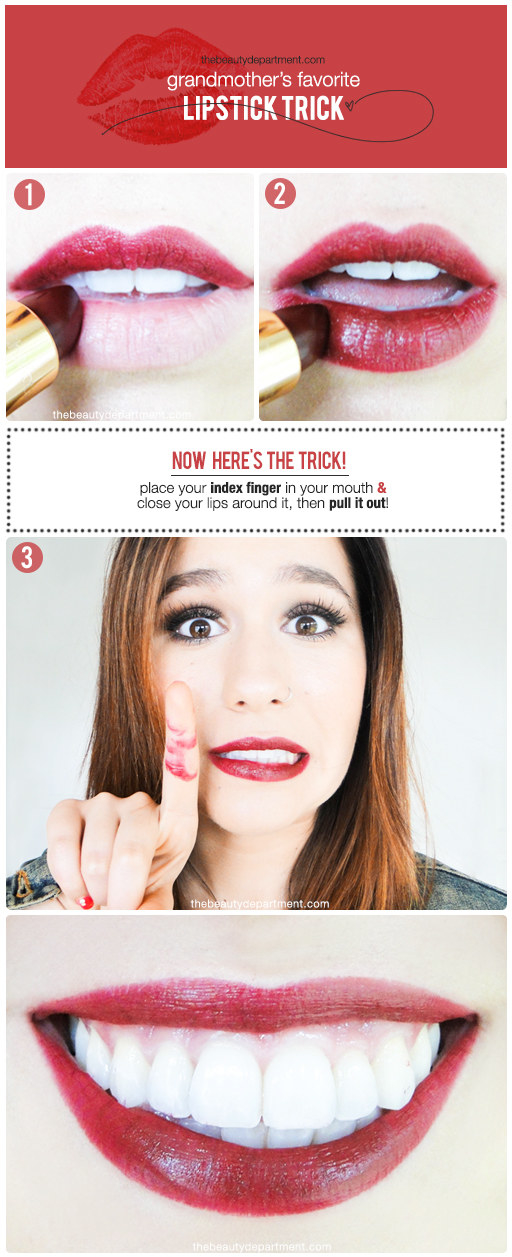
20. Perfect your pout by tracing the edges of your lips with a dab of concealer on an angled brush.
21. Psst! If you hate lipstick on your teeth as much as I do (seriously, if you see me IRL with red on my teeth, please tell me!!), run your finger in and out of your pursed lips to get rid of excess product. It really works!
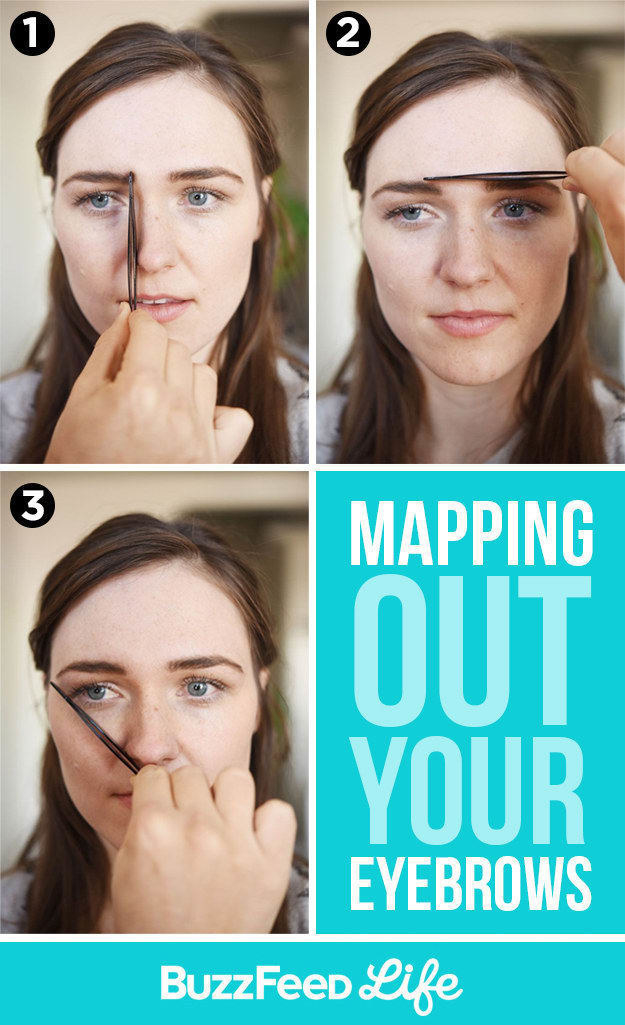
22. Use a tweezer or eyebrow pencil to line up where your brows should start, arch, and end before filling them in for your best and most natural-looking forehead caterpillars ever.
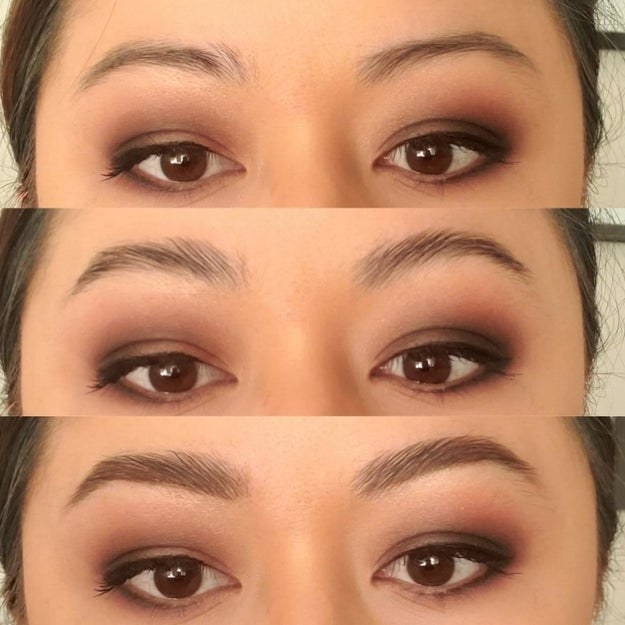
23. Try Benefit's Browvo conditioning primer both at night and underneath your makeup to help your eyebrow powder, pencil, or pomade last longer AND to help your brows grow in fuller.
24. Or give the laminated look a go with a soap brow kit complete with pomade and a spoolie to brush those eyebrow hairs UP UP and UP (without the lather some people find with actual soap brows) — with all-day staying power. It *also* conditions those hairs to help encourage brow growth!
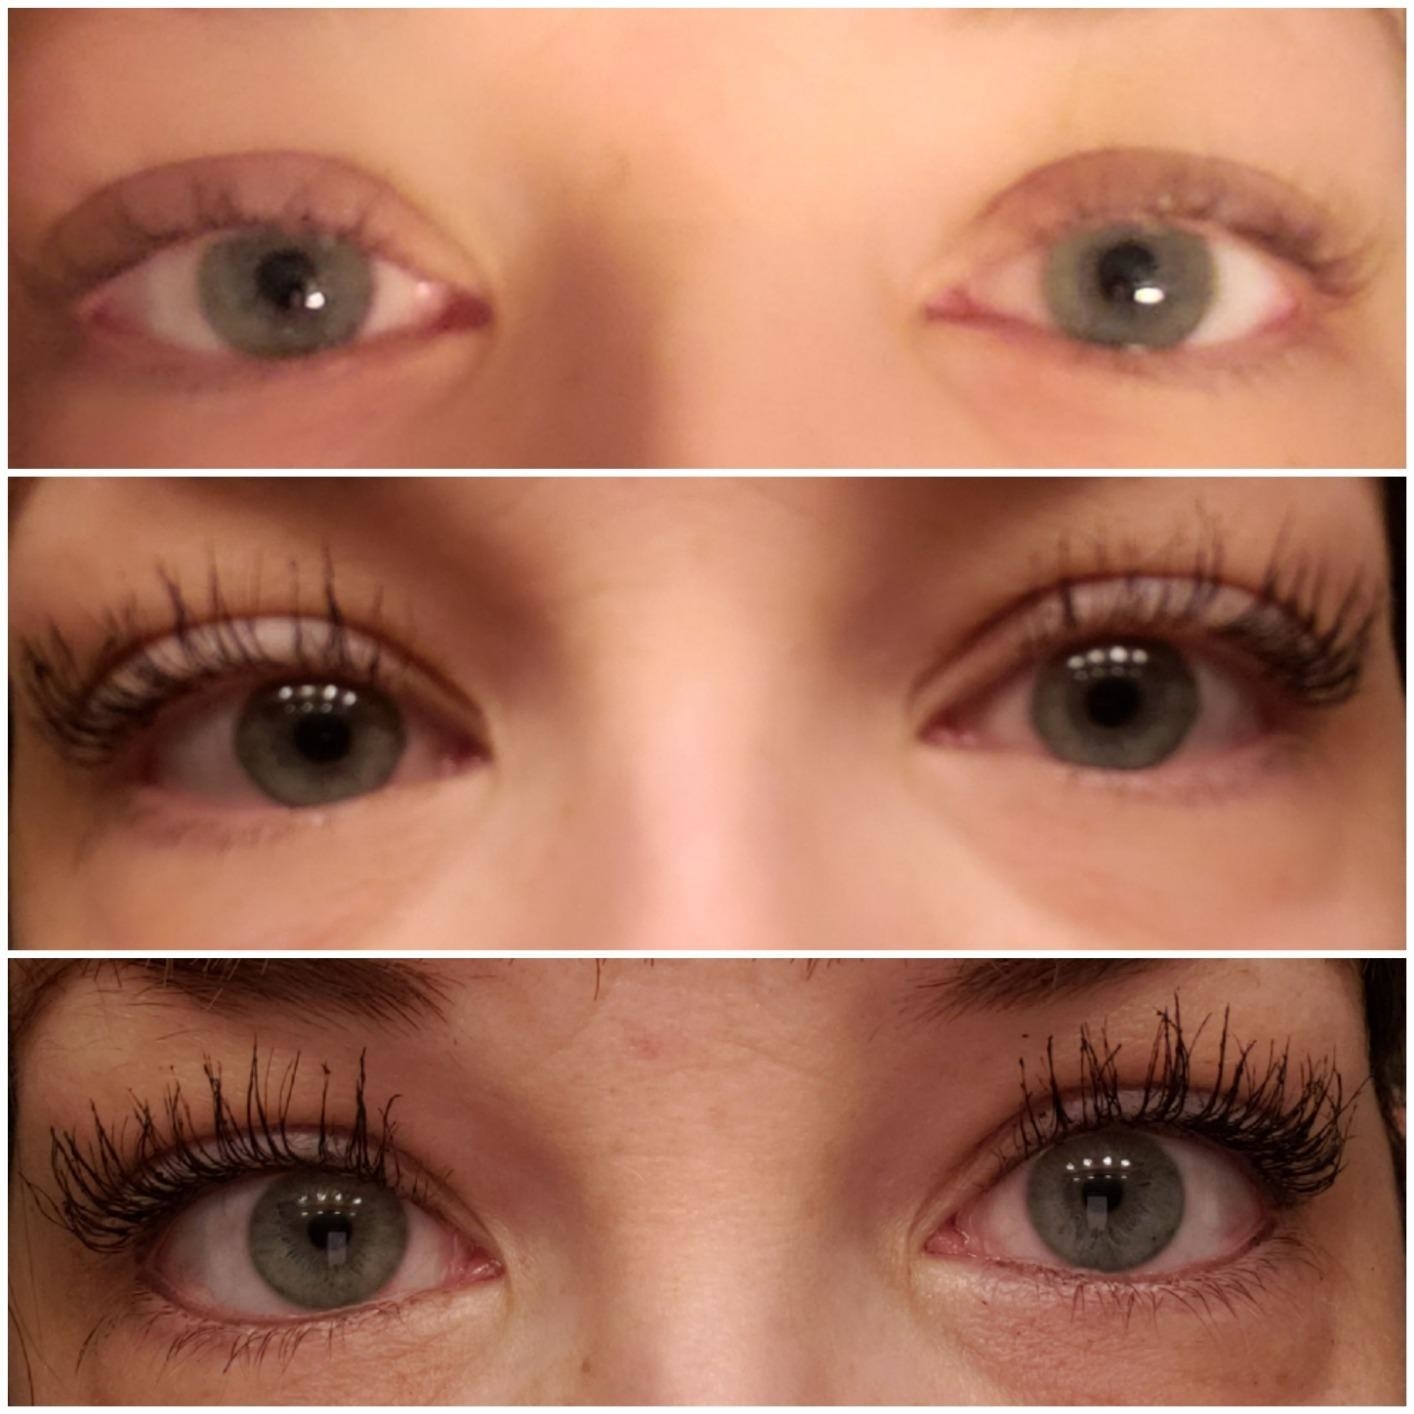
25. Know what products to splurge on, and which ones to save on. You really should throw out your mascara every three months (keeps it from drying out too!) so try a bargain mascara that ACTUALLY WORKS. May I recommend Essence's Lash Princess mascara, which over *130,000* 5-star reviewers swear by for dramatic length and volume *without* clumps, thanks to the flake- and gob-free formula and cone-shaped brush?
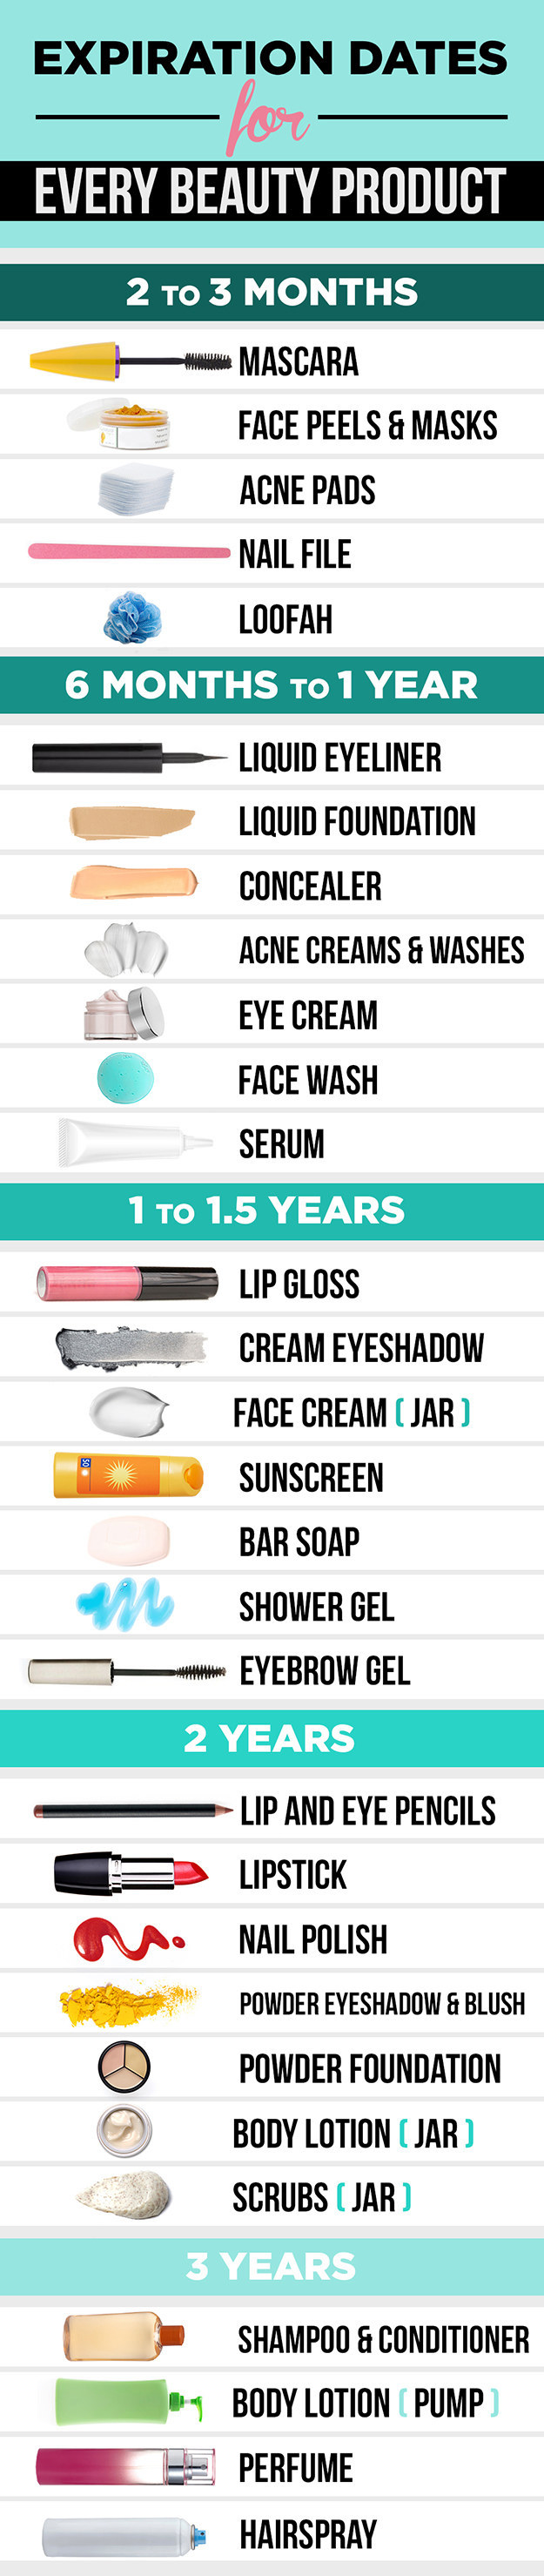
And by the way, if you want to know more about expiration dates, here's a handy chart:
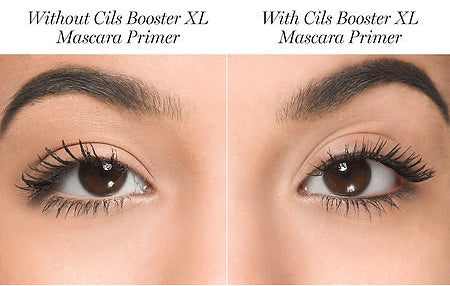
26. And for added drama, layer eyelash primer (like this top-rated Lancôme one) under your mascara for long and clump-free lashes for days (it conditions to keep them healthier, too!).
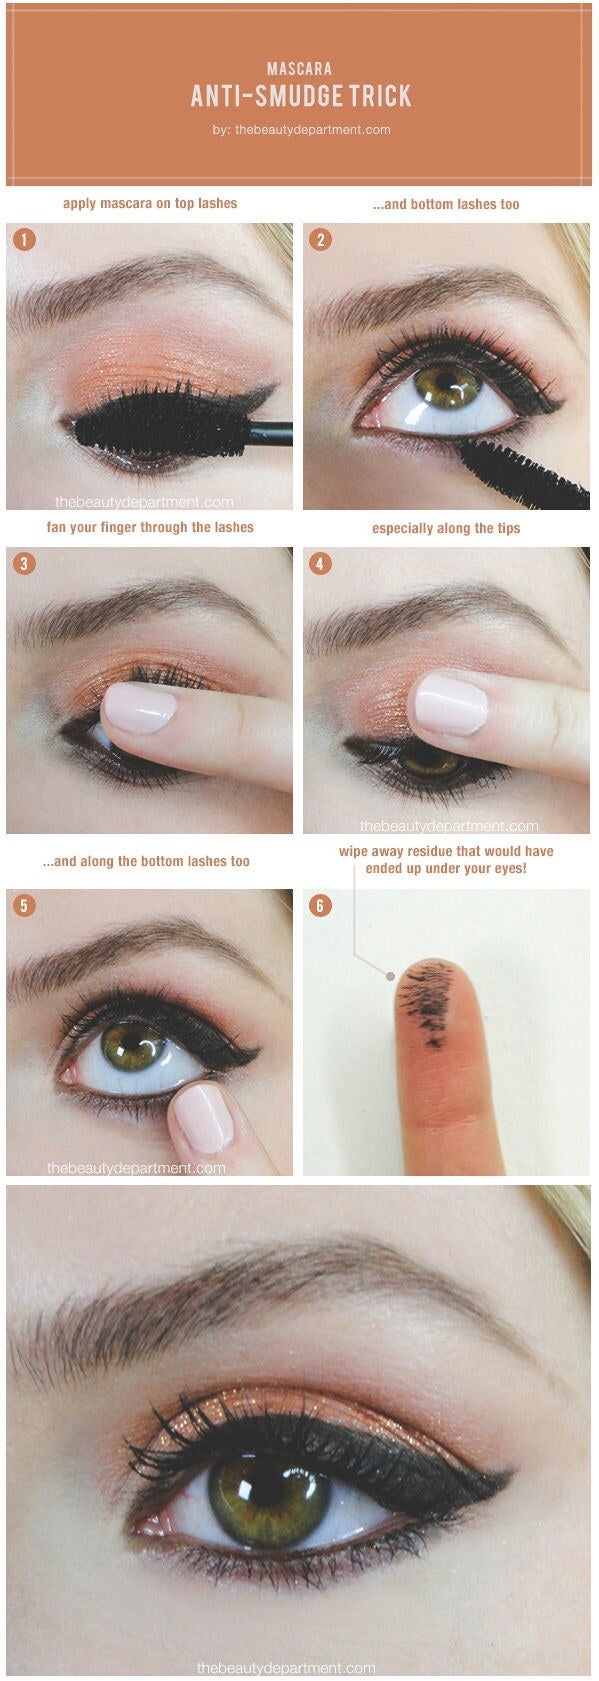
27. If you get that mascara smudge under your eye without fail, try this handy trick to stop it once and for all. Just run your finger across — in the words of Ina, how easy is that?
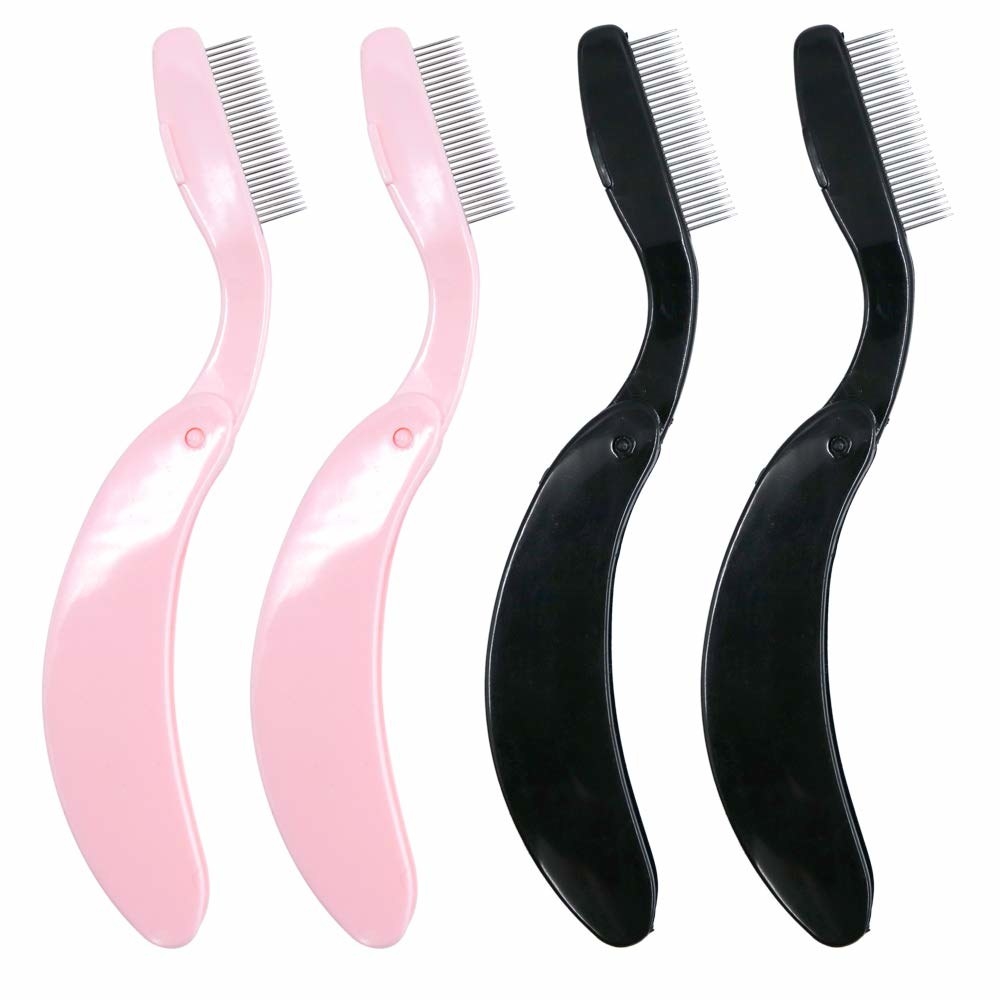
28. Combat clumping and make reapplying mascara in the evening less of a mess with a set of foldable eyelash combs. Keep one in your purse for touch-ups!
29. Want to give falsies ago? Don't get in a sticky wicket with glue. Magnetic false eyelashes (with magnetic liner) are the easiest way to get a dramatic look. And they'll *stay on* all day/all night. Because of the magnets, you can adjust the positioning without having to glue and re-glue.
30. Dot your eyeliner, then connect the dots to make doing a cat-eye with liquid liner so much easier.

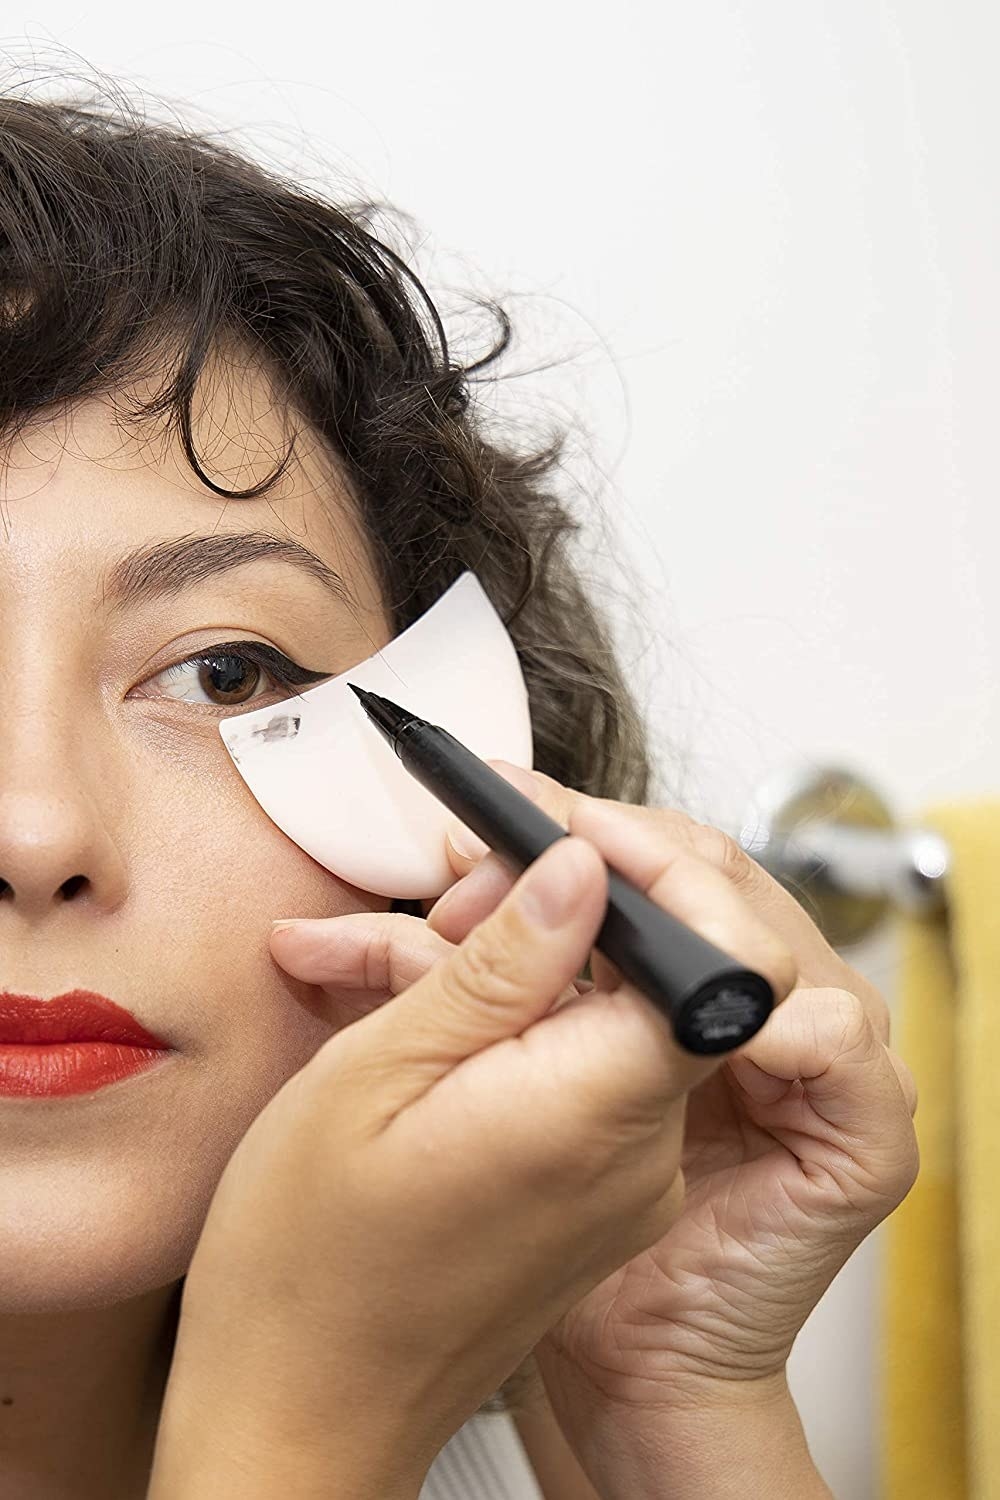
31. Or opt for a waterproof, smudge-resistant eyeliner stamp with two sides: a triangular stamp on one end and a felt-tip eyeliner on the other to create the perfect winged liner look in no time flat, i.e., you'll never be late again!
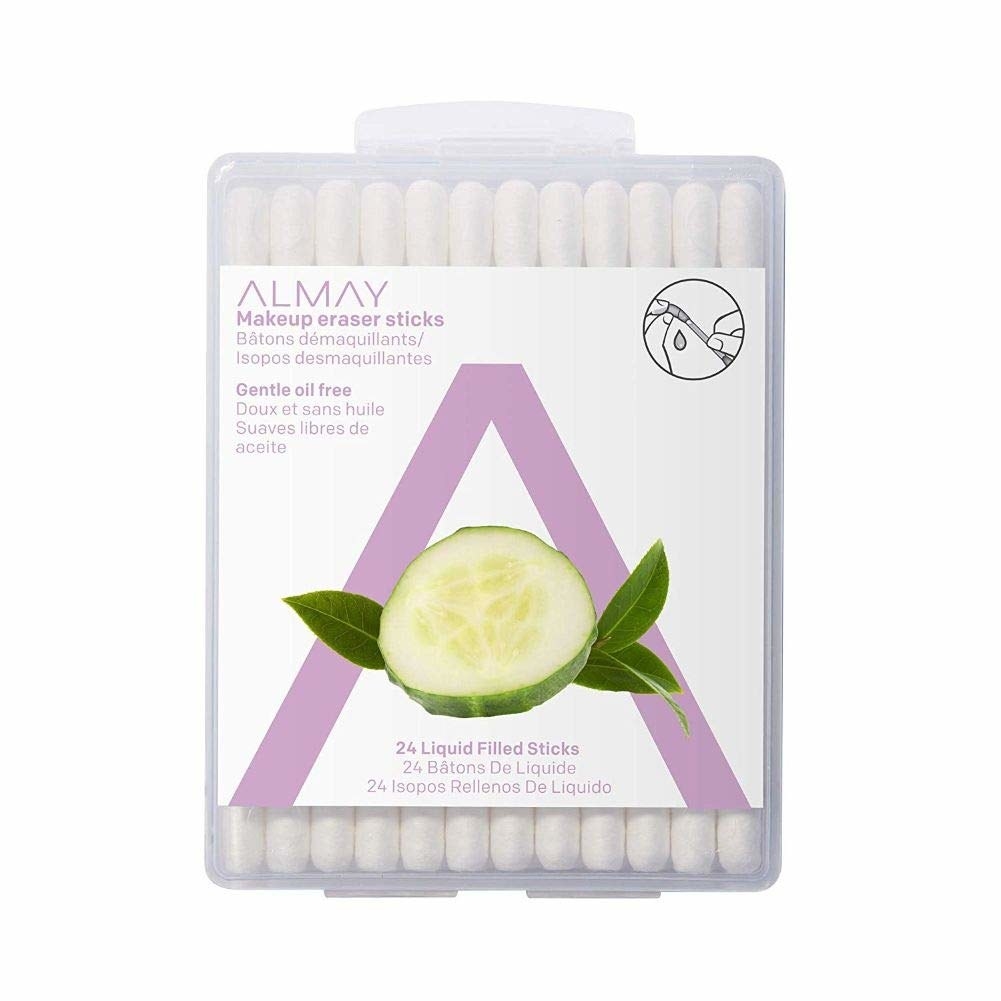
32. And erase any errant eyeliner or mascara marks (or create a cut crease eyeshadow look with *ease*) with a genius Almay cotton swab that's filled with oil-free makeup remover for the most precise strokes.
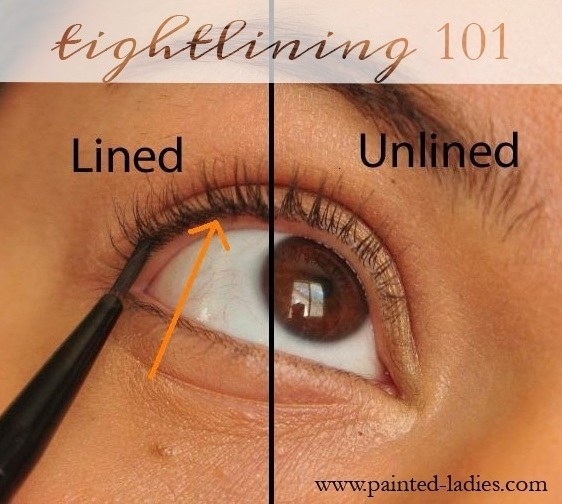
33. Tightline your eyelashes (that is, use a pencil or brush to line the spaces between hairs) to avoid having that annoying space between your liner and your lashes. It also makes your lashes look much fuller.
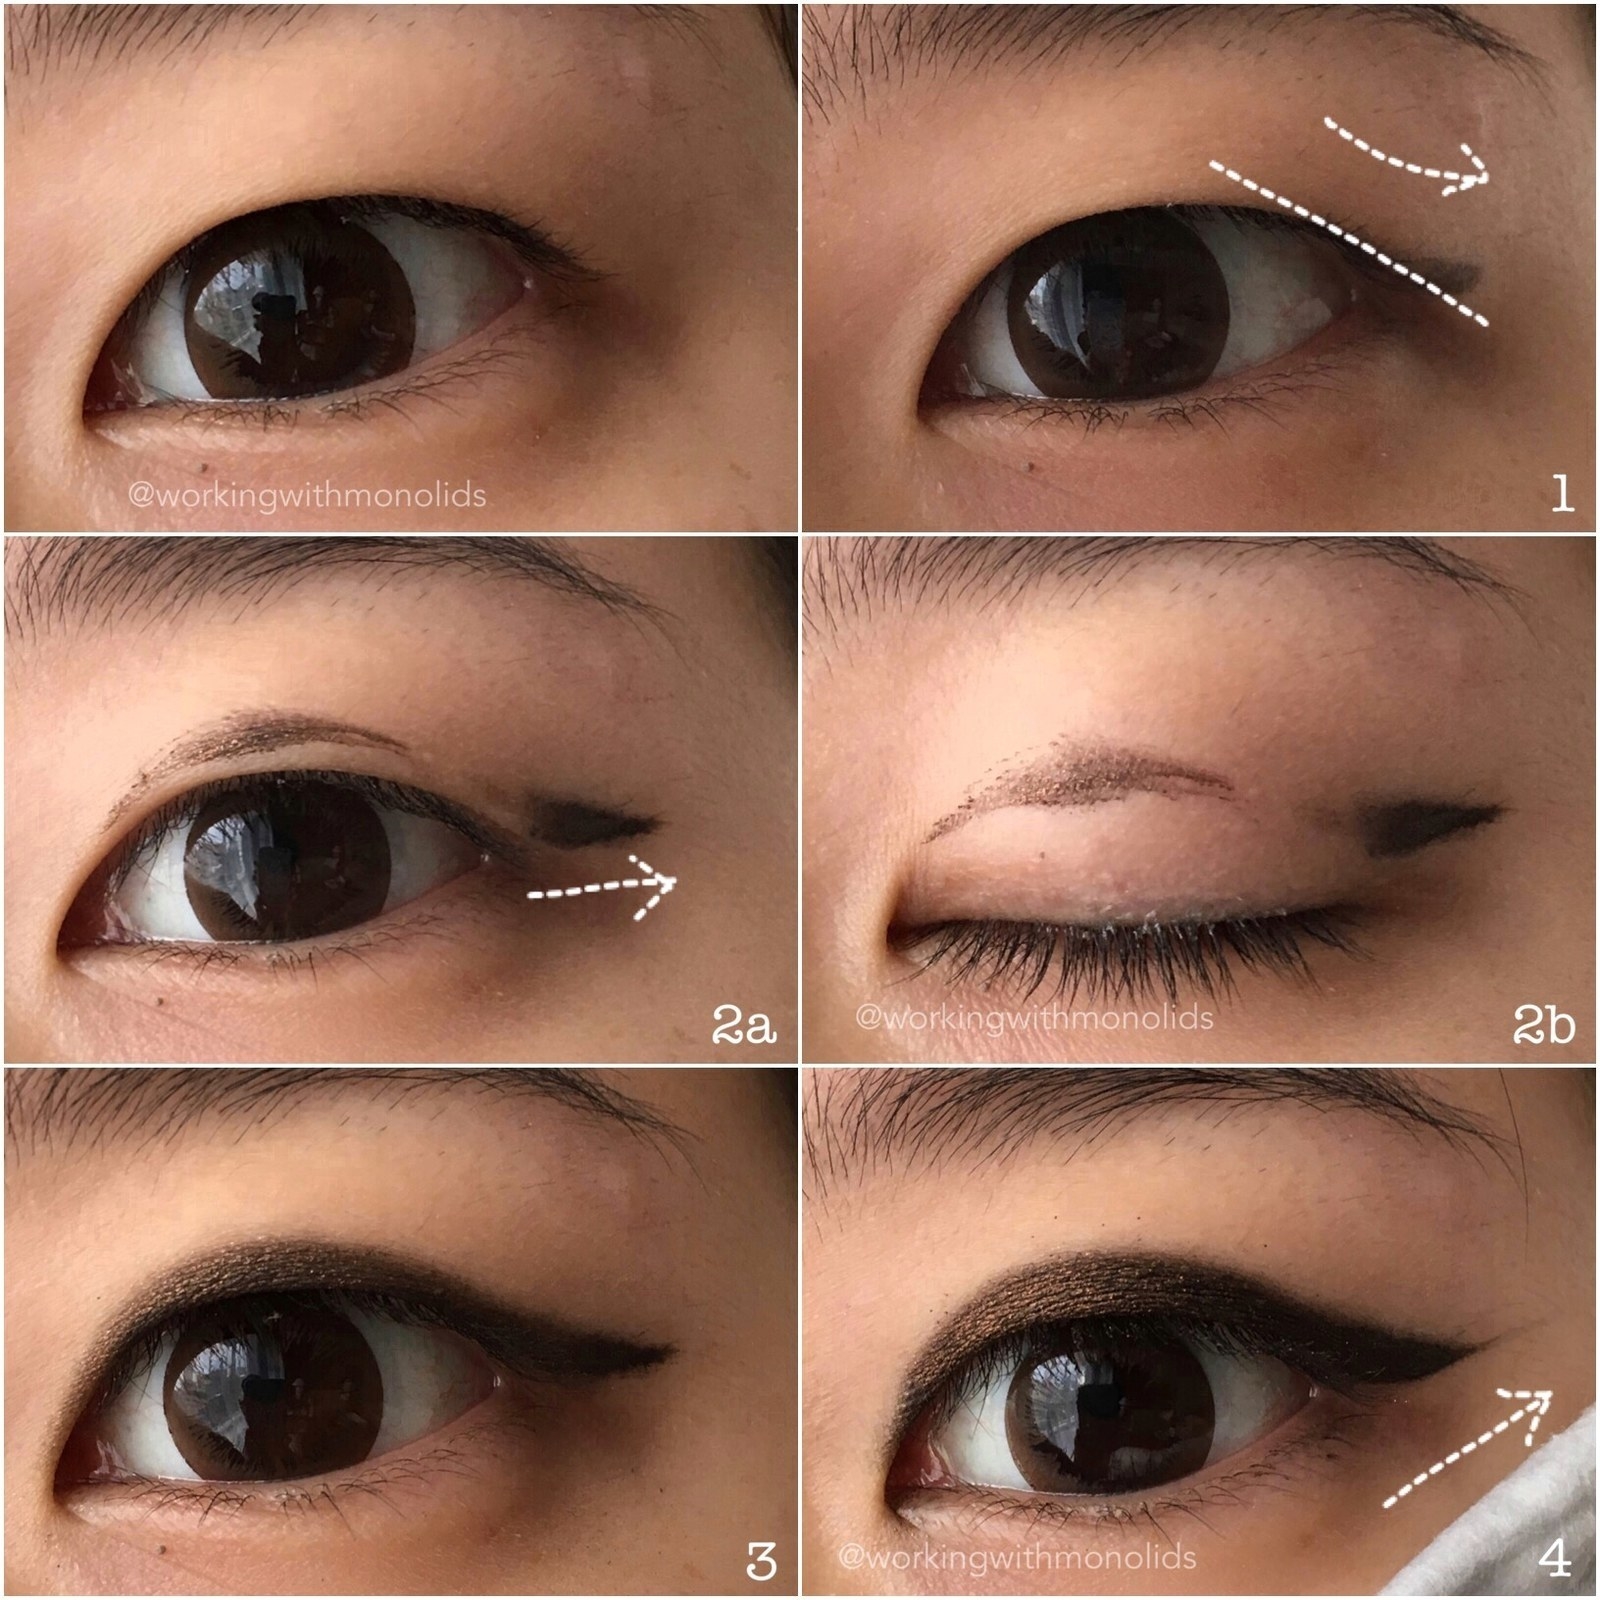
34. Create a shadowy cat eye on monolids (that won't disappear into the crease); just move it up higher on your lid.
35. Catch eyeshadow fallout and/or guide a perfect eyeliner wing or smokey eyeshadow cat eye with a reusable silicone eye makeup shield. Just rinse it clean when you're done. You can even pop it in the fridge for a soothing, cooling effect!
36. Layer a white priming base under bright eyeshadows to keep your pigments true to color.
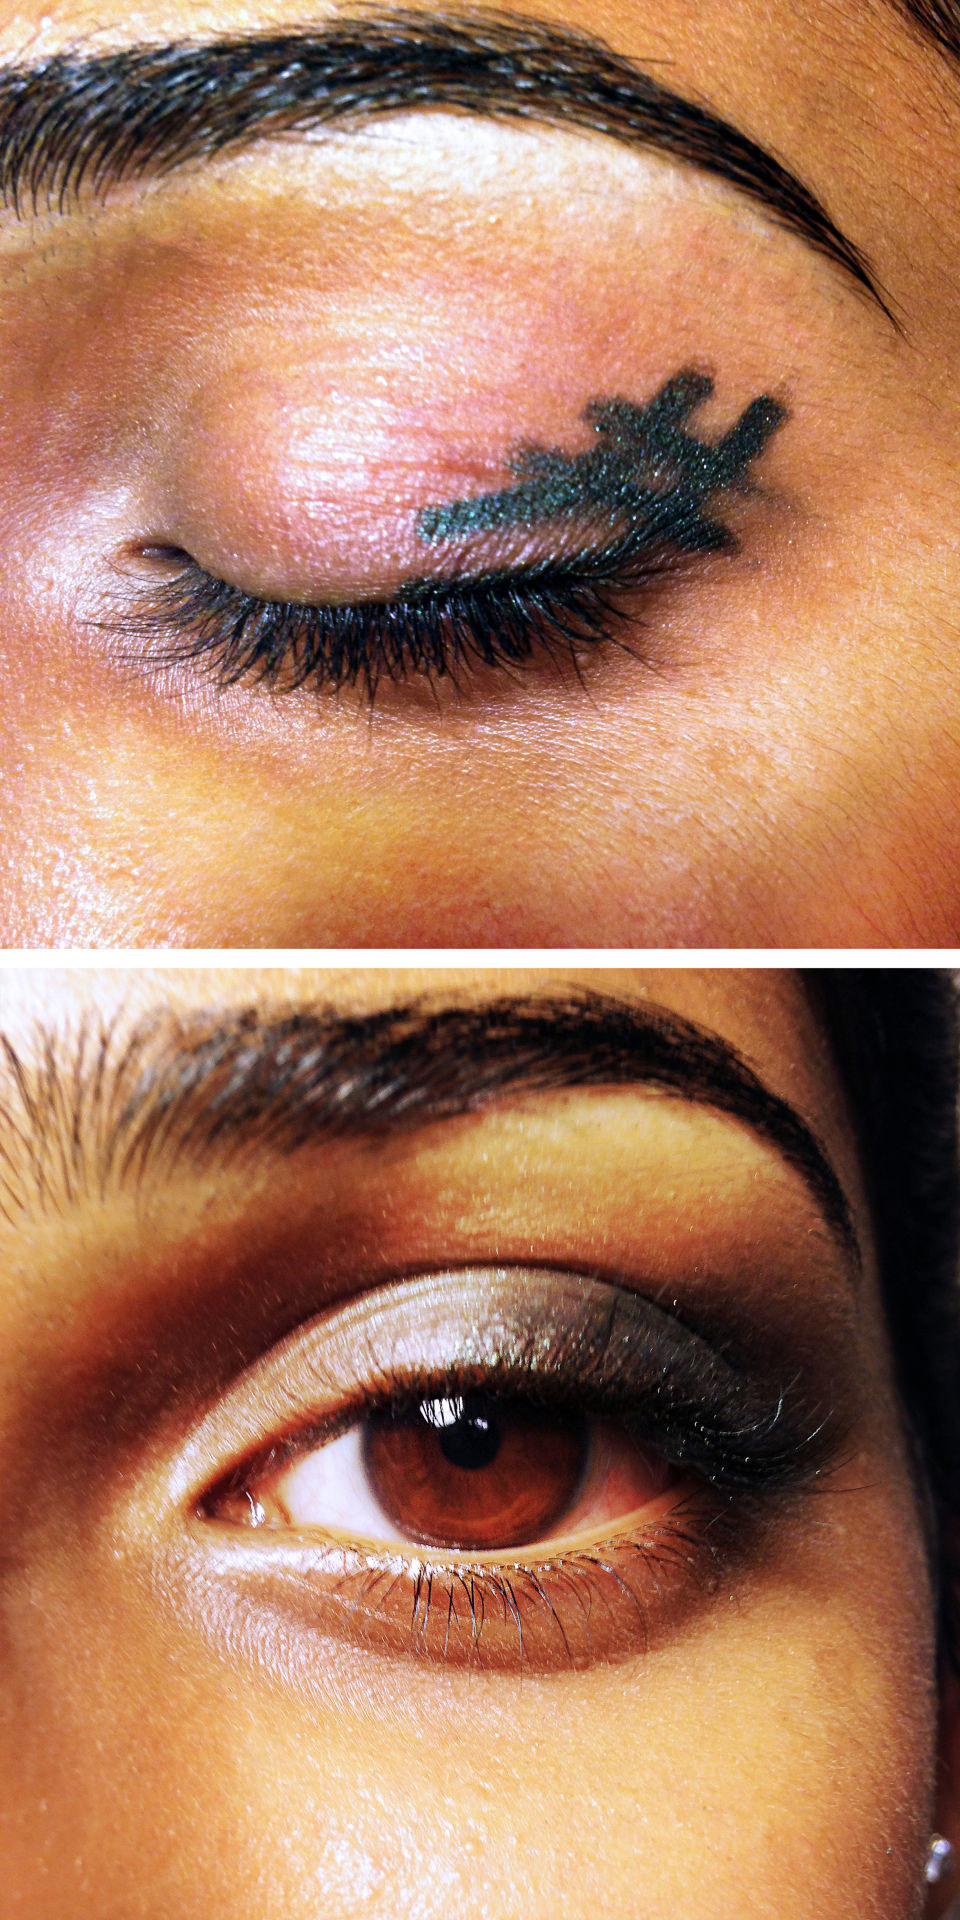
37. For a quick and effortless eyeshadow look, draw a hashtag in the outer corner of your eye with an eyeliner or eye shadow pencil and blend, blend, blend.
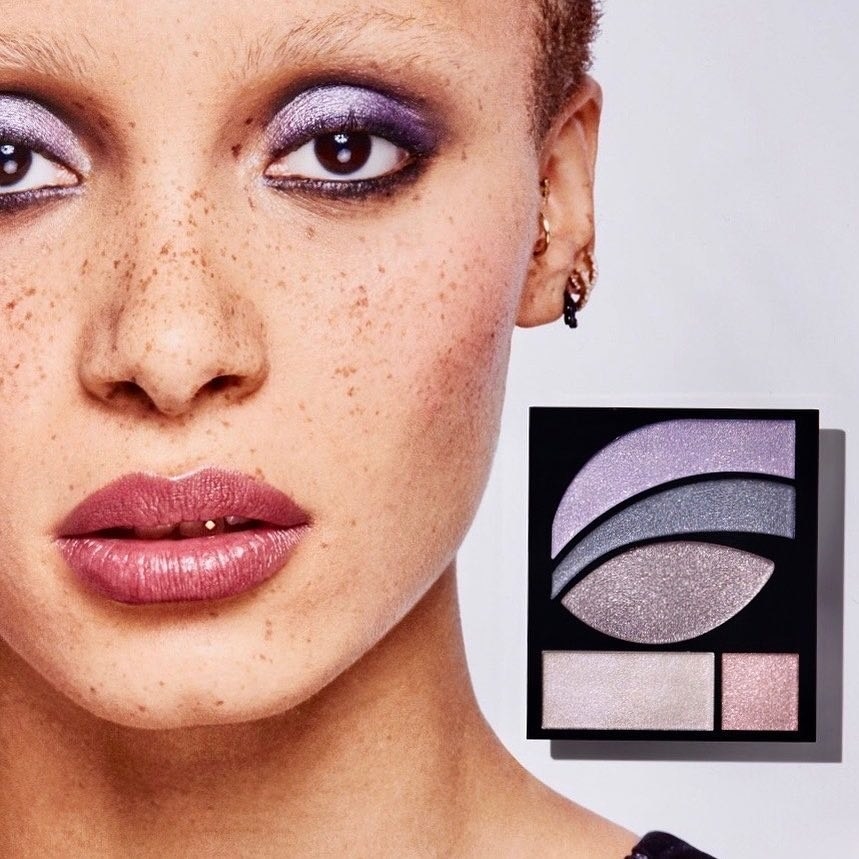
38. Or try a foolproof eyeshadow contour kit with a primer, three super-pigmented shades, and a shimmer top coat — plus a numbering system to make doing a gorgeous eye look easier than ever.
39. *Or* skip the powders and pencils altogether and opt for a liquid shadow you can dot on and blend out with your fingers — truly the easiest and most mess-free way to get a sparkly, glitter look with no fallout.
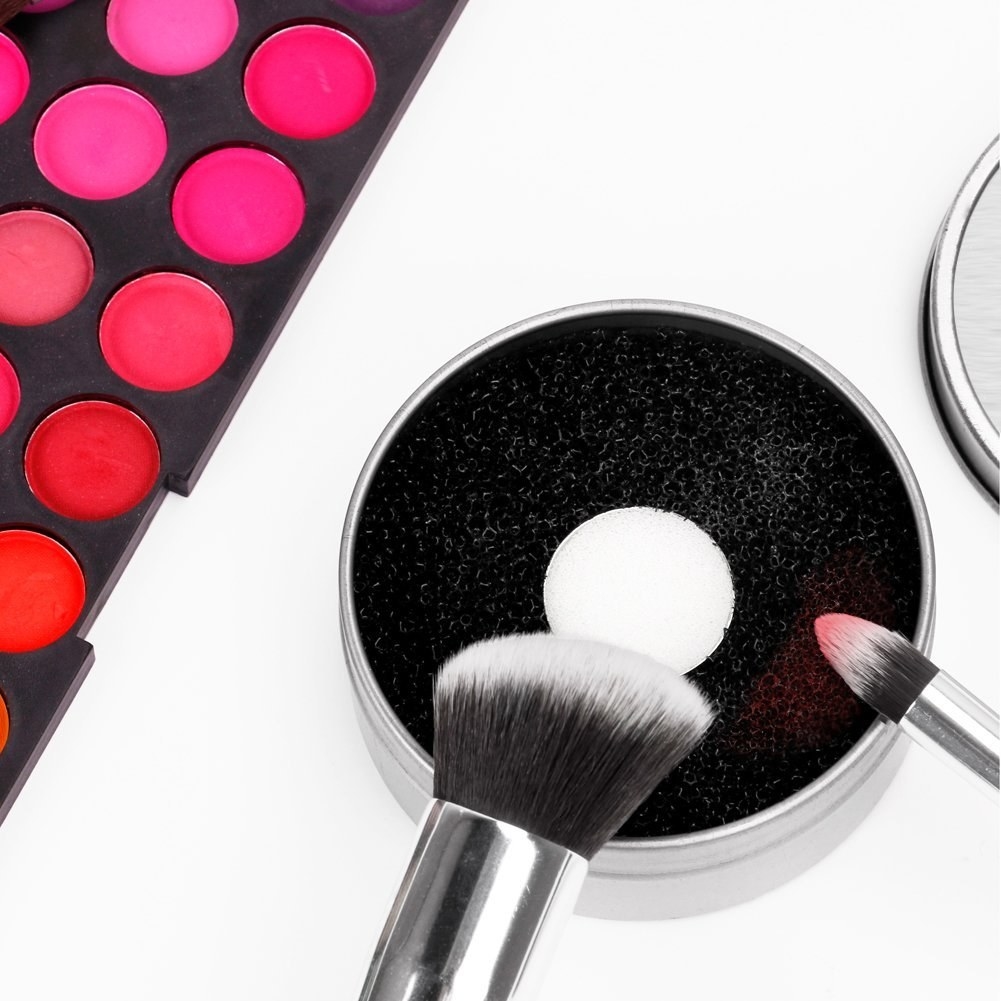
40. If you're using powder shadows, fully remove one pigment from your brush before applying another; just wipe it on this brush-cleaning sponge so your eye makeup is blended without errant marks.
41. And make all that hard work last all day and all night with a popular setting spray, like NYX's cult-favorite setting spray, which has a lot of staying power for not a lot of money.
Reviews have been edited for length and/or clarity.